Ardmore Head
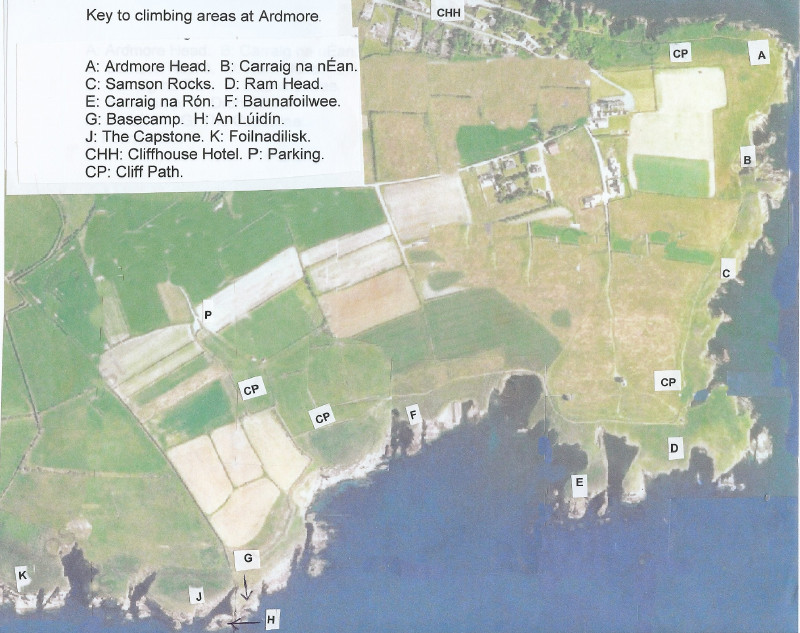
The village of Ardmore lies on the south coast of Co. Waterford, and is accessed from the main road between Dungarvan and Youghal (the N25). The headlands south of the village have a number of sea-cliffs, some of them up to 30m high. The rock is old red sandstone and, as is often the case with sandstone, the quality varies widely. At it's best it offers excellent friction, positive holds and adequate protection, at it's worst it is soft, crumbly, and best avoided. Good and bad rock often exist cheek by jowl - and good rock at the foot of a cliff can sometimes lead into bad rock as height is gained. Sometimes, too, good rock can bear a thin veneer of grit which can be a little off-putting - but a bit of traffic would eliminate this problem. The rock is soundest and cleanest where it is open to the full force of the sea, but suspect at the back of the more sheltered zawns and inlets, where it can be very friable. An element of judgement is needed in deciding what is climbable and what is not, and this type of judgement is unlikely to have been developed by climbing solely at Dalkey Quarry or the local wall. Ardmore is not the place for snatch and grab climbing; nor for moving first and thinking afterwards; nor is it likely to appeal to those who draw comfort from following a line of chalked-up holds. If, however, you have a nose for route-finding, enjoy ploughing your own furrow and have and a yen to climb in delightful, secluded and, sometimes, wild surroundings, you should find plenty here to please you. This is only an interim guide and should be seen as an indication of what remains to be done, as much as a record of what has been done. The climbs at Ardmore are not concentrated in one small area, but are scattered along a mile of the coastline. The first section of the coast faces east, is sheltered from the prevailing winds and catches the early morning sun. The second section faces south and reaps the full benefit of the noonday sun. This beautiful stretch of coastline is blessed with better than average weather, often remaining dry when higher areas to the west and north are in rain, while the benign influence of the sea and it's southern location ensure that temperatures never drop too low. Tides - In favourable wind conditions many of the climbs are unaffected by the state of the tide, but others are best approached two hours either side of low tide. The national newspapers carry details of tides for all areas of our coastline on a daily basis - it makes sense to check them before setting out. Gradings - As a lot of the climbs have not had a second ascent, gradings should be treated as provisional. Note - The cliffs here, like all sea-cliffs, are subject to the vagaries of winter storms, and these may sometimes carry away a portion of the cliff, eliminating or altering the line of a route. Use your head, don't be caught unawares. Note: As most of the metal stakes are in place since 1999 their condition has deteriorated, and they should not be relied on.
Approach - Cars can be parked near the Cliff House Hotel, reached by following the coast road south from the end of the village main street. Just beyond the hotel the cliff path, St. Declan's Way (SDW) begins, and allows access to the climbs. The furthest area can be reached on foot from here in less than half-an-hour. The areas are described from east to W, as they will be met with while moving along the path. The cliffs are dissected at frequent intervals by steep, narrow zawns, making each area independent of the one on either side, as it is usually difficult to traverse from one section to another. Within each area the climbs are described from left to right, unless otherwise stated. With the exception of a couple of routes on Cuaisin Caol Wall all the climbs are single pitch, between 7m and 25m in length. An alternative, shorter approach to the Base Camp area, which has the largest and best selection of the climbs, is to take the road by the side of the village shop at the top of the Main Street, continue past the roundtower and follow the St. Declan's Way markers to a small carpark at the entrance to the football pitch (be careful not to block any of the gateways here). A two minute walk from here will bring you out on to the cliff path, from where the approach as detailed for Basecamp is followed.
Area A - Ardmore Head.
Only five minutes walk from the Hotel. All the climbs here are on good rock and in the lowest grades, with nothing above Severe. A place to climb when the West winds are drumming up a storm! Leave the cliff path just after the first bend, at a short stretch of wooden fencing on the L and go down a steep path to a small natural arch. All these routes are tidal and accessible from low to half tide only.
The first three climbs are on the steep slab that lies to the south (right , facing out) of the descent path and directly below the Cliff Path. They all start from a small ledge 3m in from the right edge of the slab. This ledge is covered at half tide. An idyllic spot in early morning sunshine. Abseil from the fence (30m. approx.).
Casán na Naomh VD
G. Moss E. Hackett 6/2/1999.
Move across left from the belay and go up on good holds to follow a crack leading up left to a wide ledge below a large, light-coloured patch (possible belay). >From the right end of the ledge follow a ramp up left around the corner to the edge of a wide gully. Step back right onto a rib and climb to the fence.
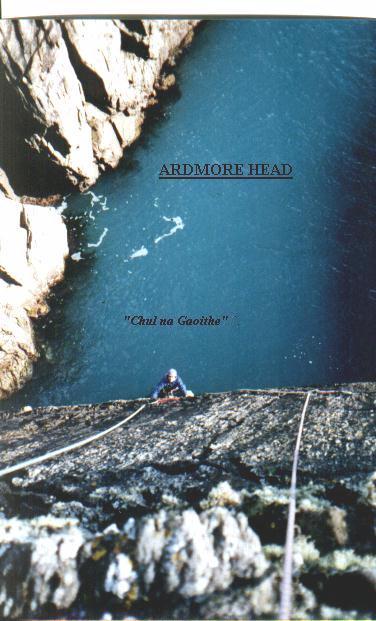
Chúl na Gaoithe S
G. Moss E. Hackett 6/2/1999.
Climb straight up from the belay to the foot of the crack running up left towards a short corner. Follow the crack, then move up direct to belay on the ledge system below the grass. Escape by an easy traverse right along the ledge system.
Díseart S
G. Moss E. Hackett 27/2/1999
Climb diagonally right from the belay to reach the cracks near the edge of the slab and move up over these to belay on the ledge system. Escape by traversing off right.
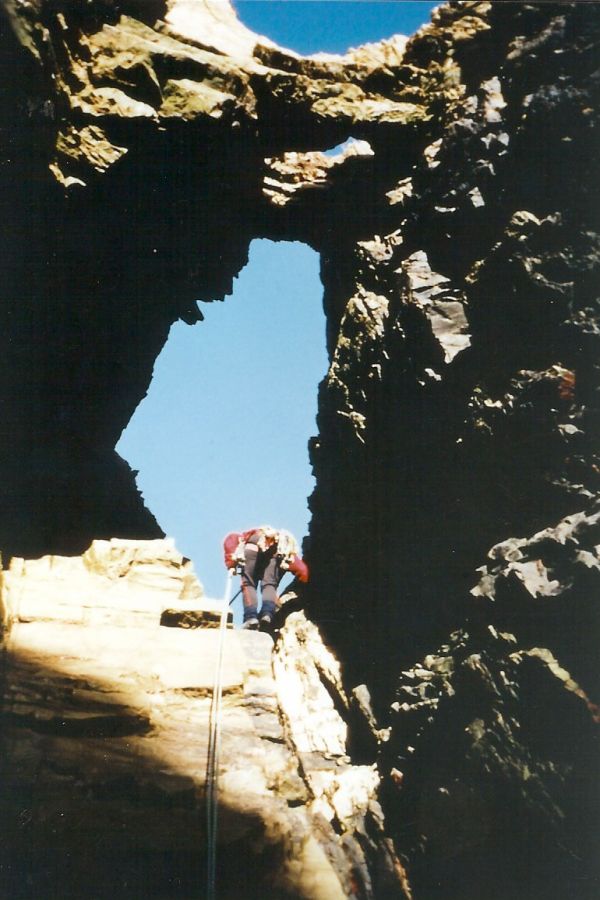
The starting point for the next two climbs is gained by abseiling beneath the two arches to the foot of the narrow gully.
Underneath the Arches VD
E. Hackett G. Moss 6/2/1999
Start on a flat boulder at the foot of the gully, or a higher ledge if this is under water. Climb diagonally left on good holds to gain the arete, which is followed to the top.
Underneath the Arches VD.
Arch gully VD
E. Hackett G. Moss 6/2/1999.
Start as for Underneath the Arches. Climb the gully.
The next batch of climbs are reached by scrambling out beyond the arch to the tip of the arete and backclimbing down an easy slab on the N side to reach a large tidal platform which contains a small pool.
Wysiwyg S
G. Moss E. Hackett 6/2/1999.
Move around to the left to a wide ledge below the crack that splits the short south-facing wall. Climb the crack.
Arete Groove VD
E. Hackett G. Moss 6/2/1999.
Start 4m right of Wysiwyg below the groove at the end of the arete. Climb the groove.
Groove & flake D
E. Hackett G. Moss 6/2/1999.
Start just right of the descent route, near the left edge of the pool, below and left of the black groove containing a large flake. Move up right to the foot of the flake, then up the groove.
Black arete VD
E. Hackett G. Moss 6/2/1999.
Start 3m right of Groove and Flake at the back of the pool. Climb a short, steep staircase, and step out right to follow the arete.
Seal VD
E. Hackett G. Moss 6/2/1999
Start 2m right of Black Arete at the right end of the pool. Up steeply to a bulge, which is climbed on good holds.
Soft Day S
M. Walsh E. Hackett G. Moss 31/7/1999
Start about 8m right of Seal, to the right of a wide, shallow corner with a light patch, and 2m left of a narrow gully, below a short wall and small overhang. Climb the overhang direct.
Greasy Gully VD
E. Hackett M. Walsh G. Moss 31/7/1999
This route follows the narrow chimney above a small inlet. The chimney is unprotected, usually greasy and not recommended.
Starfish D
E. Hackett G. Moss 6/2/1999
Start 2m right of the chimney, below the left edge of the slab. Climb the edge to a block belay.
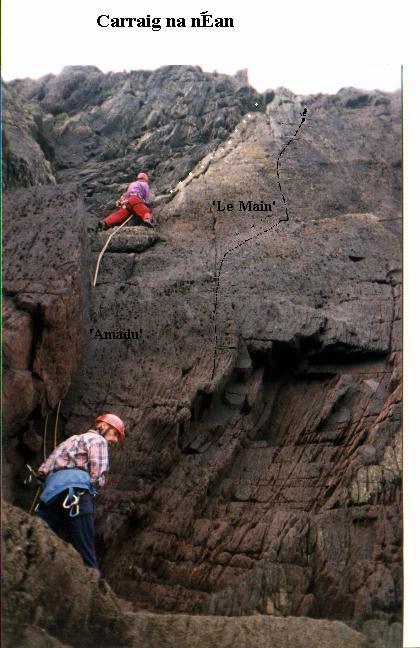
Carraig na néan
The next headland to the South. Routes from D to VS4b, all tidal.
Approach. Continue along the cliff path and leave it at a concrete stile. Go back inside the fence, passing above a zawn, then, keeping close to a drop on the right, go down to the tip of the headland and locate the top of an easy-angled slab (The Slipway) that slopes to the south. The top of The Slipway is almost directly above a small rock island. A block near the top of The Slipway makes a good abseil point for the following routes. (Note - There are large unclimbed slabs immediately south of the zawn mentioned above, but the tops of these are heavily vegetated.)
Easna Éasca VD
L. Convery. E. Murphy B. Brislane 13/11/1999
Half to low tide only. Either scramble or abseil down The Slipway (there is a short steep section near the bottom) and belay in a groove. Move across right and down to a ledge. From the right hand end of the ledge move up and left to a higher ledge. Step right onto face of obvious yellow wall. Exposed climbing to reach The Slipway, just below the steep corner that provides the next route.
Cúinne geal an lae HS 4b
L. Convery. G. Moss 13/11/1999
This climb takes the steep corner half-way down The Slipway, about 8m below the abseil block. The top of the corner is split in two by a large block. Climb the left side of the corner until it steepens. Move across right and struggle up the deep crack (crux).
Fruit Bat HS 4b.
S. Daly M. Gray 13/11/1999.
Start as for above. Climb the right side of the corner for 3m and pull across right to gain the foot of the narrow slab sloping up right beneath the overhanging wall. Climb to the top of the slab and make a difficult exit onto a ledge, below a slanting corner. Move up and pull out left onto a rib which is followed to the top.
Humus Delight D
E. Murphy B. Brislane 13/11/1999.
Start as for above. Move across right and climb the obvious right trending groove. Move back left beneath the headwall to finish just above the abseil block.
Pluto's Chute D
B. Brislane E. Murphy 13/11/1999
Start 3 m right of above. Climb the right slanting groove. Move back left at the top to finish as for Hummus Delight.
The next four climbs are on the main slab, which lies about 12m north of The Slipway. The foot of the slab can be reached by traversing right from Pluto's Chute (low tide only) or by abseiling from a stake in a grassy patch above the slab. The stake is directly above the low rock-ridge running out from the foot of the cliff.
Amadu S
L. Convery. D. Doyle G. Moss 10/10/1999
Start at the bottom left of the main slab, below a right facing corner. Climb the corner to the top of a block at the foot of the crack running up the left edge of the slab. Finish up the crack.
Le Main Au Kratin VS 4b
B. March G. Moss 8/4/00
Start just right of above, below a short crack. Follow thin crack to where it peters out and step right to stance. Move up on small solution pockets, trending left until back on original line again. Sparse protection.
Seamus's Route HS 4b
S. Crowley S. Daly 8/4/00
The crack-line 3m right of Le Main au Kratin. Protection is widely spaced.
Codladh Sámh HS 4a
G. Moss B. Brislane L. Convery. 13/11/1999
Start at the bottom right of the slab, at the foot of an easy-angled crack that slopes up right to a shoulder. Climb the crack to the shoulder. Climb the corner at the right edge of the slab to a square-cut overhang, step right and continue to a ledge with a small cave. Climb left over grass and rock to belay stake.
Samson Rocks
The area to the N of the wreck of the crane-ship 'Samson'.
Map M1, M2. Approach. From the concrete stile mentioned above continue along the S.D.W. for about 50m, until directly above a small rocky island (see map). Go down towards this on a faint path. Scramble down to a quartz-streaked block directly above the island and abseil from the block. The next two climbs start from a small ledge on the high-water mark, below the block.
Short Back & Sides VS 4c
G. Moss B. March 8/4/00
Climb slightly left and up through steep rock to gain a short slab leading to the abseil block. Poorly protected.
Samson's Downfall HVS 5a
B. March G. Moss 8/4/00
A well protected test piece. Start as for Short Back and Sides. Move up into X-shaped formation and muscle up left through overhang on good holds. Follow crack until a step left can be made to join top of Short Back and Sides.
Conjob HS
S. Daly C. Murray 8/4/00
This climb is located on the S side of the zawn immediately S of the above two climbs. Scramble carefully down the N side of the zawn and cross the large block to the S side. Go down left to a ledge below and left of the right facing corner. Climb up and right to enter the corner, which is followed to the top.
Two routes, both cracks, at VS and HVS, were climbed by F. Power and B. Rowe on a south-facing wall about 30m N of the wreck, on 9 April, 2000. No further details available.
The cliffs behind and immediately south of the wreck are heavily vegetated and uninviting.
Ram Head is situated at the point where the orientation of the cliffs change from east-facing to south-facing. The northern section of the head is too sheltered and is of little interest, but there are steep cliffs on the southern and south-eastern parts of the head which should be worth a closer look.
Carraig na Rón
Map M1, M2, M3 The headland bounded by Coolabeg zawn to the east and Baunafoilwee to the west. Routes from V. D to VS4b, all tidal.
Approach. Leave the cliff path about 70m west of the small concrete look-out post, at a section of double fencing, and descend along a little path, with Coolabeg zawn on the left (east) at first, to the tip of the headland. Scramble down to a long, wide ledge split by a narrow gully. Back-climb or abseil down the gully to a ledge system on the high-water mark.
The first 3 climbs are to the left of the gully.
Step we gaily HS 4a
L. Convery. E. Hackett, G. Moss, 22/5/1999
Traverse left (west) for 5m to the end of the ledge, scramble down and continue traversing left below two corners. Step across a narrow inlet onto a large sloping platform. Climb the short, steep, west facing wall near the head of the inlet and right of the foot of the deep corner, to gain a ramp sloping up R. Follow this, with one awkward step and go around a rib (good thread runner) before moving up to finish.
Note - The deep corner mentioned above has been looked at, but it is very friable at the top and not recommended.
Flanagan's off to Cham. VS 4b.
J. Guy G. Moss 6/12/1998
The corner 5m left of the gully. From the left end of the ledge scramble down and left to the foot of the corner. Climb to the bulge, move right then back left and up the corner.
Carraig na Rón VD
J. Guy G. Moss 6/12/1998
The steep left edge of the descent gully.
The following climbs are all to the right of the descent gully.
Stalked by a Seal S
J. Guy G. Moss 6/12/1998
The crack 1m right of the gully.
No Fall Guy HS
J. Guy G. Moss 6/12/1998
The next crack, 2m right of Stalked by a Seal.
Under Surveillance S
G. Moss J. Guy 6/12/1998
The left-facing corner 3m. right of No Fall Guy.
18 Shopping Days S
G. Moss J. Guy 6/12/1998
Start 4m left of the right-hand end of the ledge, at the foot of a short right-facing corner, below an overhang. Climb the corner, pull out left, and finish direct.
Guyline S
J. Guy G. Moss 6/12/1998
The slanting corner above the right-hand end of the ledge. Start 2m. left of the end of the ledge. Climb corner to flake, over this and move up left to finish.
Baunafoilwee
Map M1, M3Folly Zawn. This is the smaller of the two zawns below the well and folly on the section of the path overlooking Baunafoilwee.
Approach. Leave the cliff path about 20m east of the well and go down over grass (traces of a path) to the headland separating the two zawns. From the first level, rocky section abseil down the most Easterly of the three corners (small wires for anchors) and continue down the slab to a good ledge below a rock-scar just above the high water mark. All the climbs start from this ledge.
Well Done! VD
E. Hackett G. Moss 3/7/1999
Climb the short overhang above the left end of the ledge and move up to the left hand corner. Climb this, using holds on the left wall to start.
Ceramicist's Corner S
L. Convery. E. Hackett G. Moss 12/6/1999
From the left end of the ledge, traverse out left along a horizontal crack and move up to the foot of the centre corner. Make an awkward move to get established in the corner and climb it to the abseil ledge.
Physio's Delight VD
L. Convery. E. Hackett G. Moss 12/6/1999.
Climb the narrow ramp to the right of the belay ledge and the right hand corner above.
Basecamp
The cliffs in the immediate vicinity of Basecamp have the biggest concentration of climbs, ranging from D. to E1.
Approach - A little over 100m west of Fr. O'Donnell's Well the St. Declan's Way turns sharply inland (this point can be reached from the carpark at the football pitch in less than two minutes). Leave the Way at this point; go down a path of sorts, following the fence down and around to the second right-angled corner (about 150 meters). Go down sharp left just before a junction with a low bank, following a faint path, to the obvious level grassy area with a sharp drop on its west side. This is Basecamp. Looking west from here, out over the top of Basecamp Wall, the narrow cove of Cuaisín Caol is directly below, with the little promontory of An Lúidín below on the left and Cuaisín Caol Wall on the right. Straight ahead The Capstone can be seen, bridging a gap on a shoulder at about half height on the cliffs. Looking south (out to sea) the top of a narrow corner can be seen, cutting right into Basecamp, this is the line of Written in Stone. Just east of Basecamp lies The Tea Flag. This slab was a favourite spot for tea parties in the past - it is engraved with numerous names, some of them dating as far back as 1727, and many of them carved with considerable skill. It is part of the local heritage, treat it with respect.
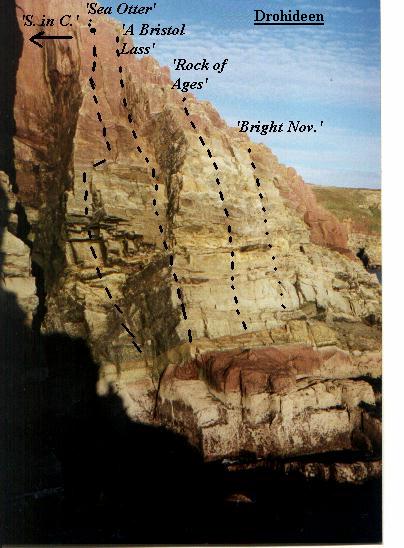
Drohideen (Map M4).
This buttress lies just east of the Tea Flag.
Approach. Climb a short step at the back of the Tea Flag and traverse east above a deep corner (the line of Chul na Greine). Scramble down in the direction of a small, circular rock island, to reach a dark ledge on the high-water mark (Note - the deep gully above the rock island has been looked at, but the rock is very poor on the upper section).
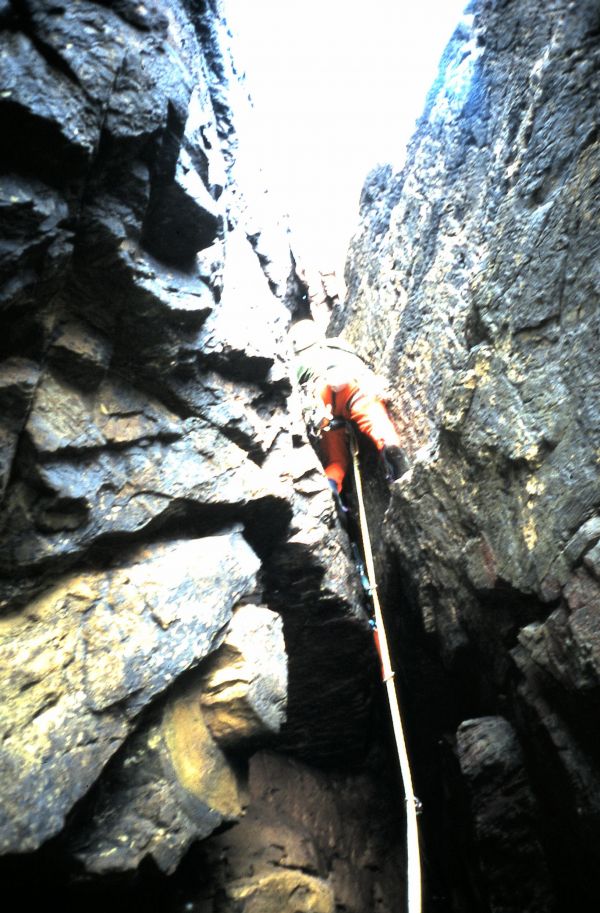
Chúl na Gréine VS 4c
G. Moss E. Hackett 14/8/1999
Traverse back west to the end of the ledge. Step down and make a few moves of about Diff., to enter the deep corner on the left. Start from a belay on the large boulders. Climb the crack on the left at the back of the corner to a gap. A difficult move regains the crack, which is followed steeply to where a short, subsidiary crack goes diagonally right. Hand traverse out along this and continue up the narrow chimney. Well protected. (Note - On the first ascent the diagonal crack was followed because the direct finish up the corner was too wet to climb. When dry, the direct would be the logical and better finish, at a grade or two higher).
Chúl na Gréine
Steeped in Crack HVS 5a
K. Cooper M. Bolger 21/11/1999
Start in the deep corner, as for Chúl na Gréine, below the wide crack on the right side of the corner. Climb the crack over a bulge and continue to the top (good sling at mid-height).
Sea Otter HVS 5a
K. Cooper M. Bolger 7/11/1999.
Start 2m right of the deep corner, 4m left of the left end of the ledge, below two small overhangs. Climb up over first overhang into a short corner (good brass wire). Climb the second overhang (crux, 2 1/2 friend) and another short corner above to large holds in scoop (sling). Move up shallow right facing corner and wall above to top.
A Bristol Lass S
G. Moss, E. Hackett 14/11/1998
Start below a left-facing corner, which is directly above the left end of the ledge. Climb the corner.
Rock of Ages VS 4c
G. Moss E. Hackett 17/4/1999
Start on the ledge, 3m right of A Bristol Lass. Climb easily to the overlap, over this steeply on small holds and move a little right to finish. Poorly protected.
Bright November D
E. Hackett G. Moss 14/11/1998
The shallow right-facing groove 3m right of above.
Tea Flag Buttress.
(Map m4). The buttress directly below the E side of Basecamp.
Approach. From a block or the stake at the E end of the level grassy area abseil down a series of short corners to a wide ledge 3m above high water mark.
Written in Stone VS 4b
G. Moss E. Hackett 27/3/1999
Traverse left (west) along a narrow ledge (D.), to reach the foot of the deep, overhanging corner crack that demarcates the left edge of the buttress. Climb the corner direct.
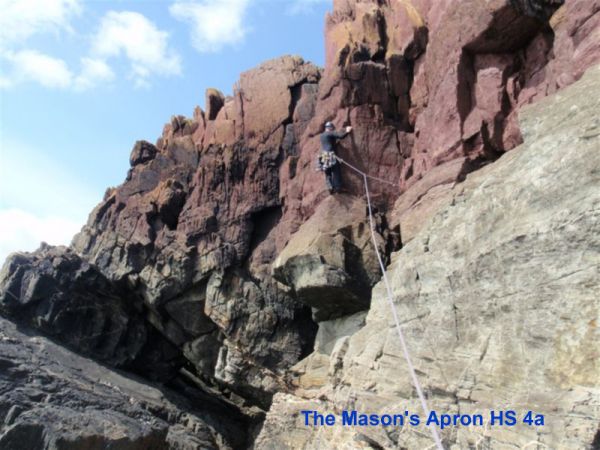
The Mason's Apron HS
G. Moss E. Hackett 27/3/1999
Start at the right end of the narrow ledge, on a wide platform. Traverse along the ledge until below a corner with an obvious jammed block in the upper section. Move up to the foot of the corner and step out left onto a sloping ledge. Traverse airily left across the slab, climb a short crack and finish pleasantly up the right-trending corner.
Guys the Limit S
J. Guy, E. Hackett G. Moss 5/12/1998
Start as for above. Climb the corner, taking the jammed block on it's left.
December Blue D
E. Hackett G. Moss J. Guy 5/12/1998
Start on the broad platform, as for above. The route follows, more or less, the line of the abseil.
Pool Corner S
E. Hackett G. Moss 27/3/1999
Start about 4m. around to the right from December Blue, below the corner at the left end of the wall. This wall overlooks a large platform with a pool at its centre. Climb the thin crack in the corner and continue over ledges to the abseil block.
Pool Corner
Big High VS 4c
J. Reville, W. Whelan. Aug 2010.
This route takes the thin crack one meter R of the corner crack of Pool Corner.
Note: The following two climbs were demolished by storms during November 2009.
Bang E1 5b
K. Cooper M. Bolger 24/10/1999.
Start 2m right of Pool Corner, just left of a roof at head height. Climb the thin crack that runs up the left-hand side of the roof to a ledge at 4m. Climb the corner above to the top.
Astralasia HVS 5a
M. Bolger K. Cooper 21/11/1999
Start below the first corner to the right of Bang. Climb the thin crack to a small roof. Move right at the roof to a small ledge. Step up left into the groove and up to the top.
By Memory Inspired HS 4a
G. Moss J. Guy 5/12/1998
Start beneath the obvious corner immediately right of the rock fall area. Climb the corner on good holds, moving left when above the quartzite projections, then back slightly right to belay on a good ledge, in a corner just below the top.
By Memory Inspired HS 4a
After the Rain HVS 5a
K. Cooper M. Bolger 10/10/1999
Start beneath the next corner to the right. Climb the corner and go up right of the block. Gain the top of the block and go up diagonally left. Climb the corner above onto slab. Step left for belay on large ledge. N.B. The corner above the slab is loose and broken.
Two for Tea VS4c
G. Moss, E. Hackett, October 1999.
Start at the extreme righthand end of the pool platform, on the left edge of a narrow zawn. Climb diagonally left into the corner and move up to where a narrow, vegetated crack system slopes up right. Follow this delicately to exit on the platform above.
An Lúidín. (Map M1, M4, M5).
The little finger of rock forming a promontory (shown clearly on the map) just west of Basecamp. It is separated from Basecamp Wall by a deep wide crack, bridged by a chockstone. The S facing wall is a suntrap and offers excellent climbing on sound rock, while there are some easier routes on the inland side.
Approach. From Basecamp scramble down over easy rock to the west (right facing out) of the narrow corner of Written in Stone and move around west to the chockstone. Step across the crack and move along the crest to the large boss at the west end. The foot of the climbs on either side can be reached by abseiling from here. The first three routes are non-tidal and are on the inland (north) side, overlooking Cuaisin Caol.
Doyle's Corner S
D. Doyle H. Condon. 14/11/1999
Abseil down the crack on the north side to a stance just above the high-water mark. Climb steeply leftwards over a bulge to reach easier ground.
Cuaisín Crack VD
E. Hackett G. Moss 24/4/1999
Start as for Doyles Corner. Climb the crack to the boss.
Lone Sea Breakers S
G. Moss E. Hackett 24/4/1999
Start as for above. Climb diagonally right for 6m then move straight up to finish on the boss.
The following climbs are all on the south-facing side of An Luidin and are accessed by abseiling down the face, following the line of the deep crack below the boss, or by back-climbing from the boss at about v.diff.
Daly Bred S
S. Daly M. Gray 14/11/1999
Abseil to the foot of the crack on the south face. Start 3m left of the crack below a ledge at a little over 2m. Gain the ledge and climb the wall near its right edge.
Guys & Dolls VS 4c
J. Guy, M. Walsh 9/1/1999
Climb the deep crack, which is steep and juggy.
Blind Man HVS 5a
D. Shiels M. Callan 9/1/1999
Note - A storm has removed the nose mentioned on this route but it does not seem to have altered the grade. Start 2m right of Guys and Dolls and just left of a prominent triangular overhang with a flake crack on its left Climb steeply to a sloping ledge just right of a short nose. Move left around the nose and mantle the pulpit (crux). Step right and follow a groove running from right to left below a higher overhang. Climb directly to the top. Protection adequate.
Plain Sailing HS 4b
D. Shiels M. Callan 9/1/1999
As for Blind Man as far as the sloping ledge. Move up and right to gain the foot of the flake crack. Follow this to the top.
Cloudburst E1 5b
K. Cooper M. Bolger 10/10/1999.
Start immediately right of Plain Sailing, below a line of ledges. Climb directly up these until a large round hold can be reached (possible wire & friend). From here good holds can be reached up on the right. Reachy moves on good holds lead to good wires and the top.
Water Slide VS 4b
D. Shiels M. Callan 9/1/1999
Start at the right end of this section of the S facing wall, 2m left of the left facing corner. Follow the groove from left to right . Poor Protection.
Murphy's Lá VD
E. Murphy B. Brislane 14/11/1999
Start right of Water Slide in a corner. Climb the corner, trending right to the foot of a higher corner capped by an overhang. Climb the right wall of this corner and move out right to finish.
The next two climbs start about 12m to the right of Murphy's L?, at the right-hand end of the south facing wall. The most convenient approach to the foot of these two climbs is by abseil, down the crack below the chockstone.
Pink Panther VD
B. Brislane E. Murphy 14/11/1999
Start 2m left of January Sun in the right facing corner. Up the corner and over ledges to the foot of a flake crack. Climb this.
January Sun S
E. Hackett G. Moss 9/1/1999
Start at the extreme right of the platform, at the bottom left of the wide crack with the chockstone. Follow the left edge of the crack.
Condor. S
G. Moss E. Hackett 9/1/1999
Hop across the channel to the right edge of the wide crack below the chockstone. Climb the edge.
Cuaisín Caol Wall
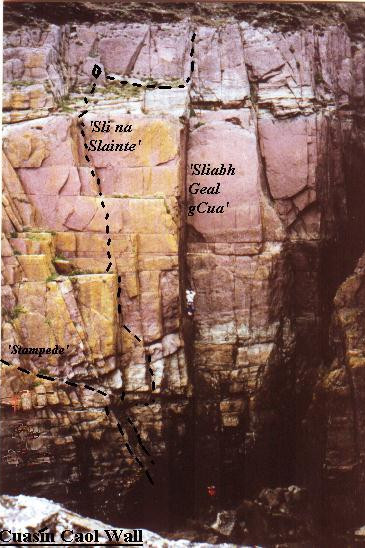
(Map M5). This is the wall facing the north side of An Lúidín, from across the narrow cove of Cuasin Caol. The left-hand section of the wall is topped by a series of platforms, or wide ledges, many of which are littered with debris, while the right-hand end has a pair of fine corners, before petering out in a steep, narrow, boulder filled gully. Just opposite the tip of An Lúidín, there is a platform with some debris on its west side and a block sitting near the edge. An abseil stake has been put in place above this, between the embankment and the edge of the cliff. Abseil down onto the platform. Two pitons have been left insitu on the platform, from which a further abseil can be made (satisfy yourself that they are ok before using them) to a large sloping ledge about 6m above high water mark. The first two climbs start from here. (An alternative approach to these two climbs is to do the first pitch of Stampede). Note - the first three climbs finish up through an area with a lot of loose debris lying on ledges and great care is needed to avoid any stonefall
Beetember HS 4a
P. Britton G. Moss 13/2/1999.
A fine start leads to a loose finish. Start from the large ledge, directly below the abseil point, just right of a step at the foot of a right facing corner. Climb the corner and continue over a slight bulge to reach a long ledge near its left end, below the wall with the quartz patches. Move a little right and carefully climb the wall to the abseil platform. Scramble carefully off.
Caol Uisce HS 4b
G. Moss E. Hackett 27/2/1999
A fine start leads to a loose finish. Start at the foot of a long, right facing corner, reached by an airy step around from the right end of the large sloping ledge mentioned above. Climb the corner on good holds and trend carefully up left over two ledges to reach the platform with the pegs. Scramble carefully off.
Stampede HS 4a
G. Moss, E. Hackett L. Convery. 22/5/1999
Easy climbing leads to a loose finish. Low to half tide. Approach from Basecamp scramble down over easy rock and move west to the chockstone bridging the crack. Scramble down the edge of the slab to the boulders at the water's edge. Start just above and right of a huge red boulder, on a large, flat boulder below a wide crack. The crack runs up to the right end of a long ramp sloping up left. 1. VD Steep moves on big holds lead to easier climbing and the foot of the ramp. Follow this easily to a block belay 2m right of the first of two right facing corners. Pitch 2. 4a. Climb the corner, passing a steep section (crux), and step left at the jammed block. Move carefully left and climb a series of steps, trending left to reach the platform with the peg belays. Scramble off from here.
Slí na Sláinte HVS 5a
G. Moss E. Hackett 25/199/1999
Protection is adequate and the interest is continuous. Start as for Stampede. Pitch 1, 5a. Climb the crack to where the angle eases just below the overhang. Traverse right on a footledge for 2m and pull over the bulge. Climb the left-trending crack to the top of the block and the steep corner above it. Several mantelshelves, one of which is difficult, lead to the foot of a second steep corner. Climb this to a wide, sloping, grassy ledge and move up to a sling and nut belay on a large flake. Pitch 2, VD Traverse right for 4m, step across right and climb the top of Sliabh Geal gCua to a metal spike belay just below the bank.
Sliabh Geal gCua VS 4c
G. Moss E. Hackett 12/6/1999
Easier than it looks. Half-tide. Start 2m right of above, below the obvious long corner line. An overhanging start on good holds leads to some mantelshelves and a short, thin section, which is difficult to protect, before gaining the crack in the upper section. Straightforward lay-backing and bridging lead to a good incut ledge and the end of the difficulties. Continue easily up the corner and scramble up a short grassy section to a metal belay stake. (On the first ascent a peg was placed just above the incut ledge, with the intention of abseiling off, to avoid loose blocks above. The peg was too poor to be trusted, however, so an escape left was made. This upper section, which goes at about v. diff., was subsequently cleaned and climbed)
Pinnacle Crack HS
E. Hackett G. Moss 2/4/1999
The pinnacle blocking the boulder filled gully to the right of Sliabh Geal gCua. It has a deep chimney on its right and two shorter corner cracks on its face. Start below the right facing corner crack on the face. Climb the corner to a spike belay, just below the top of the pinnacle. Abseil off (long sling needed).
Basecampwall
Map M5. The slightly overhanging wall directly below the west side of Basecamp. A low arch, running east-west, pierces it. From Basecamp scramble down seaward on easy rock and move west to cross the narrow cleft onto An Lúidín just above a large chockstone. Move down the slab to the mouth of the arch for the next route.
Stairway to Paradise HS 4b
J. Guy G. Moss 10/1/1999.
Start at the right side of the arch, at the foot of the obvious stepped ramp running up left. Follow the ramp to the top. Care needed with the rock
April Airs VS 4b
G. Moss E. Hackett 2/4/1999
Start 4m right of Stairway to Paradise, below a slanting crack that starts 3m up the wall and runs up to a shoulder. Climb steeply to the crack, follow this to the shoulder and climb the short wall above.
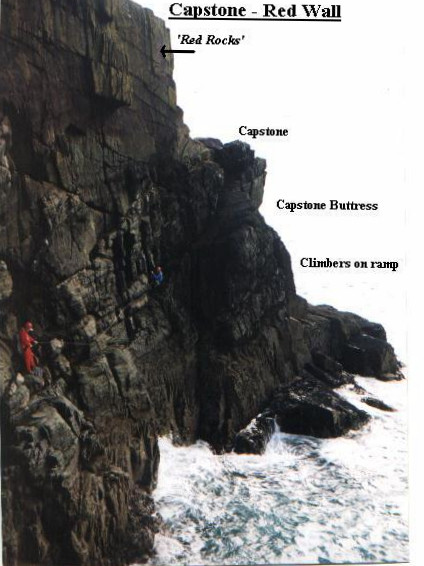
The Capstone
Map M6. It is worthwhile dropping down to Basecamp to get a fix on the position of the Capstone before approaching it.
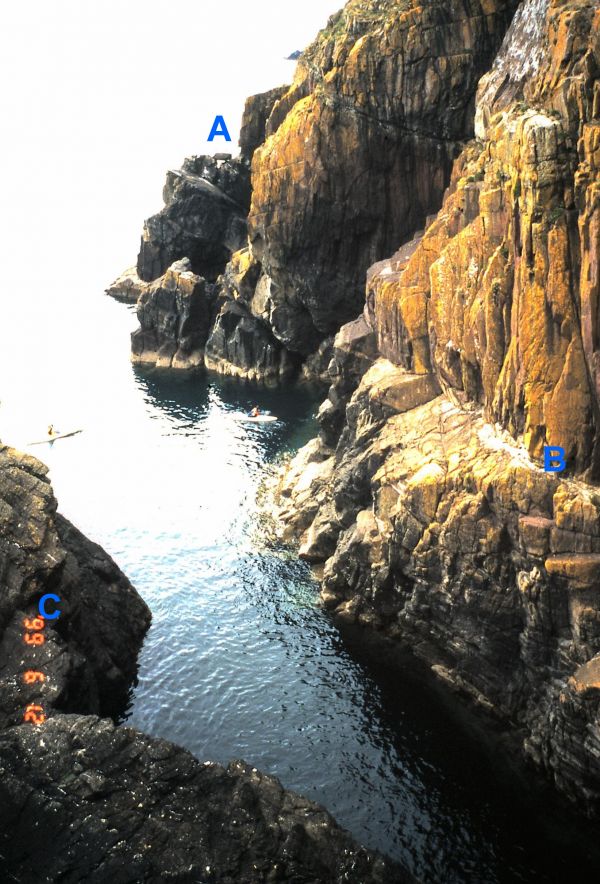
Cuasín Caol. A = Capstone. B = Beetember. C = Doyle's Corner.
To reach the Capstone from Basecamp, return to the bank junction and continue west along the bank for about 45m, until directly above a large platform with a boulder sitting at its centre. Scramble down carefully (or abseil) to the platform and abseil from the boulder, directly to the Capstone for the Left Wall, or down the corner for the Right Wall.
Capstone Left Wall.
This is the first section of the Capstone area and is reached by scrambling down left (west) from the Capstone to gain the top of the ramp that runs down across the wall. Continue down to the foot of the ramp (one awkward section) and move up to reach a wide platform just right of Foilbeg, the zawn that marks the left or west edge of this area. The wall looks impressive but, on the central section, the quality deteriorates with height.
West End Wall S
G. Moss E. Hackett 2/4/1999
Start 3m right of the edge. Follow a line, more or less direct, to the platform on top. (N.B. If tidal conditions rule out the traverse across from the Capstone, it is possible to abseil from this platform to the foot of the climb).
Corn Flakes VS 4b
D. Shiels M. Callan 9/1/1999
From the right -hand end of the ramp, move 10m(?) left and climb an overhang which leads to a corner running from right to left. Good rock and good protection at the bottom of the corner leads to poor rock and poor protection above.
Red Rocks HS
G. Moss E. Hackett 9/1/1999
Start near the top of the ramp, below and right of an obvious crack in the short, red headwall. Up steeply on good holds (no protection) to the foot of a slab. Gain the slab via a high step, move up and mantelshelf onto a ledge below the crack in the wall. Climb this or the shallow corner on the right.
Capstone Lower Buttress.
The next three routes are on the buttress directly below the Capstone and are reached by abseiling from the left (west) side of the Capstone down a corner to a barnacle-covered ledge just below the high water mark.
Capstone Crack VD
E. Hackett G. Moss 2/4/1999
Climb the corner to the Capstone and continue to the platform above.
Capstone left Corner VD
E. Hackett G. Moss 17/4/1999
Start about 3m right of Capstone Crack, below a short left facing corner with a crack. Climb the corner to a sloping ledge below a second corner. Steeply up this to the Capstone.
Capstone right corner VD
E. Hackett G. Moss 2/4/1999
Start 2m right of Capstone Left Corner, below a short right facing corner. Climb the corner, move right and up to the Capstone.
Capstone Right Wall
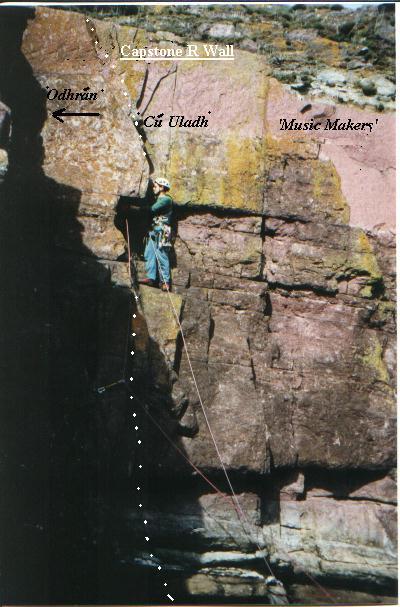
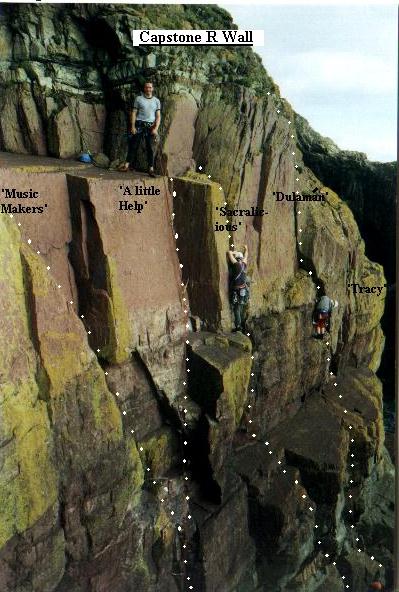
Map M6. This wall is protected from westerly winds and, as a result, is often climbable when other areas are waveswept. The climbs are reached by abseiling down the corner to the east of the block on the platform or by scrambling down right (east) from The Capstone to the foot of the slab.
Odhrán HVS 5a
R. Keane D. Shiels 9/10/1999
Start below the overhang at the foot of the slab and just right of a shallow cave. Climb the overhang for 4m, move right to good handhold and pull up on increasingly good holds to a large ledge. Move left and finish up the obvious corner.
Cú Uladh S
H. Sharkey T.O'N. 17/4/1999
Start at the left end of the ledge system, on a ledge on the high-water mark, or a higher ledge if the tide is in, below a short, narrow corner, formed by a flake, near the top of the crag. Climb up and enter the corner which leads to the platform, just right of Odhrán.
The Music Makers S
G. Moss E. Hackett 17/4/1999.
Start 3m right of Cú Uladh, below and just right of the right-facing open-book corner. Climb, trending left, to the foot of the corner. Follow the left edge of the slab in an airy position.
A little help from my friends HVS 5a
B. March F. Power. 9/10/1999
A poorly protected finish. Start as for Music Makers, below and left of protruding V-shaped block. Climb left-hand side of block to large ledge and clean left facing corner. Climb the corner (crux)to reach the right hand end of the large platform.
Sacralicious HVS 5a
D. Shiels R. Keane 9/10/1999
Start just right of A little Help From My Friends. Climb a corner to a large ledge. Step left and climb the right side of the large protruding block. From the top of the block move right to a small ledge then up and back left to finish. Small friends for protection.
Dúlamán VS 5a
G. Moss M. Walsh F. McGirl. 9/10/1999
Start to the right of Sacralicious, below a short corner. Climb the corner to the large sloping ledge. Make a difficult move to gain the small ledge below a crack sloping up left. Climb the crack to a stake belay. Well protected.
Tracy VS4c
F. Power. B. March 9/10/1999.
Start below the right end of the wide sloping ledge, behind the squat sea stack (Tuar). Climb to the sloping ledge. Move 2m left to a small niche. Up and back right on small holds to finish on a ledge (avoid loose rock slightly to left of top section).
add comment
The headland between Foilbeg and Foilmore has some steep rock, but there appears to be a horizontal band of bad rock running across the upper section.
Foilnadilisk Head
Map M1, M7. This area is demarcated on the left (west), by a narrow zawn, Foilnadilisk and on the right (east), by a smaller zawn, Foileen.
Approach. As for Basecamp as far as the junction of the earthen banks. Move up along the bank and follow a higher bank and fence west above the cliffs for a further 150m, passing two zawns to reach the headland between Foileen and Foilnadilisk. Scramble down over rough, steep ground to a wide ledge with a pile of blocks. Abseil from the blocks to the foot of the wall.
From the base of the wall move west for about 150m, scramble around back of small zawn, then down to platform at sea level (a small inlet bisects this). The crag is on the left, an obvious clean face, while the arete is immediately to the right, practically at the end of the inlet. All the climbs are short, but worthwhile
Beta Blockers HS
R. Keane D. Shiels 10/10/1999
Start below a strange block formation near the left end of the wall. Climb up through the blocks to top.
Fault Line VS 4b
D. Shiels M. Callan 10/1/1999
Start 2m right of above. Climb the obvious line.
Large Triangle. VS 4b.
D. Shiels M. Callan 10/1/1999.
Start 2m right of above. Climb through large triangular niche to top.
Foilin In Love Again VS 4c
B. March 10/10/1999.
Start 3m right of Large Triangle. Climb thin parallel cracks through small triangular niche and with difficulty gain large jug in popcorn crack. Continue to top.
Blasphemiss HS 4b
S. Daly F. Power. B. March 10/10/1999.
Start at the foot of the obvious left slanting chimney/groove at the head of the inlet. Struggle up this as best you can.
Rob HVS 5a
F. Power. B. March S. Daly 10/10/1999.
Start a little right of Blasphemiss, on flat slab below point of nose. Move up to ledge under overhang, veer left and straight up.
Foiled Again HS
D. Shiels R. Keane 10/10/1999.
Start just right of Rob, below the short pod. Dicult moves to enter the pod are followed by easier climbing.
The following three climbs are located on the wall below the abseil blocks.
Little Jack HS
B. March F. Power. 10/1/1999
Start just left of the blocks below a faint crack. Climb the crack.
Only Up. HS
F. Power. B. March 10/1/1999
Start 2m right of Little Jack, below obvious crack, which is followed to the top.
Dun Coffin VS 4c
B. March F. Power 10/1/1999
Start 3m right of Only Up. Follow flaked crack straight to top.
