Difference between revisions of "Clare Island"
ico>PjlH |
Barry watts (talk | contribs) |
||
| (82 intermediate revisions by 3 users not shown) | |||
| Line 1: | Line 1: | ||
| − | + | '''Maps:''' O.S.I. 30 or, for more detail, Achill & Corraun - Clare Island, by EastWest Mapping. | |
| − | + | '''Getting to the Island''' There are two ferry companies serving the island. See Clareislandferry.com & Clareislandfastferries.com for details of sailings and fares.<br>'''Accommodation.''' You have a choice. Less than five minutes walk from the landing pier, and directly above the blue flag beach, is the island's only campsite. Small and basic, campers have the use of the community centre's toilets, wash-hand basins and coin-operated showers, located just 50m from the campsite. There is also a hotel, Go Explore, plus several B&B's and apartments to rent. See Clare Island.ie/accommodation.<br>'''Getting around the island.''' You can walk, hire a bike (or bring your own) or, if there is a group, hire the island's only minibus. The nearest crag to the harbour is a 5k road walk away. | |
| − | ''' | + | '''Note.''' All of the following crags are on land belonging to the owners of Cois Abhainn, a B&B located at the very end of the road leading W from the harbour. Seek permission from them before entering on the lands. Contact them at 098 26216 or call up to the house and then return back down the road to a gate ('''The Gate L670 844)''') on the seaward side of the road, at a dip in the road and a stream, about 50 m below the road's only cattle grid. |
| − | + | The climbing areas are described from East to West, the routes described from L to R facing the rock. | |
| − | ''' | + | ==Scardóg L673-841== |
| + | From '''The Gate''', while keeping the fence on your right, follow it down and left for about 300m. Cross the fence at this point and go down over rock until Scardóg, a clean, black, NW facing 20m slab, comes into view. Scramble down to the bottom of either side of the slab. The climbs are described L to R facing the rock. | ||
| − | The climbs | + | The first 3 climbs start from the bottom L of the slab, the remaining 3 from the bottom R. |
| − | + | '''The Thrift.''' V. Diff. D. Walsh, Andrea Spinu, Tim Nairn | |
| − | ''' | + | Left of the main slab is a narrower slab, with a left facing corner with a crack on its right, and another crack 2m to its left. |
| + | |||
| + | Start. From the same stance as for Car Rose, Climb between the two cracks. | ||
| + | |||
| + | '''Car Rose''' HS. P. O’Brien, G.Moss 3.6.2022 | ||
| + | |||
| + | From a stance, at the bottom L of the slab move up R and climb the steep left facing blocky corner that borders the left edge of the slab. | ||
| + | |||
| + | '''Black Magic''' S. G.M., P.O’B. 23/6/22. | ||
| + | |||
| + | Start at the bottom L of the slab. Travers delicately and diagonally R for 5m to reach a crack. Climb this to the top. | ||
| + | |||
| + | The next 3 climbs start from a ledge at the bottom R of the slab | ||
| + | |||
| + | '''The Squeezed Middle''' V. Diff. G.M. D.W., P.O’B 23/6/22 | ||
| + | |||
| + | Start at the bottom R of the slab. Traverse horizontally L crossing the lines of First Crack and Any Crack? to reach a continuous crack near the centre of the slab.. Follow this to the top. | ||
| + | |||
| + | '''Any crack?''' V. Diff. DW P.O’ B., G.M 3.6.2022 | ||
| + | |||
| + | Start as for First Crack Traverse 3m left, and climb the bottom to top crack on left of quartzite markings. | ||
| + | |||
| + | '''First Crack.''' V. Diff. P. O’B, G.M 3.6.2022. | ||
| + | |||
| + | Step left around the corner on the extreme right of the slab and climb the bottom to top crack immediately above. | ||
| + | |||
| + | There is scope for more routes immediately W of the slab. | ||
| + | [[File:Scardog1.jpg|thumb|alt=|center|500x500px]] | ||
| + | |||
| + | |||
| + | [[File:CScardóg3.jpg|thumb|alt=|center|500x500px]] | ||
| + | |||
| + | ==Craigmore Area== | ||
| + | |||
| + | '''Approach''' Go through '''the gate''' and, keeping to the L of the fence, follow it down, passing a junction with another fence . Cross the fence here and continue east for a short distance, until it is possible to scramble down to sea level. There is much yet to be done here. The first route follows a dark, narrow, undercut slab just above the high water mark.<br> | ||
| + | |||
| + | [[image:CLI9aa.jpeg]] | ||
| + | |||
| + | 14. '''Van Diesel. HS 4b.''' Climbed in two pitches to avoid rope drag.<br>''J. Reville J. Byrne G. Moss 25/7/12.''<br>1. Gain the slab from the L and climb it to a broad platform.<br>2. Move back to the juggy corner behind and climb it.<br> | ||
| + | |||
| + | [[image:CLI20aa.jpeg]] | ||
| + | |||
| + | 15. '''Three Point Turns.''' Severe.<br>''J. Byrne, J. Reville, G. Moss 25/7/12.''<br>This climb is found at the foot of a series of corners around to the E of 14. Start at the foot of a biscuit-coloured corner just left of a dark overhang. Climb the corner to a good ledge and continue up to finish through a break in the skyline.<br> | ||
| + | <br /> | ||
| + | |||
| + | ==='''Toormore'''=== | ||
| + | '''Approach.''' | ||
| + | |||
| + | From '''The Gate''', follow the fence down to a junction with another fence on the R. Cross here and follow this fence to a junction with another fence running down from the road. Cross here and go down over grass to the cliff top to a point above the prominent arch - '''Arch Buttress.''' The following areas are described in relation to the arch. | ||
| + | |||
| + | Kernan's Corner Wall; Arch Buttress Wall W; Arch Buttress; Arch Buttress Wall E; Choc-a-bloc Wall. | ||
| + | |||
| + | '''A minus''' = Kernan's Korner Wall, '''A''' = Arch Buttress, '''B''' = Arch Buttress Wall, '''C''' = Choc-a-Block Wall.<br> | ||
[[File:[[File:new_approach.jpg]]]] | [[File:[[File:new_approach.jpg]]]] | ||
| − | + | ===Kernan's Korner Wall=== | |
| − | 50m west of Arch Buttress is a 20m wide Wall with a platform 3m above above high tide mark. | + | 50m west of Arch Buttress (and across another fence!) is a 20m wide Wall with a platform 3m above above high tide mark. |
| − | 1. '''The Scholar-Gypsy''' Diff. 15m <br> | + | |
| − | From east end of platform, follow continuous crack in groove to the top.,<br> | + | 1. '''The Scholar-Gypsy''' Diff. 15m <br>''P. Herbert, H. Olsson 06/07/14''<br>From east end of platform, follow continuous crack in groove to the top.,<br><br>2. '''Roddy's Arête''' Diff. 18m <br>''P .Herbert, H. Olsson 06/07/14'' <br>Start as for '''The Scholar-Gypsy''' and at 10m step out right on good hand and foot placements to small ledge on arête, continue up the arête or step right onto face to finish. |
| − | 2. '''Roddy's Arête''' Diff. 18m <br> | + | |
| − | Start as for '''The Scholar-Gypsy''' and at 10m step out right on good hand and foot placements to small ledge on arête, continue up the arête or step right onto face to finish. | + | ''Scope for more routes on this wall.''<br> |
| + | |||
| + | [[File:K_K_Wall.jpg]]<br> | ||
| + | [[File:K_K_Wall_2.jpg|alt=|center|frameless]] | ||
| + | |||
| + | |||
| + | ==Arch Wall West L665-842== | ||
| + | Immediately W of the Arch, between it and a fence, lies a smooth wall, only the E side of which is developed because of birds nesting to the W. Climbs are described L to R, and all start on a high-water platform reached by abseil. | ||
| + | |||
| + | 1 '''Avian Anger''' VS4b 15m P. O’Brien, D. Walsh 6.6.2022 | ||
| + | |||
| + | Start as for route 2, moving with difficulty up and L until a horizontal weakness yields holds, protection, and nice climbing all the way to the top. | ||
| + | |||
| + | 2. '''Seaga Ciúin.''' V. Diff 15m D. Walsh, P. O’Brien 6.6.2022 | ||
| + | |||
| + | Climb the bottom to top crack up the right side of the wall, up and slightly rightwards. Best moves at the top. Lovely. | ||
| + | |||
| + | 3 '''Corner Boy''' V. Diff 12m D. Walsh, P. O’Brien 6.6.2022 | ||
| − | [[File:[[File: | + | Separated from the smooth wall by a ramp is a stepped square shaped corner that provides one nice move right at the top. |
| + | <br />[[File:WestWall.png|thumb|alt=|center]] | ||
| + | [[File:CLI2aa.jpeg|alt=|center]] | ||
| − | + | ==='''Arch Buttress L665 842.'''=== | |
| + | These routes are on the buttress with the prominent arch, almost directly below the end of the fence. Access is gained by scrambling halfway down the sloping ramp which starts a few m. E of the fence, stepping across the narrow channel (easier at low tide), and scrambling up and back right to reach the foot of the seaward face. | ||
| − | + | 1 '''Arch Rivals.''' Diff. G. Moss, C. McGovern. 4/6/22 | |
| − | |||
| − | 1 | ||
| − | |||
| − | G.Moss, | ||
| + | The L edge of the face. | ||
| − | + | 2. '''Arch Central,''' 15m VD, P O'Brien, A Spinu, T Nairn. 4-6-22 | |
| + | |||
| + | Start at the base centre of the face and climb up the middle of the wall to the top. | ||
| + | |||
| + | 3'''. Arch Arete.''' V. Diff. ''G.Moss, J.Byrne., J.Reville. 26/7/12.''<br>The R arete of the face of the buttress. | ||
[[image:CLI3a.jpeg]] | [[image:CLI3a.jpeg]] | ||
| − | '''Arch | + | ==='''Arch Wall East.'''=== |
| − | The next five routes are on the wall | + | |
| + | |||
| + | The next five routes are on the wall immediately East of Arch Buttress and are reached by scrambling down the sloping ramp mentioned above. The climbs are described from left to right | ||
| Line 48: | Line 124: | ||
| − | 2. '''Generous John.''' V. Diff. | + | 2. '''Generous John.''' V. Diff. ''J. Reville, J. Byrne, G. Moss 26/7/12.''<br>The left-hand and narrower of two cracks near the bottom of the sloping ramp. |
| − | 3. '''PeuJoe''' V. Diff.<br> | + | |
| − | The righthand and deeper of the two cracks near the bottom of the ramp.<br> | + | 3. '''PeuJoe''' V. Diff. ''J. Byrne, J. Reville, G. Moss 26/7/12.''<br>The righthand and deeper of the two cracks near the bottom of the ramp. |
| − | + | ||
| − | The next | + | <br /> |
| + | [[File:Pulpits-Ripple Arete.jpg|thumb|Pulpits (L) and Ripple Arete (R)|alt=|center|707x707px]] | ||
| + | |||
| + | 4. '''Pulpits''' V. Diff. D. Walsh, C. Duffy 4.6.2022 | ||
| + | |||
| + | Start as for PeuJoe and climb the shallow groove directly above, passing the large overhang on the right. The protection gets sparse with height but the holds keep coming. | ||
| + | |||
| + | 5. '''Ripple Arete'''. Severe B. Walker, W. Blanchfield. . 4.6.2022 | ||
| + | |||
| + | Climb the rib immediately on the right of Pulpits. Crux at top. | ||
| + | |||
| + | The next 4 routes are reached by scrambling down to the bottom of the ramp and stepping across a gap to reach a ledge at the foot of a prominent left facing corner. | ||
| + | |||
| + | 5. '''First Gear All The Way'''. V.Diff. J. Byrne, J. Reville, G. Moss 27/7/12. | ||
| + | |||
| + | Climb the continuous crack L of the corner. | ||
| + | |||
| + | 6. '''The Way That I went'''. S.(see photo) G.M. C. McG. 6/6/22 | ||
| + | |||
| + | Start. As for First Gear All The Way. Move up R and follow a line just L of the arête, stepping R onto the arête for the final few moves, to belay at a large, jammed block. Unprotected on the upper half. | ||
| Line 58: | Line 153: | ||
| + | [[File:The Way.jpg|thumb|alt=|center]] | ||
[[image:CLI6aa.jpeg]] | [[image:CLI6aa.jpeg]] | ||
| + | <br>7. '''Red Van Man.''' HS 4b. ''J. Reville, J. Byrne, G. Moss 27/7/12.''<br>Start as for 6. Step out right and climb the crack just R of the overhang, moving back left beneath the small overhang higher up the face. <br><br>8. '''The Pirate Queen.''' HS 4b. ''G. Moss, J. Reville, J. Byrne 27/7/12.'' | ||
| + | <br>Start as for 6 Hand traverse horizontally R along a thin crack and step up to a good ledge. Climb the thin crack above the right hand end of the ledge, finishing over jammed blocks. | ||
| + | ===Choc-a-Block Wall=== | ||
| + | [[image:CLI7aa.jpeg]] | ||
| − | |||
| − | |||
| − | |||
| − | |||
| − | |||
| − | |||
| − | |||
| − | |||
| − | |||
| − | |||
| + | [[image:CLI9a.jpeg]] | ||
| + | |||
| + | |||
| + | ''The following 7 climbs are on the next face to the E and are accessed by scrambling down through a gap in the clifftop about 30 m E of the fence and moving L (facing out) to reach a good ledge system well above the highwater mark. The buttress is characterised by several blocky overhangs.'' | ||
| + | 9. '''No Brakes.''' Diff. ''J. Byrne, J. Reville, G. Moss 26/7/12.'' | ||
| + | <br>This climb follows a line just left of the line of overhangs, to finish up via a notch in the skyline near the left edge of the face.<br><br>10. '''Carl's Magic Mackerel.''' M Severe. ''J. Reville, J. Byrne, G. Moss 26/7/12.''<br>Start just right of 7. Climb up through a gap in the overhang to gain, and follow, the crack in the upper face, 2m right of 7.<br><br>11. '''Gráinneuaile.''' Severe. ''G. Moss, J. Byrne, J. Reville 26/7/12.''<br>Start 3m right of 8, below a short, left facing corner capped by a blocky overhang. Climb the corner to the overhang, surmount this on good holds and continue straight up.<br><br>12. '''Two Car Family.''' Diff. ''G. Moss, J. Byrne, J. Reville 26/7/12.''<br>Start 3m right of 9, below a short right facing corner capped by an overhang. Climb up just right of the overhang and step left to a good ledge. Move a little left and finish up just left of a projecting block.<br><br>13.''' Go Explore.''' V. Diff. ''J. Reville, J. Byrne, G. Moss 26/7/12.''<br>Start 2m right of 10, below a line of sharp projecting blocks. Climb straight up over the blocks to the top.<br><br>14. '''Sucking Diesel.''' V.Diff. ''J. Byrne, J. Reville, G. Moss 26/7/12.''<br>Start 2m right of 11, below a wide crack 2m in from the right edge of the face. Climb straight up through the crack to the top.<br><br>15.''' Vantastic.''' V. Diff. ''G. Moss, J. Byrne, J. Reville 26/7/12.''<br>This climb follows the right edge of the face. | ||
| − | + | =='''Tón a Bhuaile'''== | |
| + | ==='''Inland Crag - L661-843'''=== | ||
| + | '''Approach.''' As for Arch Buttress. From there continue W, crossing a fence, a stream and another fence. Follow rising ground, with a fence on the L, and go through a wide gate. Drop down into a shallow valley, which contains the Inland Crag at its W end. | ||
| + | [[File:IC.jpg|center|thumb|650x650px]] | ||
| − | + | 1. '''Maithe Cailín'''. V. Diff. C. McGovern, G. Moss 5.6.22 | |
| + | Start 4m R of the L edge of the crag, at the foot of two stacked blocks and directly under a notch in the skyline From the top of the blocks step onto the face and move up, stepping L at half-height and then climbing diagonally R to finish at the highest point. | ||
| + | 2. D. Walsh, C. Duffy, 5.6.2022 V. Diff. | ||
| + | Start from a small block and climb the crack above that runs continuously lower left crag to top left. | ||
| − | + | 3. '''Climb4Cian'''. V. Diff. C. McGovern, G Moss, 5.6.22 | |
| − | |||
| − | |||
| − | |||
| − | |||
| − | |||
| − | |||
| − | |||
| − | |||
| − | |||
| − | |||
| − | |||
| − | |||
| − | |||
| − | |||
| − | |||
| − | |||
| − | |||
| − | |||
| − | |||
| − | |||
| − | |||
| − | + | Start just over 2m R of Rte.1, directly below a small but obvious V formation at half height. Climb directly to the V and straight on up. | |
| − | + | 4. D. Walsh, C Duffy, 5/6/2022 V. Diff | |
| − | |||
| + | 5 C. Duffy, D. Walsh, 5.6.2022 V. Diff. | ||
| + | ==='''Tón a’Bhuaile''' '''East Crag'''. L662-842=== | ||
| + | [[File:TonaB.jpg|thumb|alt=|center|500x500px]] | ||
| + | Approach. From the inland crag walk directly S to an arch giving access to the area known as Broad Table. Before crossing the arch a prominent L-facing corner can be seen to the E (L facing out). This provides the following climb. | ||
| − | + | '''Ni crack Cuinne é''' : 25m VS4c+ P O'Brien, B. Walker, 5-6-22. | |
| + | Scramble to tidal ledge at base of cliff about 80m east of arch. Start 2m left of the obvious L-facing corner on smooth wall. A small wire placement can be made about 5m up from the tidal ledge. At wire placement move R into the corner and climb to top. The crack in the corner allows for some finger layback but blanks out in places. Difficulties ease about 5m from the top.[[File:CI2.jpg|thumb|Ní crack cúinne é|alt=|center|600x600px]] | ||
| + | '''Broad Table Outer''' L661-841 | ||
| − | + | Approach. As for N ''crack cúinne é, c''ross southwards over the Arch then there is an easy scramble to get to the top of the wall. Access point to the foot of the routes is via abseil, easily rigged slings on large boulders. | |
| − | |||
| − | |||
| − | |||
| + | 1. '''Sea Campion'''. V. Diff. T Nairn, P O'Brien, A Spînu, 5/6/2022. | ||
| + | The route straight forward, just right under the abseil point. Cams are useful for protection in the cracks (middle of the route). Careful with slippery plants on the rock. Use abseil point for anchors. | ||
| − | + | 2. '''The Fern.''' Severe A Spînu, P O'Brien, T. Nairn, 5/6/2022. | |
| + | The route is to the left of the abseil point and Sea Campion, following a zigzag rock formation. Good protection in horizontal cracks.[[File:Andrea2.jpg|thumb|alt=|center|888x888px]] | ||
| + | [[File:Andrea1.jpg|thumb|alt=|center|533x533px]] | ||
| + | ===='''Uaiche Mhiley''' L659-84==== | ||
| − | + | # | |
| − | + | Approach. As for the Inland Crag. From here continue contouring West, cross a fence and follow a low wall, which is less than 1m high and without a fence, as it slopes downward. Cross this near its lowest point and scramble down to reach a broad platform, from where the climbs start. | |
| − | Start | + | '''Aoife’s Challenge.''' V.Diff. C. McGovern, G. Moss. 6/6/22 Start near the L end of the platform., below a series of shallow overlaps. Climb directly up through these, on good rock but with widely spaced protection. |
| − | J. | + | #[[File:Aoife.jpg|thumb|alt=|center|667x667px]]'''Samphire Switch''' V.Diff. J. French, C. Duffy, 6/6/22. Up the main main crack staying on the more blank, less chossy rock to the side.[[File:Samphire switch.jpg|center|thumb|645x645px]]'''Flaky Finish''' V. Diff C. McGovern, G.Moss. 6/6/22 Start. At the foot of a deep crack, just R of a pale section of softer rock. Follow the line as far as a clear turn towards the left.. Note the rock is flakey from this point to the finish however good protection is available. [[File:FlakyFinish.jpg|thumb|alt=|center|1110x1110px]] |
Latest revision as of 13:14, 16 October 2023
Maps: O.S.I. 30 or, for more detail, Achill & Corraun - Clare Island, by EastWest Mapping.
Getting to the Island There are two ferry companies serving the island. See Clareislandferry.com & Clareislandfastferries.com for details of sailings and fares.
Accommodation. You have a choice. Less than five minutes walk from the landing pier, and directly above the blue flag beach, is the island's only campsite. Small and basic, campers have the use of the community centre's toilets, wash-hand basins and coin-operated showers, located just 50m from the campsite. There is also a hotel, Go Explore, plus several B&B's and apartments to rent. See Clare Island.ie/accommodation.
Getting around the island. You can walk, hire a bike (or bring your own) or, if there is a group, hire the island's only minibus. The nearest crag to the harbour is a 5k road walk away.
Note. All of the following crags are on land belonging to the owners of Cois Abhainn, a B&B located at the very end of the road leading W from the harbour. Seek permission from them before entering on the lands. Contact them at 098 26216 or call up to the house and then return back down the road to a gate (The Gate L670 844)) on the seaward side of the road, at a dip in the road and a stream, about 50 m below the road's only cattle grid.
The climbing areas are described from East to West, the routes described from L to R facing the rock.
Scardóg L673-841
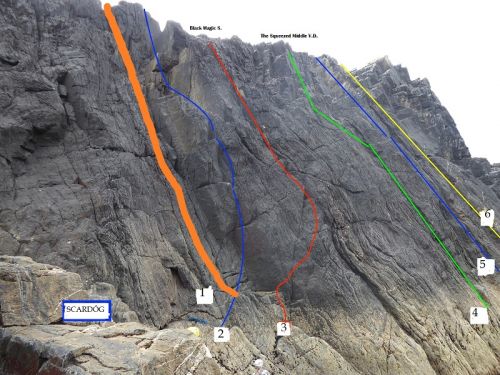
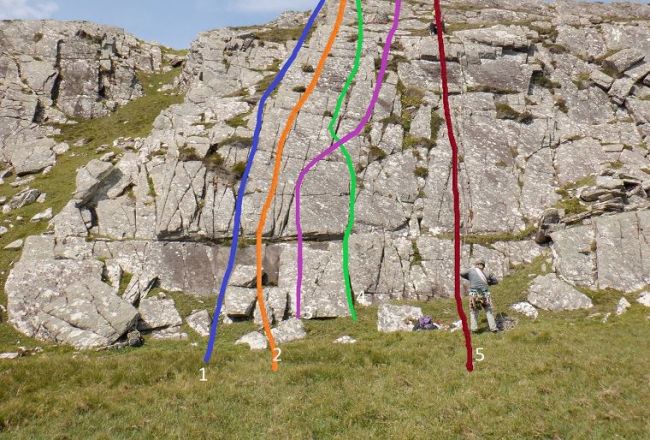
From The Gate, while keeping the fence on your right, follow it down and left for about 300m. Cross the fence at this point and go down over rock until Scardóg, a clean, black, NW facing 20m slab, comes into view. Scramble down to the bottom of either side of the slab. The climbs are described L to R facing the rock.
The first 3 climbs start from the bottom L of the slab, the remaining 3 from the bottom R.
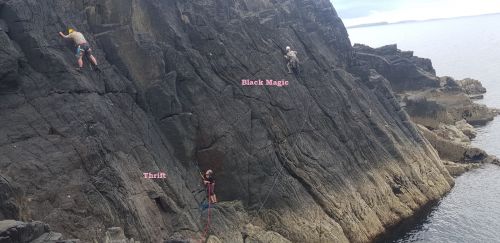
The Thrift. V. Diff. D. Walsh, Andrea Spinu, Tim Nairn
Left of the main slab is a narrower slab, with a left facing corner with a crack on its right, and another crack 2m to its left.
Start. From the same stance as for Car Rose, Climb between the two cracks.
Car Rose HS. P. O’Brien, G.Moss 3.6.2022
From a stance, at the bottom L of the slab move up R and climb the steep left facing blocky corner that borders the left edge of the slab.
Black Magic S. G.M., P.O’B. 23/6/22.
Start at the bottom L of the slab. Travers delicately and diagonally R for 5m to reach a crack. Climb this to the top.
The next 3 climbs start from a ledge at the bottom R of the slab
The Squeezed Middle V. Diff. G.M. D.W., P.O’B 23/6/22
Start at the bottom R of the slab. Traverse horizontally L crossing the lines of First Crack and Any Crack? to reach a continuous crack near the centre of the slab.. Follow this to the top.
Any crack? V. Diff. DW P.O’ B., G.M 3.6.2022
Start as for First Crack Traverse 3m left, and climb the bottom to top crack on left of quartzite markings.
First Crack. V. Diff. P. O’B, G.M 3.6.2022.
Step left around the corner on the extreme right of the slab and climb the bottom to top crack immediately above.
There is scope for more routes immediately W of the slab.
Craigmore Area
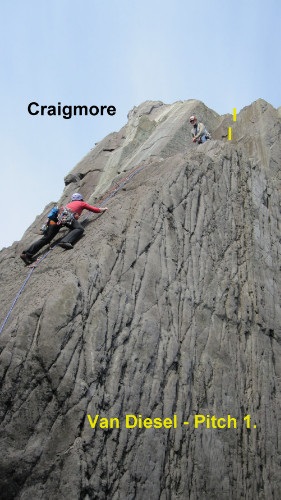
Approach Go through the gate and, keeping to the L of the fence, follow it down, passing a junction with another fence . Cross the fence here and continue east for a short distance, until it is possible to scramble down to sea level. There is much yet to be done here. The first route follows a dark, narrow, undercut slab just above the high water mark.
14. Van Diesel. HS 4b. Climbed in two pitches to avoid rope drag.
J. Reville J. Byrne G. Moss 25/7/12.
1. Gain the slab from the L and climb it to a broad platform.
2. Move back to the juggy corner behind and climb it.
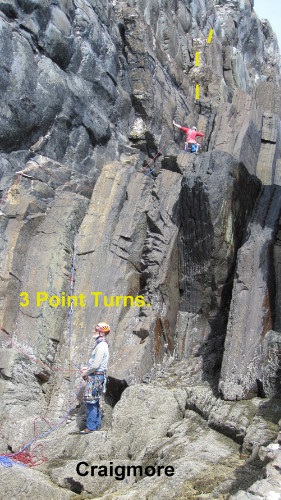
15. Three Point Turns. Severe.
J. Byrne, J. Reville, G. Moss 25/7/12.
This climb is found at the foot of a series of corners around to the E of 14. Start at the foot of a biscuit-coloured corner just left of a dark overhang. Climb the corner to a good ledge and continue up to finish through a break in the skyline.
Toormore
Approach.
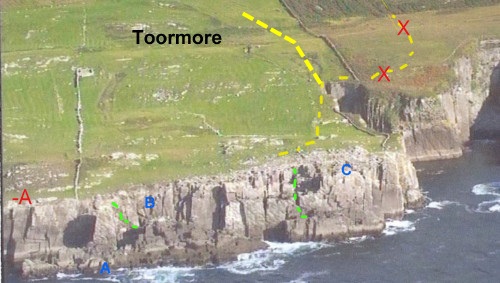
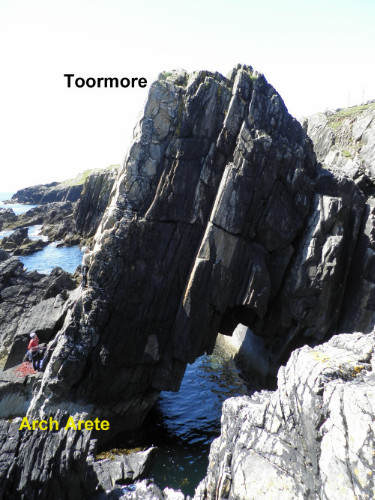
From The Gate, follow the fence down to a junction with another fence on the R. Cross here and follow this fence to a junction with another fence running down from the road. Cross here and go down over grass to the cliff top to a point above the prominent arch - Arch Buttress. The following areas are described in relation to the arch.
Kernan's Corner Wall; Arch Buttress Wall W; Arch Buttress; Arch Buttress Wall E; Choc-a-bloc Wall.
A minus = Kernan's Korner Wall, A = Arch Buttress, B = Arch Buttress Wall, C = Choc-a-Block Wall.
Kernan's Korner Wall
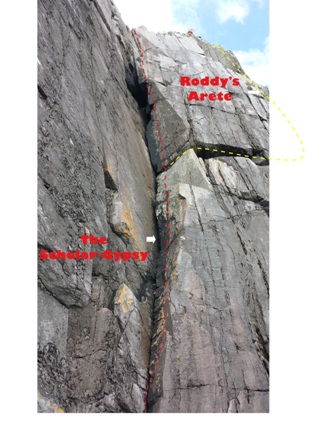
50m west of Arch Buttress (and across another fence!) is a 20m wide Wall with a platform 3m above above high tide mark.
1. The Scholar-Gypsy Diff. 15m
P. Herbert, H. Olsson 06/07/14
From east end of platform, follow continuous crack in groove to the top.,
2. Roddy's Arête Diff. 18m
P .Herbert, H. Olsson 06/07/14
Start as for The Scholar-Gypsy and at 10m step out right on good hand and foot placements to small ledge on arête, continue up the arête or step right onto face to finish.
Scope for more routes on this wall.
Arch Wall West L665-842
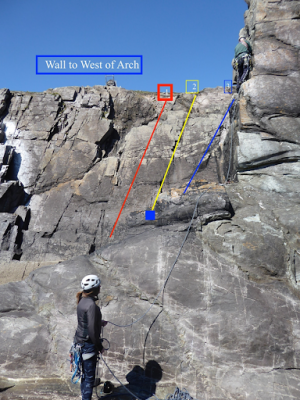
Immediately W of the Arch, between it and a fence, lies a smooth wall, only the E side of which is developed because of birds nesting to the W. Climbs are described L to R, and all start on a high-water platform reached by abseil.
1 Avian Anger VS4b 15m P. O’Brien, D. Walsh 6.6.2022
Start as for route 2, moving with difficulty up and L until a horizontal weakness yields holds, protection, and nice climbing all the way to the top.
2. Seaga Ciúin. V. Diff 15m D. Walsh, P. O’Brien 6.6.2022
Climb the bottom to top crack up the right side of the wall, up and slightly rightwards. Best moves at the top. Lovely.
3 Corner Boy V. Diff 12m D. Walsh, P. O’Brien 6.6.2022
Separated from the smooth wall by a ramp is a stepped square shaped corner that provides one nice move right at the top.
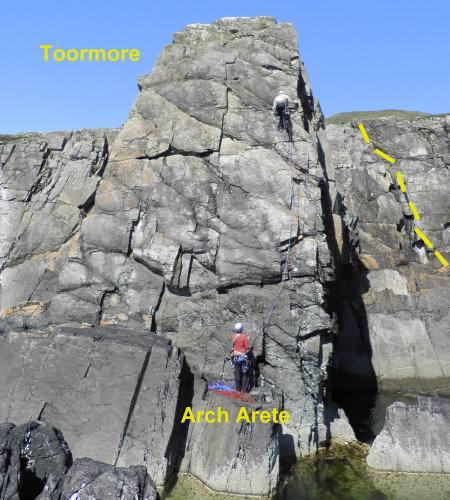
Arch Buttress L665 842.
These routes are on the buttress with the prominent arch, almost directly below the end of the fence. Access is gained by scrambling halfway down the sloping ramp which starts a few m. E of the fence, stepping across the narrow channel (easier at low tide), and scrambling up and back right to reach the foot of the seaward face.
1 Arch Rivals. Diff. G. Moss, C. McGovern. 4/6/22
The L edge of the face.
2. Arch Central, 15m VD, P O'Brien, A Spinu, T Nairn. 4-6-22
Start at the base centre of the face and climb up the middle of the wall to the top.
3. Arch Arete. V. Diff. G.Moss, J.Byrne., J.Reville. 26/7/12.
The R arete of the face of the buttress.
Arch Wall East.
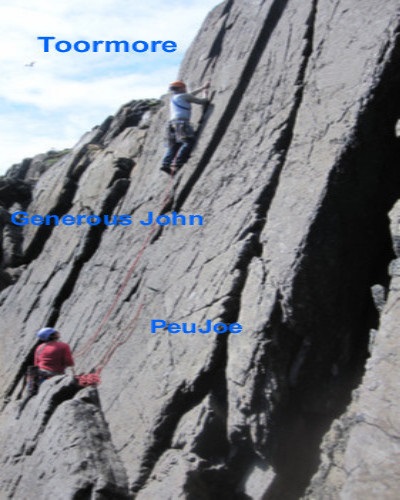
The next five routes are on the wall immediately East of Arch Buttress and are reached by scrambling down the sloping ramp mentioned above. The climbs are described from left to right
2. Generous John. V. Diff. J. Reville, J. Byrne, G. Moss 26/7/12.
The left-hand and narrower of two cracks near the bottom of the sloping ramp.
3. PeuJoe V. Diff. J. Byrne, J. Reville, G. Moss 26/7/12.
The righthand and deeper of the two cracks near the bottom of the ramp.
4. Pulpits V. Diff. D. Walsh, C. Duffy 4.6.2022
Start as for PeuJoe and climb the shallow groove directly above, passing the large overhang on the right. The protection gets sparse with height but the holds keep coming.
5. Ripple Arete. Severe B. Walker, W. Blanchfield. . 4.6.2022
Climb the rib immediately on the right of Pulpits. Crux at top.
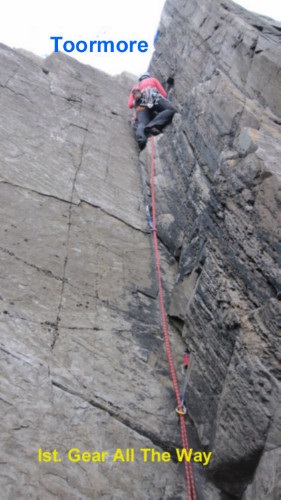
The next 4 routes are reached by scrambling down to the bottom of the ramp and stepping across a gap to reach a ledge at the foot of a prominent left facing corner.
5. First Gear All The Way. V.Diff. J. Byrne, J. Reville, G. Moss 27/7/12.
Climb the continuous crack L of the corner.
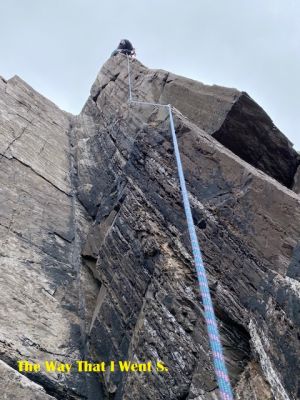
6. The Way That I went. S.(see photo) G.M. C. McG. 6/6/22
Start. As for First Gear All The Way. Move up R and follow a line just L of the arête, stepping R onto the arête for the final few moves, to belay at a large, jammed block. Unprotected on the upper half.
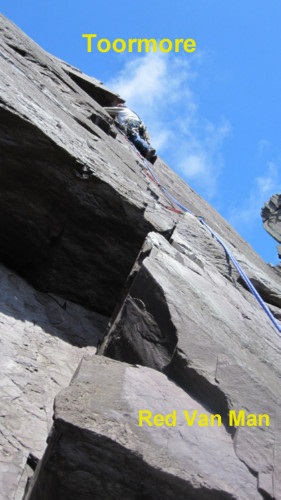
7. Red Van Man. HS 4b. J. Reville, J. Byrne, G. Moss 27/7/12.
Start as for 6. Step out right and climb the crack just R of the overhang, moving back left beneath the small overhang higher up the face.
8. The Pirate Queen. HS 4b. G. Moss, J. Reville, J. Byrne 27/7/12.
Start as for 6 Hand traverse horizontally R along a thin crack and step up to a good ledge. Climb the thin crack above the right hand end of the ledge, finishing over jammed blocks.
Choc-a-Block Wall
The following 7 climbs are on the next face to the E and are accessed by scrambling down through a gap in the clifftop about 30 m E of the fence and moving L (facing out) to reach a good ledge system well above the highwater mark. The buttress is characterised by several blocky overhangs.
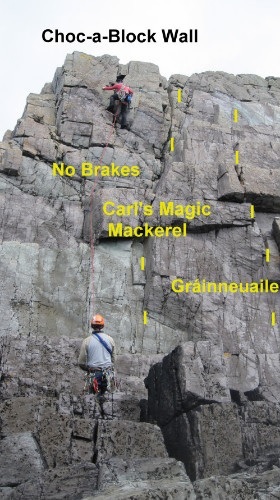
9. No Brakes. Diff. J. Byrne, J. Reville, G. Moss 26/7/12.
This climb follows a line just left of the line of overhangs, to finish up via a notch in the skyline near the left edge of the face.
10. Carl's Magic Mackerel. M Severe. J. Reville, J. Byrne, G. Moss 26/7/12.
Start just right of 7. Climb up through a gap in the overhang to gain, and follow, the crack in the upper face, 2m right of 7.
11. Gráinneuaile. Severe. G. Moss, J. Byrne, J. Reville 26/7/12.
Start 3m right of 8, below a short, left facing corner capped by a blocky overhang. Climb the corner to the overhang, surmount this on good holds and continue straight up.
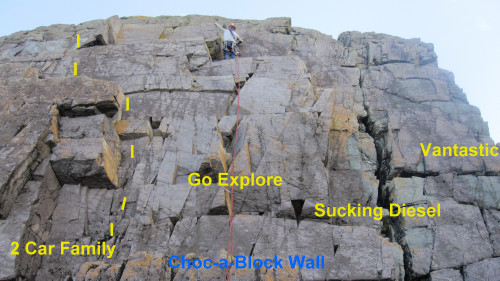
12. Two Car Family. Diff. G. Moss, J. Byrne, J. Reville 26/7/12.
Start 3m right of 9, below a short right facing corner capped by an overhang. Climb up just right of the overhang and step left to a good ledge. Move a little left and finish up just left of a projecting block.
13. Go Explore. V. Diff. J. Reville, J. Byrne, G. Moss 26/7/12.
Start 2m right of 10, below a line of sharp projecting blocks. Climb straight up over the blocks to the top.
14. Sucking Diesel. V.Diff. J. Byrne, J. Reville, G. Moss 26/7/12.
Start 2m right of 11, below a wide crack 2m in from the right edge of the face. Climb straight up through the crack to the top.
15. Vantastic. V. Diff. G. Moss, J. Byrne, J. Reville 26/7/12.
This climb follows the right edge of the face.
Tón a Bhuaile
Inland Crag - L661-843
Approach. As for Arch Buttress. From there continue W, crossing a fence, a stream and another fence. Follow rising ground, with a fence on the L, and go through a wide gate. Drop down into a shallow valley, which contains the Inland Crag at its W end.
1. Maithe Cailín. V. Diff. C. McGovern, G. Moss 5.6.22
Start 4m R of the L edge of the crag, at the foot of two stacked blocks and directly under a notch in the skyline From the top of the blocks step onto the face and move up, stepping L at half-height and then climbing diagonally R to finish at the highest point.
2. D. Walsh, C. Duffy, 5.6.2022 V. Diff.
Start from a small block and climb the crack above that runs continuously lower left crag to top left.
3. Climb4Cian. V. Diff. C. McGovern, G Moss, 5.6.22
Start just over 2m R of Rte.1, directly below a small but obvious V formation at half height. Climb directly to the V and straight on up.
4. D. Walsh, C Duffy, 5/6/2022 V. Diff
5 C. Duffy, D. Walsh, 5.6.2022 V. Diff.
Tón a’Bhuaile East Crag. L662-842
Approach. From the inland crag walk directly S to an arch giving access to the area known as Broad Table. Before crossing the arch a prominent L-facing corner can be seen to the E (L facing out). This provides the following climb.
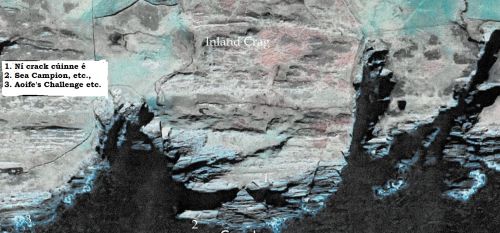
Ni crack Cuinne é : 25m VS4c+ P O'Brien, B. Walker, 5-6-22.
Scramble to tidal ledge at base of cliff about 80m east of arch. Start 2m left of the obvious L-facing corner on smooth wall. A small wire placement can be made about 5m up from the tidal ledge. At wire placement move R into the corner and climb to top. The crack in the corner allows for some finger layback but blanks out in places. Difficulties ease about 5m from the top.
Broad Table Outer L661-841
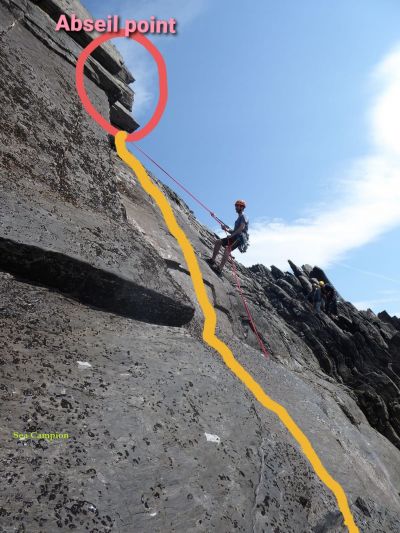
Approach. As for N crack cúinne é, cross southwards over the Arch then there is an easy scramble to get to the top of the wall. Access point to the foot of the routes is via abseil, easily rigged slings on large boulders.
1. Sea Campion. V. Diff. T Nairn, P O'Brien, A Spînu, 5/6/2022.
The route straight forward, just right under the abseil point. Cams are useful for protection in the cracks (middle of the route). Careful with slippery plants on the rock. Use abseil point for anchors.
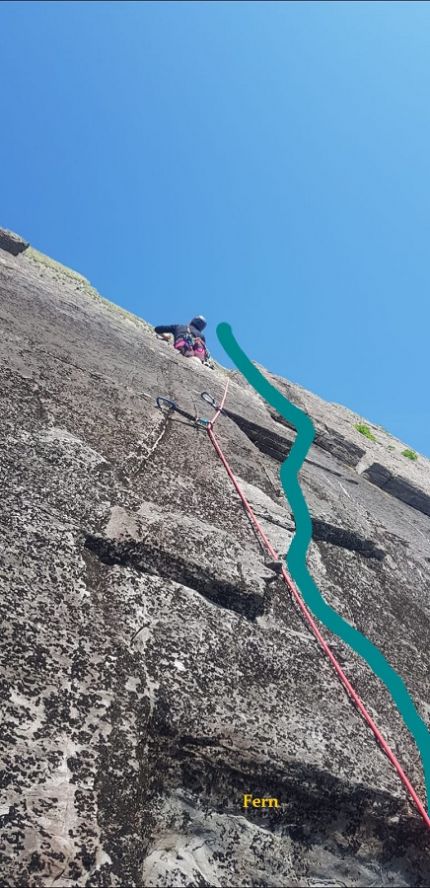
2. The Fern. Severe A Spînu, P O'Brien, T. Nairn, 5/6/2022.
The route is to the left of the abseil point and Sea Campion, following a zigzag rock formation. Good protection in horizontal cracks.
Uaiche Mhiley L659-84
Approach. As for the Inland Crag. From here continue contouring West, cross a fence and follow a low wall, which is less than 1m high and without a fence, as it slopes downward. Cross this near its lowest point and scramble down to reach a broad platform, from where the climbs start.
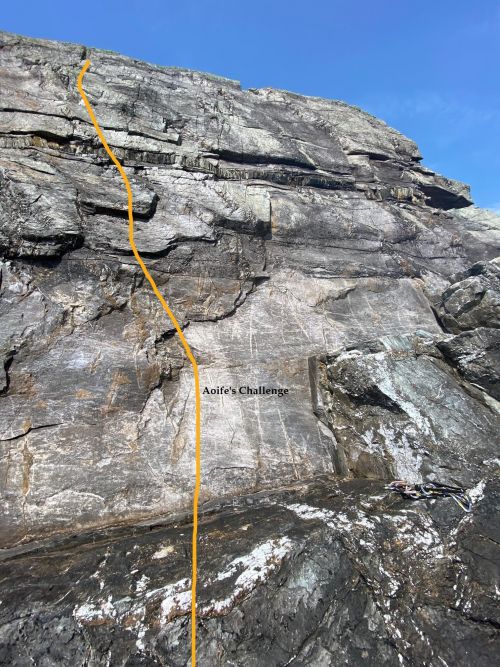
Aoife’s Challenge. V.Diff. C. McGovern, G. Moss. 6/6/22 Start near the L end of the platform., below a series of shallow overlaps. Climb directly up through these, on good rock but with widely spaced protection.
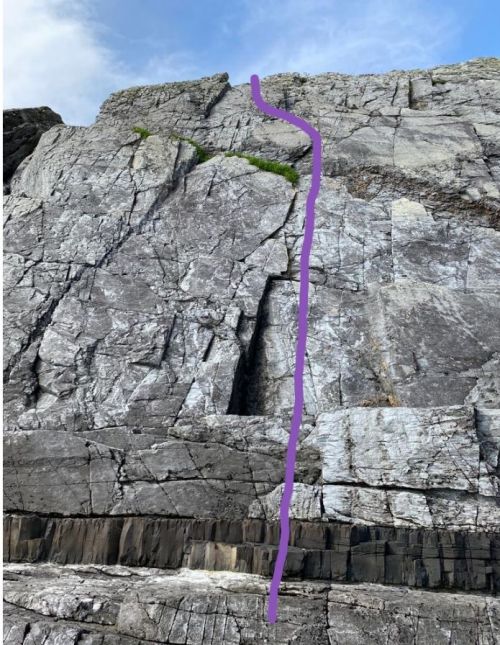
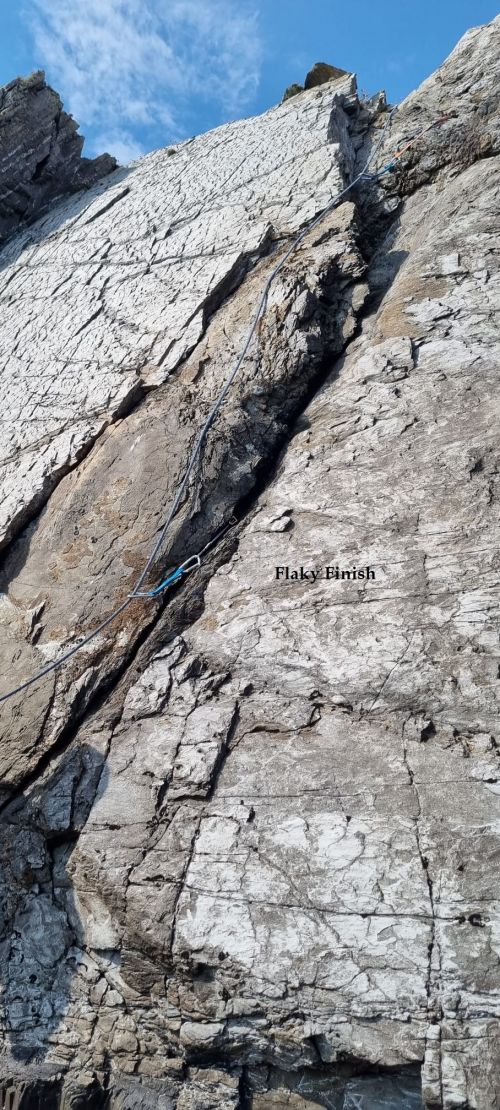
- Samphire Switch V.Diff. J. French, C. Duffy, 6/6/22. Up the main main crack staying on the more blank, less chossy rock to the side.Flaky Finish V. Diff C. McGovern, G.Moss. 6/6/22 Start. At the foot of a deep crack, just R of a pale section of softer rock. Follow the line as far as a clear turn towards the left.. Note the rock is flakey from this point to the finish however good protection is available.
