Bray Head
Printed guidebook available here
Selected climbs on Bray Head.
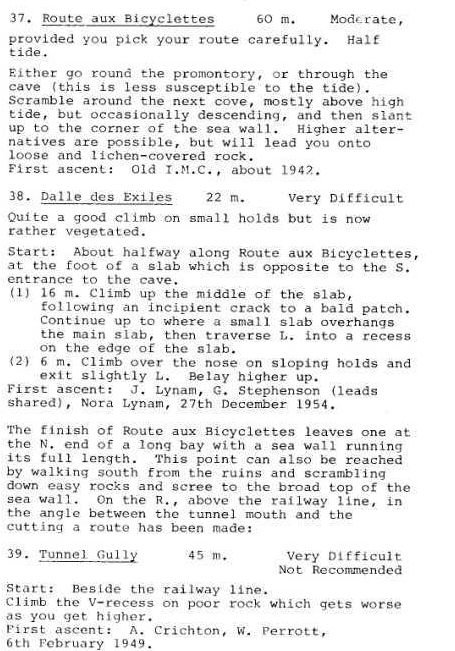
The cliffs below Bray Head (O290 156) provide a pleasant introduction to sea cliff climbing and all that it entails: abseil approaches, tidal belays; etc. They are modest in height and difficulty - nothing higher than 28m or harder than 5a. The rock is slate, smooth and hard with sharp holds, providing good friction when dry, but very slippery and best avoided when wet. The benign influence of the sea ensures that temperatures never drop too low and the fact that this stretch of coastline is very sheltered, being protected by Bray Head from the westerly winds, makes climbing here possible throughout the winter. It is not the place to be, however, when the winds are coming from the east or north-east.
The best time to visit the cliffs is at low tide, though many of the climbs can be done at all states of the tide. The national newspapers publish tide tables, giving up-to-the-minute information on the times of high tides all around our coast or you can check on the web.
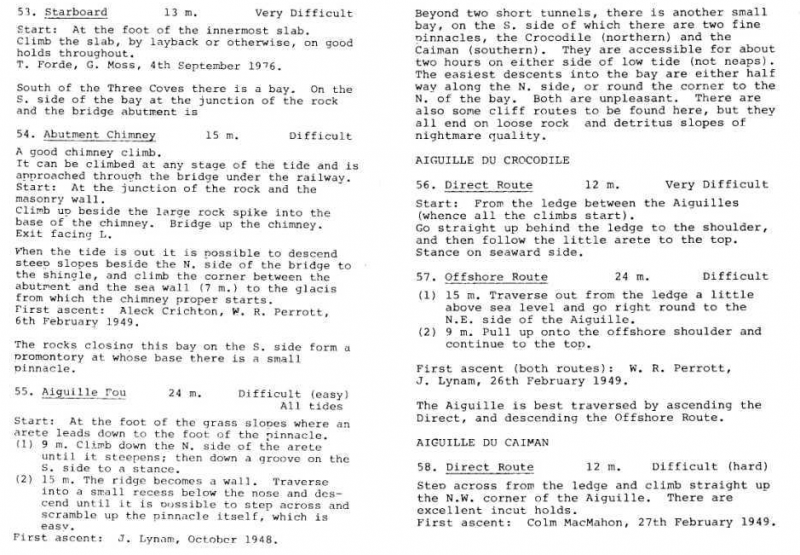
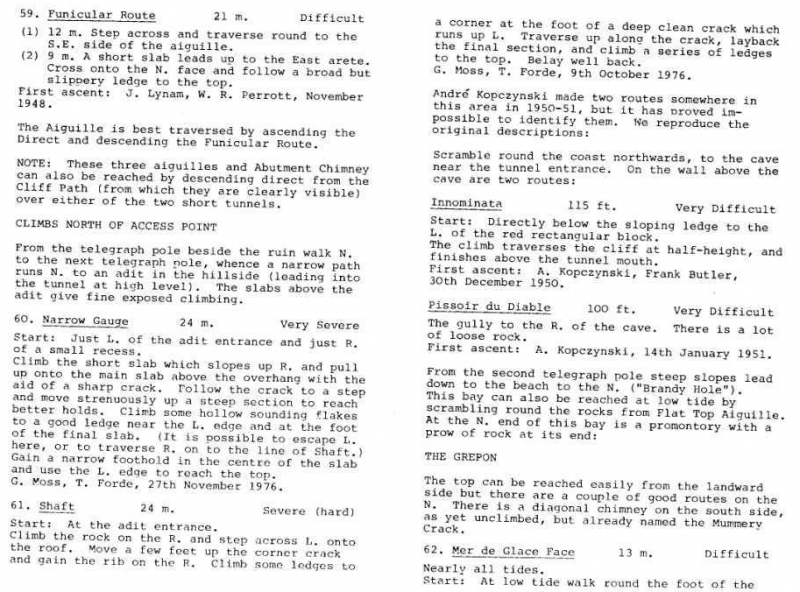
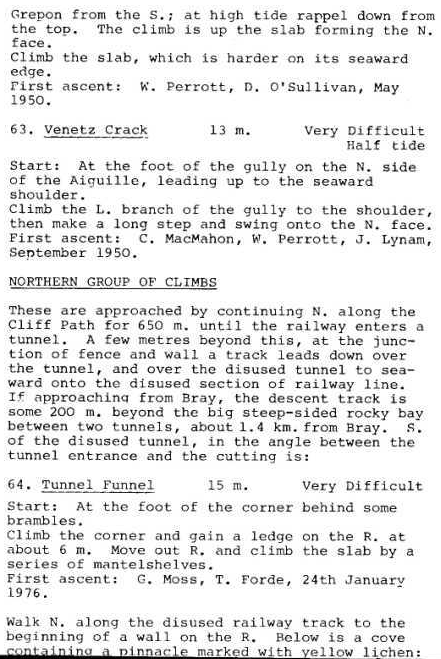
There have been many changes in the Bray area since the last Bray Head guide was published in 1978. A huge increase in the population of Bray and North Wicklow, coupled with an upsurge of interest in leisure walking, has led to large numbers using the Cliff Path on a daily basis, making the climbs immediately above the Path unfeasible. In addition, the extension of the DART service to Greystones has greatly increased traffic, and security, on the section of the railway line running below Bray Head, with the result that many of the climbs on the cliffs below the line are now out of bounds. However, the two areas detailed here, Cable Rock and Streaky Slab, have no access problems, as they can be reached without trespassing on the line. We have listed only the more popular climbs in these two areas; routes that have been climbed frequently over the years and have stood the test of time. Full details of all the climbs on Bray Head can be found in the Bray Head guide book, published by the F.M.C.I. in 1978 and copies of this are included below.
Acess by public transport.
All the climbs are accessed from The Cliff Path, which runs along the coast, above the railway line, from Bray to Greystones. The Path starts at the southern end of Bray Esplanade (twenty minutes walk from Bray DART station, or five minutes from the terminus of the 45 bus route). From here a pleasant walk of about twenty minutes will bring you to Streaky Slab, while the gate for Cable Rock is a further ten minutes along the Path
Access by car
Traveling south on the M11/N11, ignore the turn-offs for Bray and take the turn off signposted Greystones. Take the Greystones exit on the next two roundabouts. Immediately after cresting the long hill (Windgates), take the turn on the left, which ends at a private car park fronting some new houses, Turn here and drive back up the road a short distance, to where there parking is possible against the hedge on the left. Walk down past the houses, cross the stile, and follow the track down to the Cliff Path (5 minutes). This point on the Path is a 30 minute walk from the southern end of Bray promenade, or a 15 minute walk from Windgates, which is on the No.84 (Dublin/Delgany) bus route. Turn right for Cable Rock, or left for Streaky Slab.
The climbs, and the climbing areas, are described from left to right (south to north).
Cable Rock
From the stile mentioned above walk to the right (south) for a few metres and go through the gate in the fence on the left (the gate is now flat on the ground, smothered in grass), following a narrow path down towards the sea (watch out for the two narrow dykes en route). After passing through a patch of furze watch out for the stump of a telegraph pole and, on your left, the top of a rusty bracket sticking up above the top of the cliff.
Cable Rock has two sections; Bracket Slabs and The Pulpit Area and access to both is by abseil.
The Pulpit
For The Pulpit area continue along the faint path beyond the pole stump for about 50m, to where the rocky top of the cliff is visible down below on the left. Go down carefully over steep grass and rock to the top of the cliff and locate a prominent, flat-topped buttress rising almost halfway up the slabs below. This is The Pulpit and the first climbs start from here. The rock in this area is of excellent quality, though the rounded footholds require competent footwork. To reach the Pulpit either abseil down the short groove (the Gangplank, Moderate) or climb down it.
Pulpit Area
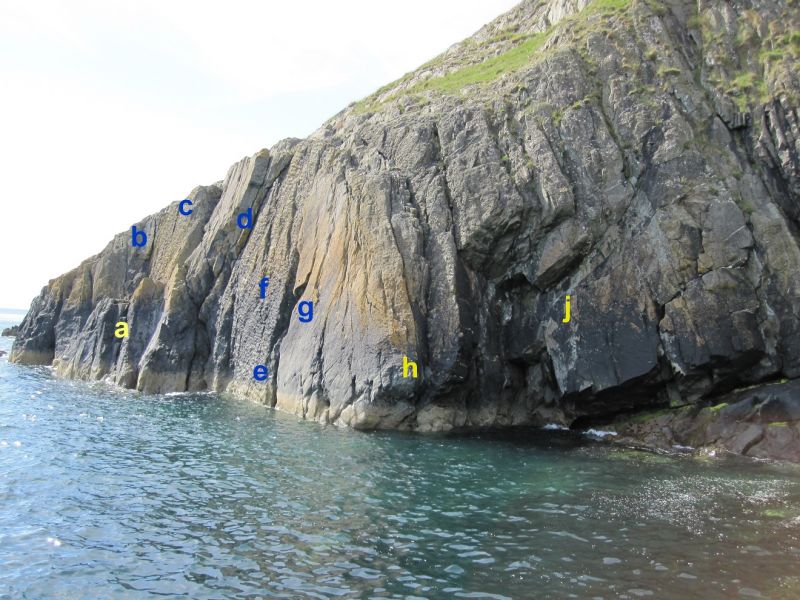
A = The Pulpit. B = Cockle. C = Scallop. D = Puffin. E = Barnacle. F = Carrageen. G = Are You With Me? H = Crab. J = Blackbottom.
Winkle-picker. 19m S (3c)
Just left of the Pulpit an obvious wide crack runs up the easy-angled slabs. This is the line of Cockle and about 2m left of this is a groove, partly hidden from view. The climb follows this groove. Start from the Pulpit. Climb down the steep left-hand side of the Pulpit and step across to the base of Cockle crack. A little above the high-water mark a thin crack runs across left towards the groove. Traverse delicately along this and make a long step left into the base of the groove. Climb this to the top.
G. Moss, T. Forde, 2/11/1975
Cockle. 18m D
Half tide only. Start from the Pulpit. Climb down the steep left-hand side of the Pulpit and step across to the base of the crack. Climb this. There is another route starting in a separate crack system just to the right of Cockle. This route was climbed on the same day as Cockle but was never recorded for some reason. Well worth doing. Climb the crack easily to the base of an obvious flake. Ascend the flake to top. V.Diff.
G. Moss, T. Clancy 21/9/1974
Scallop** 15m HS (4b)
A narrow chimney separates the left side of the Pulpit from the slabs. A thin, intermittent crack starts near the base of the chimney and runs up the steep slab to a little notch at the top. This is the line of Scallop.
Climb down the steep left-hand side of the Pulpit and move into the base of the short chimney. Gain the crack and climb it. Protection adequate, though it needs careful placement. At full tide, or when heavy seas are running, the crack can be reached by a delicate traverse left from the Pulpit platform.
G.Moss, T. Forde, 8/11/1975.
SCALLOP HS 4b
The Gangplank 10m M
The easy angled crack in the groove above the Pulpit. Either back-climb it or abseil down it to reach the Pulpit.
OYSTER. 12m S )
Start from the Pulpit. Climb diagonally right up the black slab to the right of The Gangplank to a horizontal crack. Make a delicate step across right to a small spike and follow the thin crack on small holds.
G.Moss, T. Forde, 24/8/1976
LOBSTER 13m S (4a)
Start from the Pulpit. Move across right to the foot of a narrow slab with an overlap and thin crack on it's left. Climb the narrow slab until it is possible to step across right (crossing the line of Puffin) onto the main slab, below a flake-crack sloping up right. Layback the flake to the top.
T. Forde, G. Moss, 31/8/1976.
PUFFIN* 18m HS (4b)
Scramble down the right-hand side of the Pulpit, and step right into a groove. Climb this to the base of the deep crack. Climb the crack, moving left into a groove near the top. Large hexes or friends useful.
G. Moss, T. Forde, 12/10/1974.
RULE THE WAVES. 15m HS (4b)
Scramble down the right-hand side of the Pulpit and move right across the groove to the foot of the steep, dimpled slab. Climb this, trending slightly right near the top. Sparse Protection.
G.Moss, P. Britton 5/10/1985.
Carraigeen* 18m HS (4b)
About 8m right of the Pulpit a narrow chimney runs straight up the slab from the sea. This is the line of Barnacle, and the climb starts from it's base.
Start from a nut belay at the base of the chimney, reached by abseil. The belay point varies with the state of the tide. Climb diagonally left across the slab to gain a crack which runs up diagonally left. Follow the crack to finish up via the flake as for the finish of Lobster.
G. Moss, T. Forde, 8/3/1975.
Thoughts from the Glans. 12m S (4a)
Start as for Carrageen. Climb up the grey slab a little left of the chimney, on rounded holds, to reach left-trending crack. Pass the left side of a bulge and climb direct to the top on good jugs.
M. Tracey, July, 1992.
Barnacle* 12m VD
Start As for Carrageen. Climb the chimney .
G. Moss, T. Forde, 12/10/1974.
ARE YOU WITH ME** 14m HVS (5a)
Start As for Carrageen. Step out right and climb onto small overhanging block. Make a bold move out right and mantelshelf up onto ledge (crux). Good flake hold about 1.5m right of the overhanging block. Climb left-trending crack to top on good holds (small wires useful for protection).
Mick Tracey, July 1992
Hornblower's Crack. 14m VS (4c)
Start about 4m right of Barnacle chimney, on a short ramp just above the high tide mark. Climb slightly left into recessed crack, which is left trending (crux). Follow the obvious line to the top.
M. Tracey July 1992.
Crab. 12m D
Useful for starting Mammary Gland. 5m right of Barnacle there is an easy angled chimney with a steep undercut base, this is the line of Crab.
Abseil down to a nut belay in the base of the chimney. Climb the chimney.
G. Moss, T. Forde, 22/3/1975.
Mammary Gland 15m HVS (5a)
Low tide only. After a difficult start it joins Thunderbolt at half-height.
Start As for Crab, at the very bottom of the chimney. Make a difficult traverse right from the base of Crab to a small ledge. Climb right up the crack above, tricky to start with, but easing with height.
J. O'Reilly, P. Owens, D Whooley, Nov. 1990.
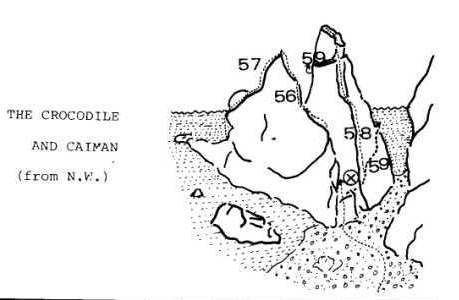
Bracket Slabs
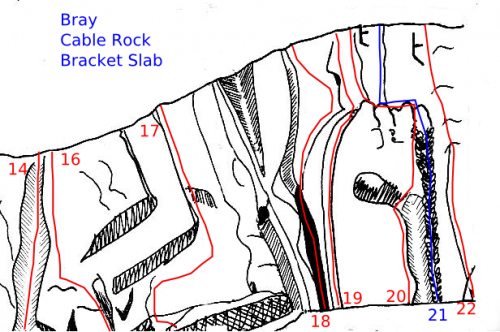
For Bracket Slabs, you need to locate the boulders, with several pitons in situ (check their condition before using them), two meters in from the edge of the cliff and opposite the obvious brackets jutting out from just below the top of the cliff. An abseil of 25 meters from the edge of the cliff, down between the two brackets, following the obvious groove of Cricklewood, will land you on The Slipway. Unless you are leaving the rope in situ you will need to extend the anchor point to the edge of the slab, otherwise the rope may not pull down.
NOTE: The easiest line back up from here is Cricklewood, at mild severe (harder in wet conditions).
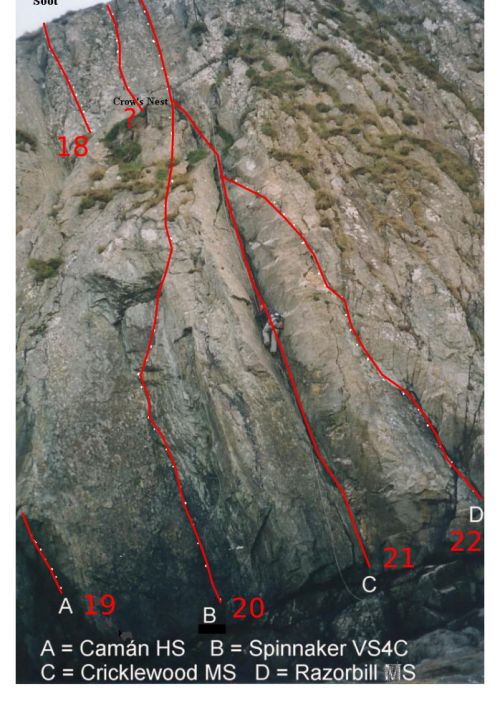
From the base of Cricklewood a sloping shelf - The Slipway - runs down along the foot of the slabs to the sea-floor. Immediately left of Cricklewood is a fine lichen-spotted slab, with a thin crack running up it's right-hand side to an overhang: this is Spinnaker. Left of Spinnaker a narrow, bow-shaped slab gives the line of Camán, and immediately left of this is a constricted chimney - Tough Soot. The corners down to the left of this have been climbed, but in recent years they have become very vegetated on the upper section, due to soil slippage, and are no longer feasible. At the foot of the Slipway is Black-Bottom, a large, black, undercut slab with a crack running across it's lower section and an overhang on the top left.
Thunderbolt VD
Low tide only. Start in the corner below and left of the bottom of the Slipway, to the left of Black-Bottom slab. Climb up to reach the right end of a horizontal crack. Move out along this and up to a second crack. Continue easily to the top.
G. Moss, T. Forde 15/3/1975
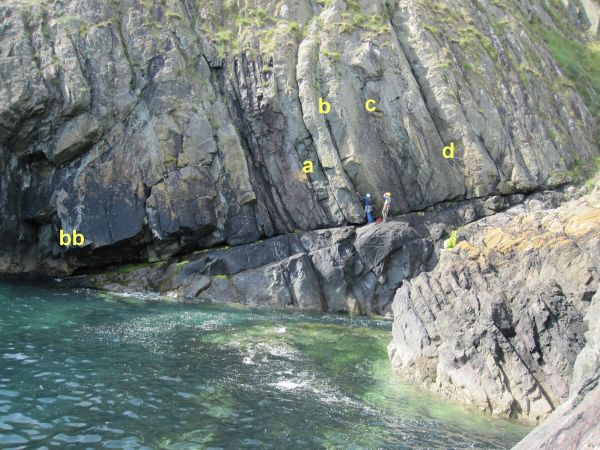
The Slipway. bb - Blackbottom VS. A - Toughsoot HVS. B - Camán HS. C - Spinnaker VS. D - Cricklewood MS.
Black-bottom 20m VS (4c)
Low tide only. (poor protection). Start by scrambling carefully down to reach an oblong, seaweed-covered block at the bottom of the Slipway. Step off the block onto the slab and move left to a niche at the foot of the vertical crack. Climb the crack until it fades out below the overhang. Make a couple of difficult moves right to gain good holds and climb diagonally right to the top of the slab. Pull up over the overhanging corner and follow the groove up left to a belay.
G. Moss, T. Forde, 15/3/1975
Tough Soot 28m HVS (5a, 4c)
Low to half-tide Start from the Slipway, at the foot of a narrow chimney, just left of Camán.
1. 18m Climb the chimney and the corner above to a block belay just below the left edge of The Crow's Nest.
2. 10m (delicate and unprotected originally, this pitch has recently been equipped with pitons). Climb the green slab above, starting at the bottom right and finishing on the top left or, if preferred, climb the 2nd pitch of Camán).
G. Moss, T. Forde, 20/3/1976
Camán. 28m HS (4b, 4a)
Note This climb has recently, and unnecessarily, been equipped with numerous pitons. How long they will last in the salt-laden atmosphere remains to be seen.
Start from the Slipway, at the foot of a narrow, curving slab with a deep crack in the overlap on its right.
1. 18m Climb the slab (a runner on the curve of the crack will prevent the rope from becoming jammed in the crack) and the corner above, to a block belay below the Crow's Nest, as for Tough Soot.
2 10m Climb the thin crack just left of the first bracket.
T. Forde, G.Moss, 7/12/1974
Spinnaker* 28m VS (4c, 4a)
Start from the Slipway, 3m left of Cricklewood, at the bottom right of the slab. 1. 18m Climb the shallow crack (small wires) on small holds to reach a good hold 2m below the overhang. Make a difficult move up (crux) to gain a good crack beneath the overhang. Step out right move up and over the blocks to the Crows Nest.
2. 10m As for the second pitch of Camán.
G. Moss, T. Forde, 18/10/1975
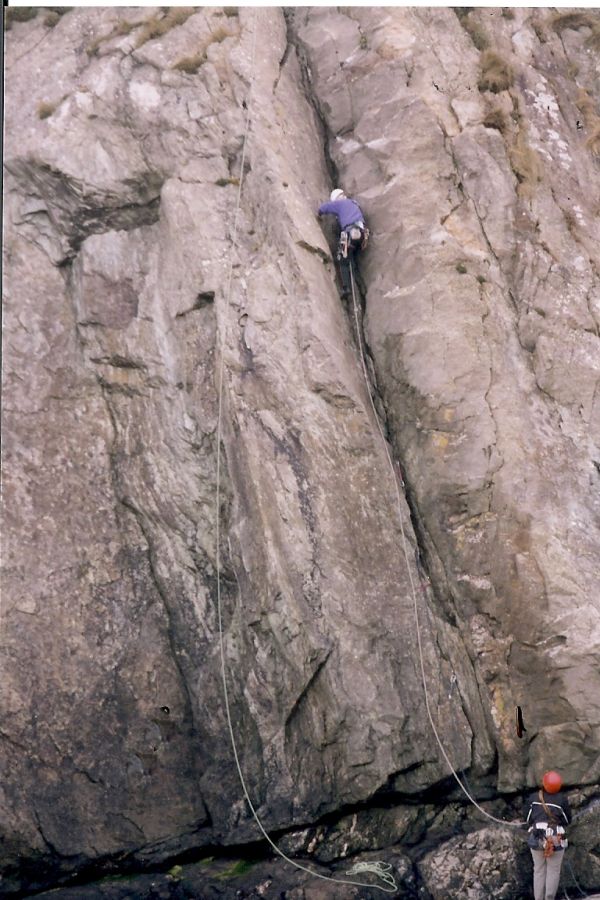
Cricklewood** 28m S (4a)
The first route put up in this area, and probably the most frequently climbed line hereabouts. Start On the Slipway, below the obvious long groove. Climb the groove, which is difficult to start, to the Crow's Nest (possible belay, advisable during stormy weather, when communication is difficult), and continue up the shallow corner between the two brackets.
G. Moss, T. Clancy, 21/7/1974
Cricklewood S (line of abseil access)
Razorbill 28m S (4a)
The initial slab is delicate, particularly when wet. Start just right of Cricklewood, below a narrow slab, with a thin crack on its right. Climb the slab near its left edge (delicate) and the rib on the edge of Cricklewood until an obvious traverse line leads left into that climb. Finish as for Cricklewood.
G. Moss, T. Forde, 12/10/1974.
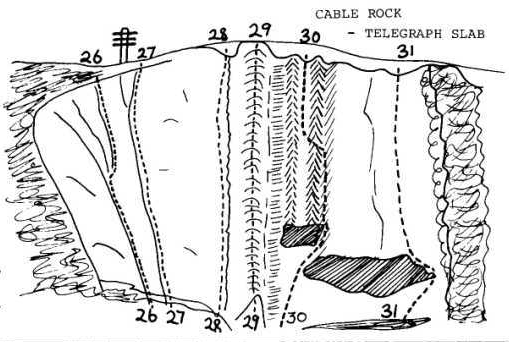
Telegraph Slab
Right of Bracket Slab and away from the sea.
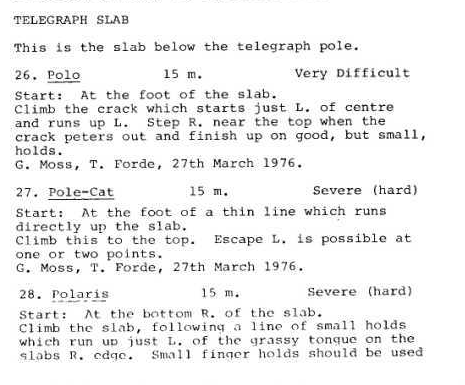
The telegraph pole on the left in the topo gave the name to Telegraph Slab but it was badly burnt in a gorse fire a few years back and cut down (the wires now run along the railway line through the tunnel). We used to ab down the slab from the pole, when going down to the foot of Bracket Slabs, so the slab got a fair bit of traffic and we kept the routes fairly clean, but they are all vegetated now and have been included just for the record. The whole area where the pole was has become covered in gorse but you might find one of the steel braces for the pole among the furze bushes and ab from that. Now the preferred approach is to ab down the line of Cricklewood from 3 insitu pegs.
The line of Twilight is now buried beneath huge piles of boulders, put there to prevent coastal erosion.
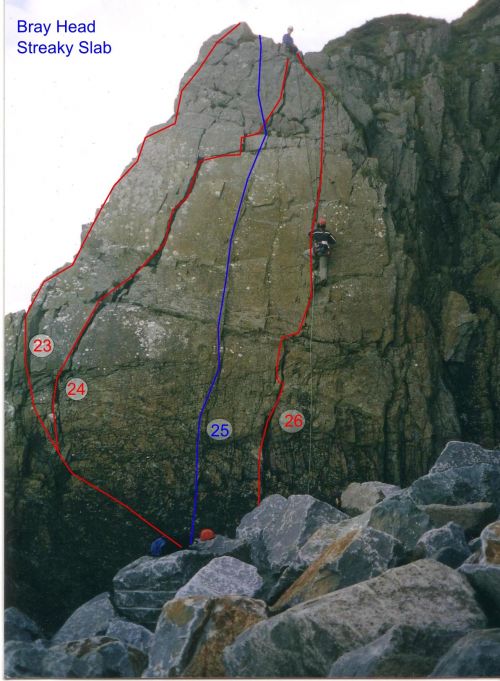
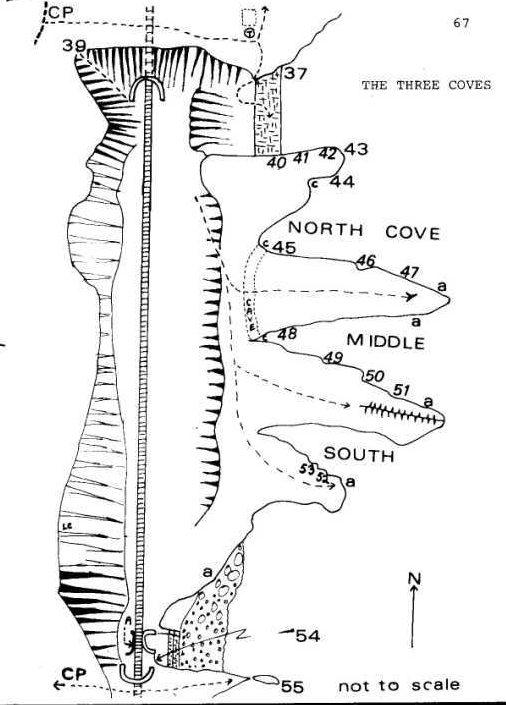
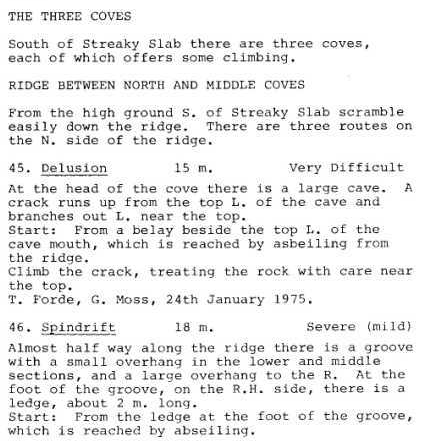
Streaky Slab
Home to some of the earliest climbs in the country.
Access.
Coming from Bray, follow the Cliff Path to a point a few metres short of where it rises to meet a short flight of steps, 20 minutes, (coming from the other direction, this is the flight of steps you descend, 10 minutes). Cross the fence and follow traces of a narrow path leftwards towards a patch of scree. Go down over this to a path fronting a bank. Shaft is reached by turning left here, but for Streaky Slab turn right and follow the path, with care, for about 50m, to a little rocky notch above some steps leading down to a boulder field. Cross this to the bottom of the slab.
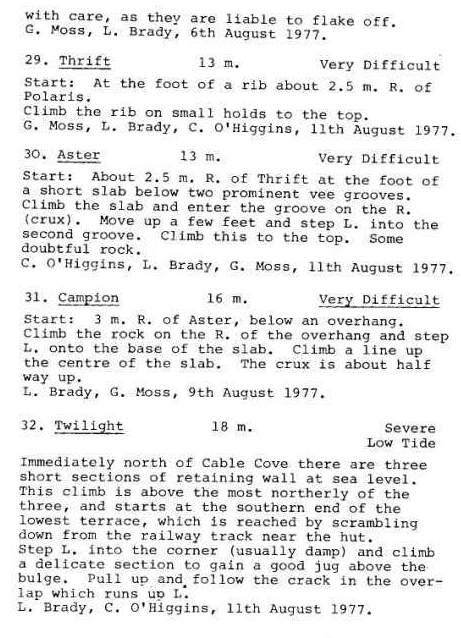
The first three climbs were originally started by traversing in above the sea from a concrete platform to the right of the slab, but the platform has been demolished and the sea pushed back by the dumping of large boulders here in an attempt to protect the railway line from coastal erosion.
Airy Edge* 18m VD
Well named. Start from the boulders below the left edge. Climb up to a saddle below the edge. Follow the edge, keeping to the face of the slab.
Old I.M.C. circa 1942.
Fat Crack. 18m M
Start below the wide crack. Climb up to the crack and follow it to the top.
Old I.M.C. circa. 1942.
Jack Spratt. 15m VS (4b)
Delightful, delicate, but unprotected slab climbing; a more serious proposition nowadays, as a fall would land you on the boulders, rather than in the sea. Start below a thin, shallow, intermittent crack running up near the centre of the slab. Climb the crack to a narrow sloping ledge just below half-height. A couple of thin moves lead to better holds and the horizontal section of Fat Crack. Finish direct.
G. Moss, T. Forde, 9/11/1974
LEAN CRACK* 14m VD
Pleasant climbing on small holds, with good protection. Start
2m in from the right edge, below the obvious crack. Some
difficult moves lead to better holds, step left near the top to
finish up the crack.
Old I.M.C. circa. 1942.
)
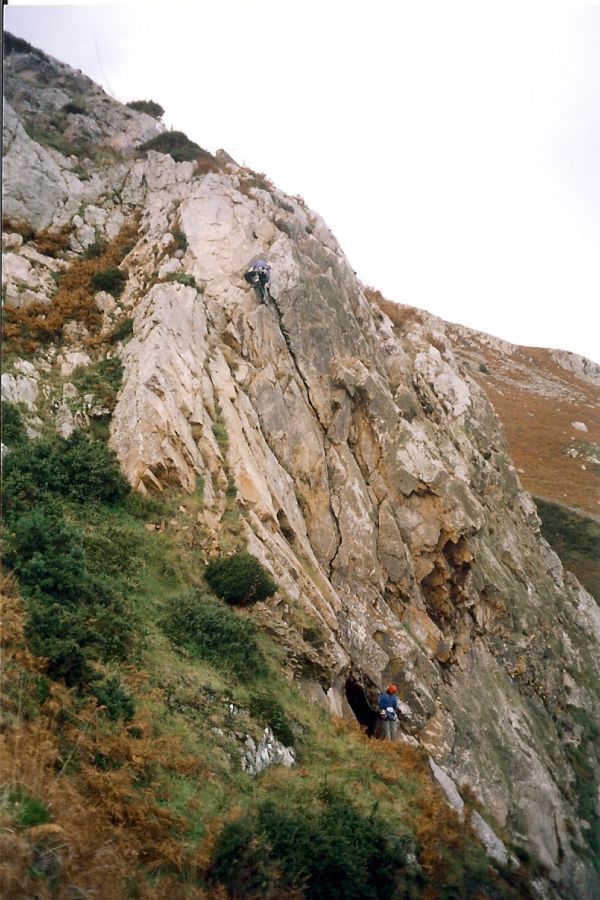
The next climb lies a little to the north of Streaky Slab and is approached by turning left after descending to the bank mentioned above. Follow the narrow path carefully north to the cave-like mouth of the adit. The rock here is quartzite, the protection excellent, and the climb worth making the short detour for.
Shaft** 20m VS (4b)
Start at the entrance to the adit. Climb up on the right and step left onto the roof of the adit. Follow the crack into the corner and step right to climb the rib leading to some blocks below the start of the deep, clean crack running up left. Follow this up over a bulge. Move slightly right and up to belay on a large block.
G. Moss, T. Forde, 9/10/1976.
Shaft VS4b
Inland Climbs
Ballynamuddagh South
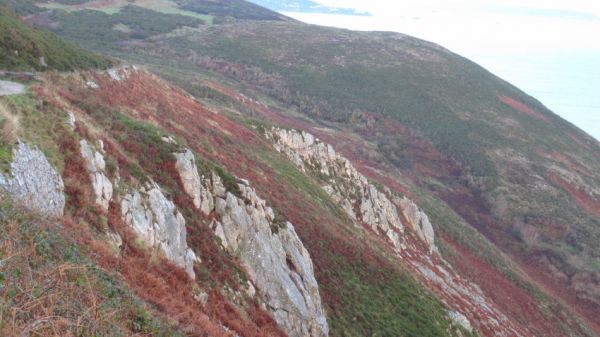
I first climbed on this buttress back in 1974, soloing several routes at the time, some of the quite airy. But I wasn’t satisfied with the clumps of heather obscuring holds at the bottom and top of the climbs, or the fact that there were numerous small, loose rocks sitting on ledges (probably cast down during the construction of the track and boundary wall above, all those years ago), so the plan was to return and tidy everything up before submitting the routes for publication. Then Ted came along, we turned our attention to the sea cliffs and so Ballynamuddagh South never made it into the little guidebook “Bray Head and Minor Crags around Dublin” published in 1978.
The approach follows a carriageway constructed by Lord Meath over a hundred years ago, to allow visitors staying at his nearby mansion, Killruddery House, enjoy the wide-ranging views from the Head without having to put a foot to the ground. Happily, pedestrian use of the carriageway has always been allowed. All-in-all, a pleasant spot for an easy day, a sunny winter's morning or a summer evening, and only a twenty minute stroll from the car park or bus-stop.
View of buttress from the track.
APPROACH. Leave the N11 at junction 7, (the one north of Kilmacanoge) and follow the signposts for Greystones to reach the R761, the road leading directly from Bray to Greystones. Drive up the hill towards Greystones, passing the entrance to Bray Golf Club, and take the first turn on the left. This turn is directly opposite a Dublin Bus shelter on the far side of the road. (For those travelling by bus (no.84) alight at Windgates, 5 meters from here). Drive a short distance down this cul-de-sac to park at the far end of a low stone wall on the right, near the foot of a lane (the original carriageway).
Approaching from this direction the buttress we are heading for is the nearest and highest of the Ballynamuddagh buttresses, yet, conversely, it is the last of the three to come into view. It lies only a few meters below the track, directly under one of the few remaining sections of the old boundary wall and directly above a small beach covered in boulder armour. The crag is tucked into a steep, bracken-covered slope and it is possible, with care, to scramble down near the northern edge, to access the foot of the crag (look for traces of a path going down by the two small, dead trees). Or you can, if you choose, use one of several abseil points I equipped while cleaning, but note that each of these points can, and should, be backed up with an additional thread, hex or nut. A 50m rope, doubled, will get you to the foot of the climbs and as an added precaution, if you do decide to abseil in, it makes sense to gear up just below the wall, before moving down to the ab point.
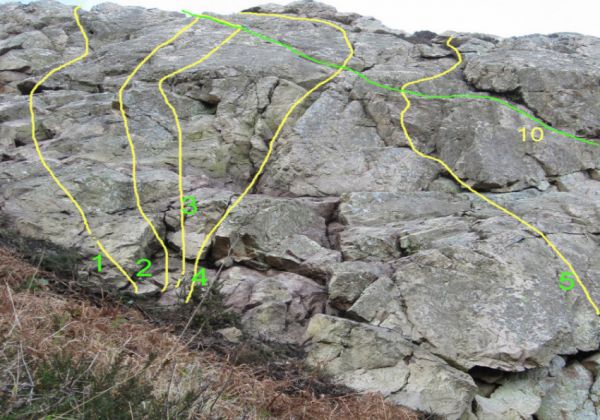
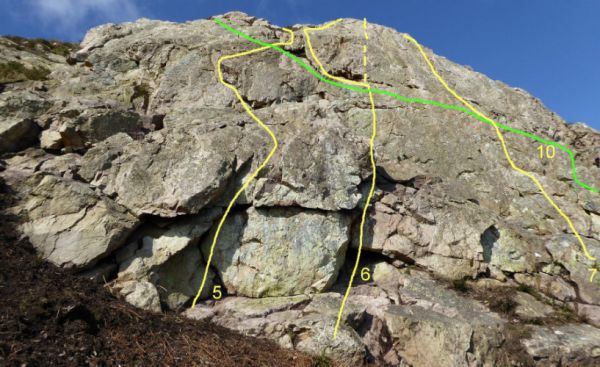
Note: while several of the easier climbs can be well protected and may be suitable for those learning to lead, the centre of the face is steep, with small holds, and spaced protection, requiring steadiness. The climbs are described from Left to Right while facing the crag.
The first four routes start from the same belay point - at a little furze bush at the bottom of the left edge of the crag.
I. Leo. Diff.
Climb the Left edge, step across L and follow a crack to belay in a little niche.
H.Herzmann, G.Moss. 4/12/13.
2. Deja Vu. V. Diff.
Start as for route 1. Climb up easily to a short inverted vee groove below a thin intermittent crack running up near the L edge of the slab. Make a delicate step up onto the slab (crux) and follow the crack on improving holds. Belay as for route 1.
G. Moss, H. Herzmann 9/1/14.
3. New Year Nerves. VS4c.
Start as for route 1. Move up and make a steep move to gain a ledge level with the toe of the slab. Make a delicate step out right onto the bottom of the slab and continue delicately up the centre on tiny holds, to reach a thin flake crack sloping up L (small wires or friends useful here). Follow this to the top and belay as for route 1.
G. Moss, H. Herzmann 9/1/14.
4. Poldi. Diff.
Start as for route 1, 3m below an obvious groove which runs up the R side of the slab. Move up and climb the groove, followed by a short crack, slanting diagonally L to finish up in the little niche as for route 1.
H. Herzmann, G. Moss 4/12/13.
5. Grumpy Old Men. VS4b.
Start 3m down R of Poldi. at a belay below a shallow corner slanting up R. A difficult start (crux) leads to easier climbing up to a short, steep L-facing corner just L of a narrow, sloping ledge. Steep moves up L to better holds, then slant back across R to the foot of a crack on the L side of a block. Climb the crack and the easy groove above to a thread belay.
G. Moss, H. Herzmann, B. Lawless. 5/3/2014
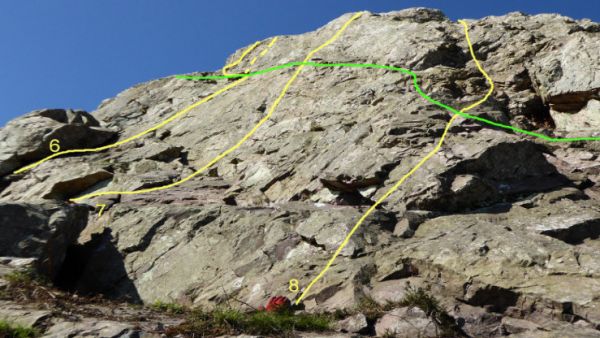
6. Reeling In The Years. HS/VS4b.
Start below a short, R-slanting, overhung corner, 2m R of route 5. Climb the corner and move up to the top of the horizontal flake. Make some delicate moves up to gain the ledge below the undercut crack, crux, (a runner here would be of as much for the benefit of the second as for the leader). Continue straight up on small holds (VS4b) or move L to reach better holds and climb the crack on the R side of a block (HS). From the top of the block step out R and climb the slab to a thread belay.
G. Moss, H. Herzmann 4/12/13.
7. Tempus Fugit. VS4c.
Start 3m R of 6, on a grassy ledge, level with, and just L of, the top of a pointed block. Climb easily up the short slab to the undercut cracks, and move up to the top of a large flake below the upper wall. Step up and make some delicate moves to reach a ledge and the diagonal crack line of The Long Haul. Step L and climb a break in the upper face on small holds. Protection is sparse on the upper section. G. Moss, H. Herzmann 27/11/13.
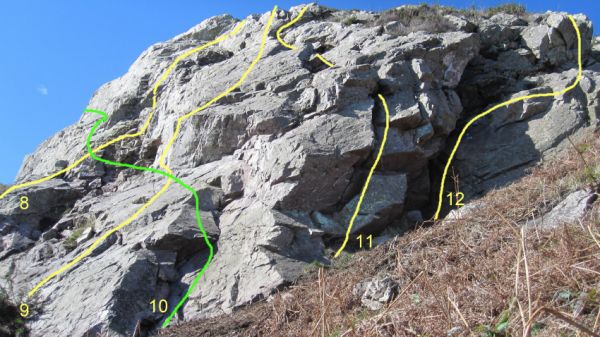
8. The Good Samaritan. S.
Start on a grassy ledge, just down R of a pointed block, below a blunt rib. Climb the centre of the rib to a ledge. Move up steeply, slanting a little R above the cave then back L to finish up through the gap in the skyline to a block belay.
H. Herzmann, G. Moss 26/2/14.
The vegetated drainage line below the little cave has been looked at, but the rock in the cave's immediate vicinity is poor and best avoided.
9. An Bodach. V.Diff.
Start 2m R of The Good Samaritan, at a little furze bush. Climb up and make some delicate moves to reach good holds above the short impending wall (good runner out L). Pull up onto a narrow ledge, step up R and continue up the short, steep slab above on small but good holds to reach a ledge. Climb straight up the short wall above to finish at the block, as for route 8.
G. Moss, H. Herzmann B.L. 5/3/14.
10. The Scenic Route. VS4b.
A Right to Left rising girdle of the face, following the line of an intermittent, undercut crack. Continuously interesting, it requires steadiness from both leader and second. Start below a short L-slanting corner at the bottom R edge of the face. Move up the corner and step around L below a short impending wall. Traverse delicately L beneath the wall, moving up to a ledge. Step across below the little cave to a block (good nut placements here). Make steep, committing moves up and L on small, but good holds, to gain a ledge and the continuation of the crack. Follow this L., with spaced protection,to reach a crack on the R side of a block. Step out L onto the slab and move L to join up with the finishing moves of New Year Nerves. Belay as for that route in a little niche.
G. Moss, H. Herzmann 26/2/14.
11. Low Hanging Fruit. M.Severe.
Start around R. and up 2m from the bottom R. edge of the crag, at a block below a deep crack. Climb the crack, which is awkward to start, and continue more easily up to a ledge. Climb straight up via a line of cracks and jammed blocks, to a block belay as for route 8. Large hexes or friends useful.
G. Moss 24/2/14.
12. Stocking Filler. V. Diff.
Start just R of Route 11, below a short chimney, overhung on the L. Climb the chimney and step out R onto the huge block. From the top of this step across and climb twin cracks on good holds. Scramble up and slightly R to a belay at a little hollow.
G. Moss, H. Herzmann 1/4/14
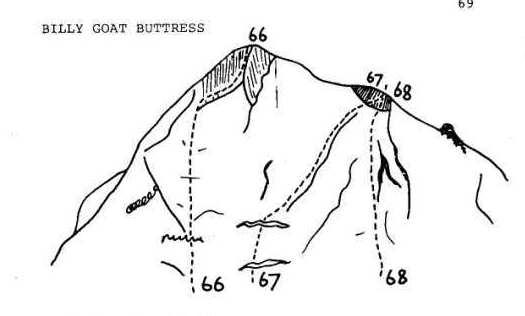
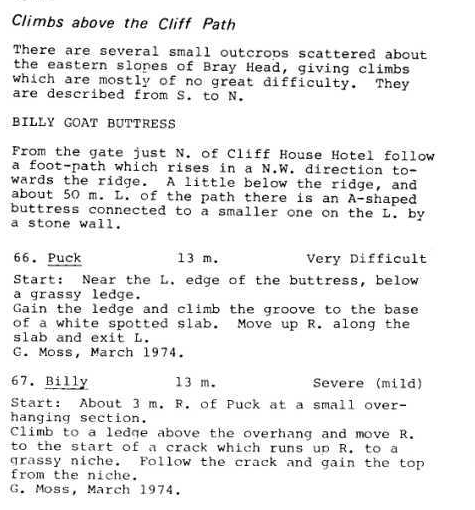
Billy Goat Buttress
This buttress is best approached as for Ballynamuddagh S. The buttress can be seen down on the Right from the point where the track swings north after cresting the ridge.
One more route on page below.
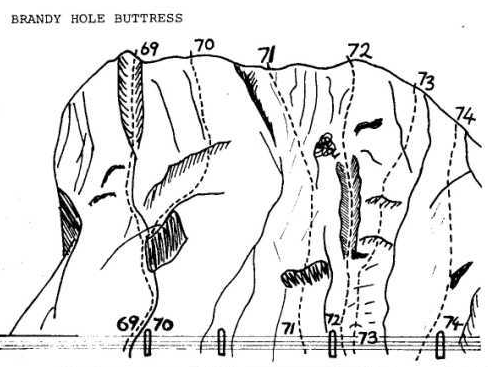
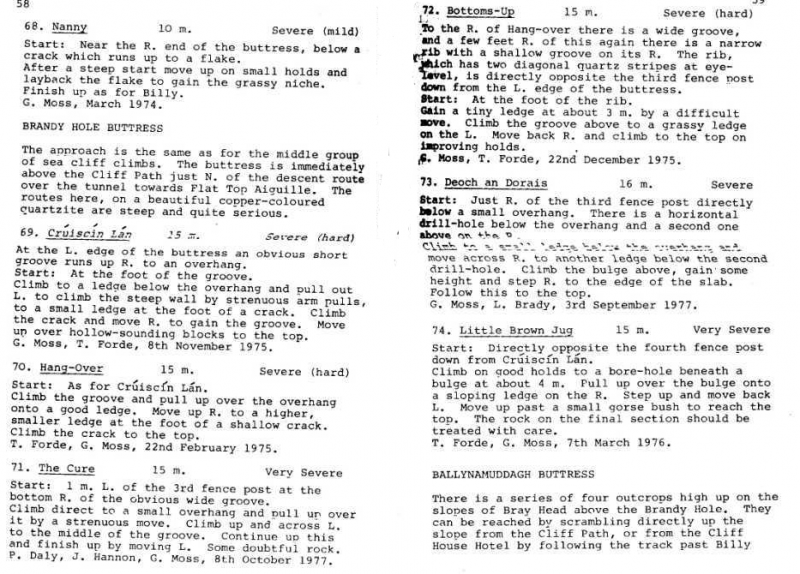
Brandy Hole Buttress
The Cliff Walk was much less busy when these routes were put up than it is now. It is probably not a very comfortable place to climb. While the rock on Brandy Hole Buttress is sound, climbers should be aware that the top of the crag is littered with small rocks and it is difficult not to dislodge some of these onto the path below while setting up belays.
Ballynamuddagh Buttress Central and North
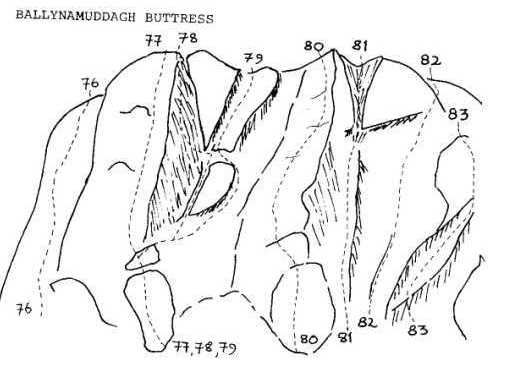
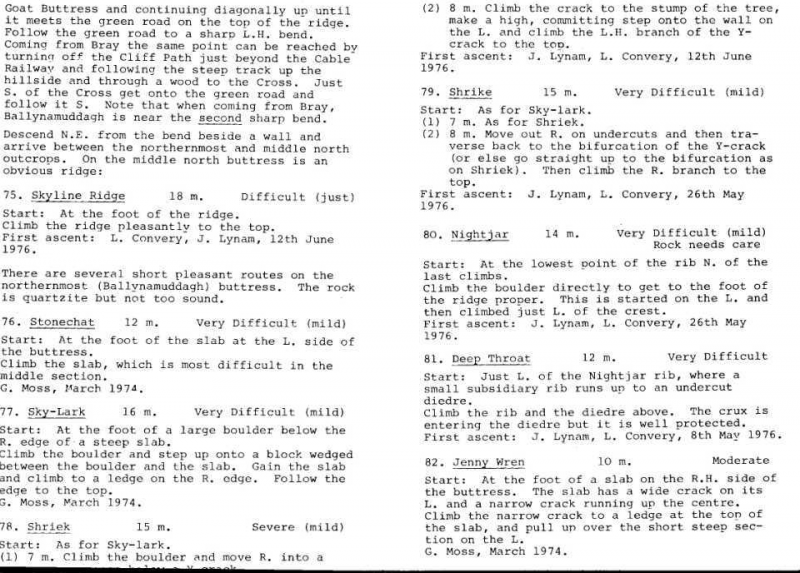
Ballynamuddagh North Buttress. (Note: the tree stump mentioned has become a thriving holly tree over the years and now covers much of both Shriek and Shrike).
Description starts on page above.
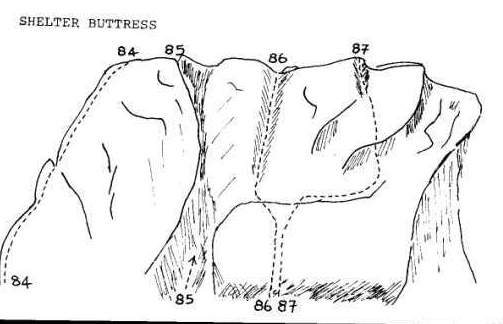
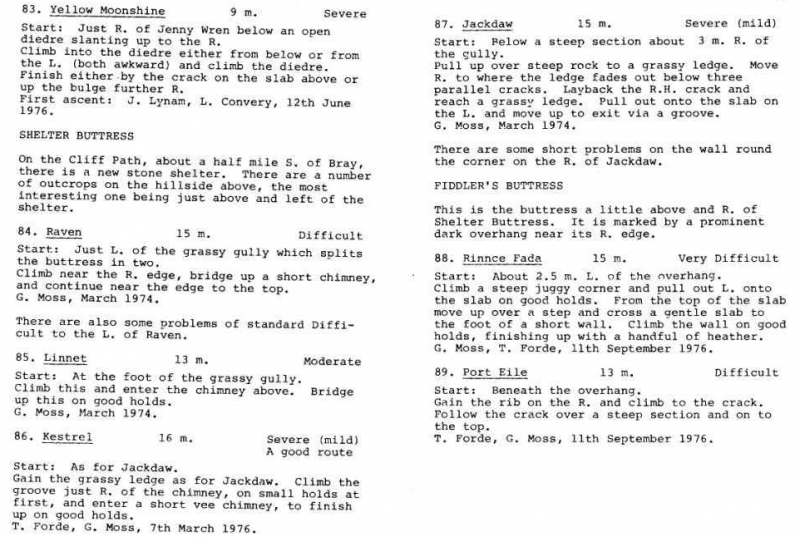
Shelter Buttress & Fiddlers Buttress
Farrells Rock
Routes in unsafe areas included for record
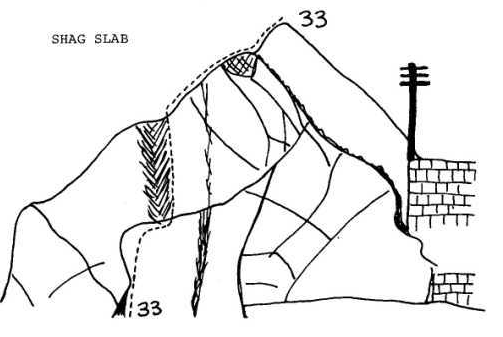
The approach to Shag Slab has been buried beneath the boulders, though it may be possible to hop across these, and the telegraph pole has been cut down.
<googlemap version="0.9" lat="53.176839" lon="-6.073975" zoom="18"> 53.176427, -6.072943 Pulpit 53.176478, -6.073463 Bracket Slabs 53.179221, -6.074987 Streaky Slab </googlemap>
FARRELLS ROCK
Leave the upper car park for the Cliff Walk and walk along the track until you arrive at the ruin known as Lord Meaths House. Turn sharply right, heading uphill to the obvious crag to the right of your viewpoint. The view of Bray from the base of the crag is worth the small walk.
1. GRÁ MÓ CHROÍ MS 4/5/2018
Gearóid Ó'Cróinín 10M Solo
Start at the lowest corner of the crag,under the slight overhang. Climb left out onto the ridge of the crag. Climb straight up and squeeze through the small chimney, before climbing out onto a more open space and topping out. The view from here offers amazing views of Bray and the sea :)
2. FOR THE CRACK VDIFF 4/5/2018
Géaróid Ó'Cróinín 8M Solo
Walk about half way around the northern side of the crag, until you come to an obvious crack. There is a slightly grassy area to the right of the climbing route. Start on the medium block. Climb straight up until you top out at the top of the crag.
