Difference between revisions of "Black Ball Head"
(tidyong) |
m |
||
| Line 10: | Line 10: | ||
'''Ecstasy Wall''' | '''Ecstasy Wall''' | ||
| − | A South Westerly facing wall of well-weathered volcanic tufa offering high quality off-vertical climbing. The rock bands above the climbs are filled with ledges and jugs. Some caution is advised as | + | A South Westerly facing wall of well-weathered volcanic tufa offering high quality off-vertical climbing. The rock bands above the climbs are filled with ledges and jugs. Some caution is advised as these strata are a bit brittle in places. The use of micro-wires is advantageous. For Ecstasy leftWall and the Headwall (which are really named Bunnadoonroe - Bun a'Dún Rua) abseil down the gully on the left (preferably using a minimum 50m rope) and traverse leftwards (looking in) over ledges and easy niches, approximately 3-4m above high tidal mark. The following routes start in niches, centrally at the base of the wall. All routes offer good protection and holds. |
'''The Rolling Wave''' VS * <br />''Gerry Galligan, Hugh Reynolds 3 Aug 2020''<br />1) Mod. Starts on the large and low tidal shelf at the far left-hand end of the Head, i.e. at its apex point - the bow. Climb the short black bow of the Head to gain the wide ledge. Belay here. 8m.<br />2) 4c Move up the shallow, grooved-wall (crux) to finish through the notch of two horizontal fingers of rock - the forked bowsprit. Belay here - possibly the best belay position in the world! 17m. | '''The Rolling Wave''' VS * <br />''Gerry Galligan, Hugh Reynolds 3 Aug 2020''<br />1) Mod. Starts on the large and low tidal shelf at the far left-hand end of the Head, i.e. at its apex point - the bow. Climb the short black bow of the Head to gain the wide ledge. Belay here. 8m.<br />2) 4c Move up the shallow, grooved-wall (crux) to finish through the notch of two horizontal fingers of rock - the forked bowsprit. Belay here - possibly the best belay position in the world! 17m. | ||
| Line 50: | Line 50: | ||
'''Dole Flakes Direct''' 40m S<br /> | '''Dole Flakes Direct''' 40m S<br /> | ||
''Colm Peppard, Barry Watts, 3/6/2018''<br /> | ''Colm Peppard, Barry Watts, 3/6/2018''<br /> | ||
| − | From the gully descends rightwards (facing out) down the sloping ramp until you reach the ledges | + | From the gully descends rightwards (facing out) down the sloping ramp until you reach the ledges 4m above the waterline. This climb takes the right most corner system on this face. Climb over ledges and left facing corners until you reach a steep blank corner with a set of rock spikes on your right up high, climb to the spikes and stand up on a ramp above, continue up the wall and corner above the spikes. |
| − | 4m above the waterline. This climb takes the right most corner system on this face. | ||
| − | Climb over ledges and left facing corners until you reach a steep blank corner with a set of rock | ||
| − | spikes on your right up high, climb to the | ||
'''Dole Flakes''' 50m VD<br /> | '''Dole Flakes''' 50m VD<br /> | ||
| Line 65: | Line 62: | ||
'''Triton''' 45m HS<br /> | '''Triton''' 45m HS<br /> | ||
| − | ''Colm Peppard, Gerry Galligan 26/9/2018''<br /> | + | ''Colm Peppard, Gerry Galligan 26/9/2018''<br />From the bottom of the abseil gully traverse leftwards (looking back in) for several metres and you’ll see a small overlap with a distinct inset triangular face immediately to its right at the top of the wall in front of you. |
| − | + | ||
| + | 1) 25m (approx) At the bottom of the wall (stepping off a little ledge) there is thread a little above head height to the left. Pull up on a good handhold to get initial protection into this thread. Climb straight on up to gain the easier angled ledge above the triangular face. Continue directly up the slab and angle rightwards to finish up the distinct vertical crack in the higher face just to the left of the obvious corner on the right. There is a belay immediately at the top of this next vertical face.<br /> | ||
2) 20m (approx) Scramble/climb on upwards trending rightwards towards the top of the abseil gully for an easy Diff/V Diff finish depending on your route. | 2) 20m (approx) Scramble/climb on upwards trending rightwards towards the top of the abseil gully for an easy Diff/V Diff finish depending on your route. | ||
| Line 81: | Line 79: | ||
'''Regatta Ridge''' 70m VD <br /> | '''Regatta Ridge''' 70m VD <br /> | ||
| − | ''Barry Watts, Gerry Galligan, 5/8/2017''<br /> | + | ''Barry Watts, Gerry Galligan, 5/8/2017''<br />1. 35m Follow a line 1-3m right of the true arete. Protection improves with height. Belay at a ledge on the right. <br>2. 35m Continue up the arete on good holds until the rock becomes poorer. Veer right to follow a shallow corner crack to emerge at a large terrace, Traverse right for 6m and gain the next ledge system by a vertical crack. Move left to finish. |
| − | 1. 35m Follow a line 1-3m right of the true arete. Protection improves with height. Belay at a ledge on the right. <br>2. 35m Continue up the arete on good holds until the rock becomes poorer. Veer right to follow a shallow corner crack to emerge at a large terrace, Traverse right for 6m and gain the next ledge system by a vertical crack. Move left to finish. | ||
'''Back to Mizen''' 65m VD <br /> | '''Back to Mizen''' 65m VD <br /> | ||
| Line 94: | Line 91: | ||
'''Long March North''' 50m VD<br /> | '''Long March North''' 50m VD<br /> | ||
''Barry Watts, Colm Peppard, (alt leads) 3/6/2018''<br /> | ''Barry Watts, Colm Peppard, (alt leads) 3/6/2018''<br /> | ||
| − | 1) Start 6m right of '''DD''' under a bulge at 6m. Climb | + | 1) 45m Start 6m right of '''DD''' under a bulge at 6m. Climb |
over the bulge and continue more easily over a few steep steps | over the bulge and continue more easily over a few steep steps | ||
| − | to a final headwall taking a belay at a wide crack. | + | to a final headwall taking a belay at a wide crack.<br /> |
| − | 2) Climb the pillar left of the crack to a wide ledge. | + | 2) 6m Climb the pillar left of the crack to a wide ledge. |
[[File:BSW.jpg|600px|File:BSW.jpg]] | [[File:BSW.jpg|600px|File:BSW.jpg]] | ||
| Line 107: | Line 104: | ||
'''Black Sabbath''' 20m VS 4c<br /> | '''Black Sabbath''' 20m VS 4c<br /> | ||
''Sile Daly, David Craig, 16/07/2017.'' <br /> | ''Sile Daly, David Craig, 16/07/2017.'' <br /> | ||
| − | Start at the first obvious and widest crack trending diagonally to the right. Climb this for 3 meters until the angle eases, then step left onto the the face and climb up vaguely leftwards through the steepest territory you can see passing through a few overlaps to the top of the slab | + | Start at the first obvious and widest crack trending diagonally to the right. Climb this for 3 meters until the angle eases, then step left onto the the face and climb up vaguely leftwards through the steepest territory you can see passing through a few overlaps to the top of the slab. |
'''Black Sabbath Wall''' | '''Black Sabbath Wall''' | ||
Revision as of 17:23, 7 August 2021
Blackball Head is a headland 5 kilometers from Dzogchen Beara on the way to Dursey Sound. Travelling west from Castletownbere, 2.5 km west of Dzochen Beara turn left and follow a minor road 2km to harbour. Tiglin/Paddy O'Leary originally developed some routes 1km East of the signal tower which are not documented.
Approach Park considerately around a number of pull in spots at Blackball Harbour, walk in via the commonage north of the signal tower by following a faint animal path around the bay until you reach a wire fence, strike South for the signal tower.
The climbing North West and South West facing walls of generally good volcanic tufa below the signal tower.
Ecstasy Wall
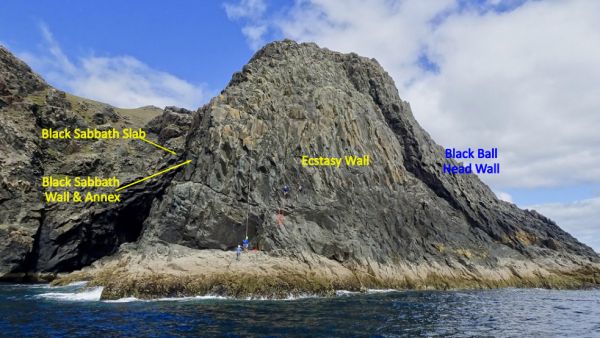
A South Westerly facing wall of well-weathered volcanic tufa offering high quality off-vertical climbing. The rock bands above the climbs are filled with ledges and jugs. Some caution is advised as these strata are a bit brittle in places. The use of micro-wires is advantageous. For Ecstasy leftWall and the Headwall (which are really named Bunnadoonroe - Bun a'Dún Rua) abseil down the gully on the left (preferably using a minimum 50m rope) and traverse leftwards (looking in) over ledges and easy niches, approximately 3-4m above high tidal mark. The following routes start in niches, centrally at the base of the wall. All routes offer good protection and holds.
The Rolling Wave VS *
Gerry Galligan, Hugh Reynolds 3 Aug 2020
1) Mod. Starts on the large and low tidal shelf at the far left-hand end of the Head, i.e. at its apex point - the bow. Climb the short black bow of the Head to gain the wide ledge. Belay here. 8m.
2) 4c Move up the shallow, grooved-wall (crux) to finish through the notch of two horizontal fingers of rock - the forked bowsprit. Belay here - possibly the best belay position in the world! 17m.
U-31 HVS
Gerry Galligan, Steven Hanney (alt leads) 1 Aug 2021
Two short minefields!
1) 7m Starts on the large and low tidal shelf at the far left-hand end of the Head, i.e. at its apex point - the bow. On the ocean-side, two grooves split the short wall. Take the left groove to gain the wide ledge.
2) Move up the shallow grooved-wall and left-facing corner, 2m right of 'The Rolling Wave'. Difficult moves to gain a block-ledge (crux). Continue up the short cracked wall to finish.
Josias 35m HVS
Gerry Galligan, Colm Peppard 26/9/2018
Left, at the end of the Head, high above the low tidal shelf, is a prominent triangular jutting block – The Prow. This route follows a line beneath and past it. Start on the arete, right of the tidal shelf, to gain a distinctive, wide groove. Climb this groove directly (crux). Continue on easier holds, passing the Prow on your lefthand-side.
Donkey Dharma 35m S **
Cearbhall Daly, Gerry Galligan 3/06/2018
A very enjoyable climb. Scramble down leftwards to the end of the Head to a large low shelf at the tideline. Belay at the right-hand end, next to a wall. This route follows a prominent crack just right of the arete, trending rightwards on the main Head wall. Good protection throughout.
An Saol Bocht 35m VS 4c
Cearbhall Daly, Gerry Galligan 3/06/2018
Start just left of Act Of Contrition. Climb straight up easy angled slab to begin with. Aim for a short off-width crack in the centre of a slab. Negotiate this, optionally via the right-hand side. Continue up slabs (crux) to a long wide ledge, finishing up the wall above.
Act of Contrition 35m HS 4a
Gerry Galligan, Cearbhall Daly 3/06/2018
Takes a direct line 6m left of Dharmachakra. Starts over easy slabs and continues directly up a left-facing corner. Good protection.
Dharmachakra 35m S
Gerry Galligan, Barry Watts, 5/8/2017
Move directly up over good ledges and holds of irregular features to yellow lichen slabs. Follow a left-trending line around ovelaps at the left-end of a blank wall to top.
Bhóithrín Na Smaointe 35m HS
Gerry Galligan, Barry Watts, 6/8/2017
Follows the same line as Dharmachakra up on to the yellow lichen slabs. Then continue up, trending right, to a long horizontal crack at the base of a wide slab of few features. Move right to a prominent corner and follow this corner up to the top.
Rock Lobster 35m VS 4b *
Hugh Reynolds, Gerry Galligan, 2/8/2020
Three left-facing short corners stand at the left end of an incised blue headwall. Here take the middle corner offering limited protection(crux). Continue up another short corner and finish directly to the top.
Sea of Joy 35m VS 4a
Gerry Galligan, Barry Watts, 5/8/2017
Left-facing double corners stand at the left end of an incised blue headwall. Here take the longer, right-hand corner directly to the top. A triangular groove mid-way can be surmounted directly or via a short slab on it’s left.
Dole Flakes Direct 40m S
Colm Peppard, Barry Watts, 3/6/2018
From the gully descends rightwards (facing out) down the sloping ramp until you reach the ledges 4m above the waterline. This climb takes the right most corner system on this face. Climb over ledges and left facing corners until you reach a steep blank corner with a set of rock spikes on your right up high, climb to the spikes and stand up on a ramp above, continue up the wall and corner above the spikes.
Dole Flakes 50m VD
Barry Watts, Colm Peppard, (alt leads) 3/6/2018
From the gully descends rightwards (facing out) down the sloping ramp until you reach the ledges
4m above the waterline. This climb starts on the right most corner system on this face.
1. Climb over ledges and left facing corners until you reach a steep blank corner with a set of rock
spikes on your right up high, climb to the spokes and traverse along the ramp for 6m to a belay
in a crack on a ledge. 30m
2. Continue up the pleasant crack for to a belay. 20m
Triton 45m HS
Colm Peppard, Gerry Galligan 26/9/2018
From the bottom of the abseil gully traverse leftwards (looking back in) for several metres and you’ll see a small overlap with a distinct inset triangular face immediately to its right at the top of the wall in front of you.
1) 25m (approx) At the bottom of the wall (stepping off a little ledge) there is thread a little above head height to the left. Pull up on a good handhold to get initial protection into this thread. Climb straight on up to gain the easier angled ledge above the triangular face. Continue directly up the slab and angle rightwards to finish up the distinct vertical crack in the higher face just to the left of the obvious corner on the right. There is a belay immediately at the top of this next vertical face.
2) 20m (approx) Scramble/climb on upwards trending rightwards towards the top of the abseil gully for an easy Diff/V Diff finish depending on your route.
SS Kerry Head 45m S
Barry Watts, Colm Peppard, 3/6/2018
Climb the steep crack 1m left of the bottom of the gully to easier ground. traverse diagonally left to a
boulder, climb straight up from here to the abseil ledge.
Blackball Headwall
Very enjoyable long, low grade climbing with a South Westerly aspect can be found here.
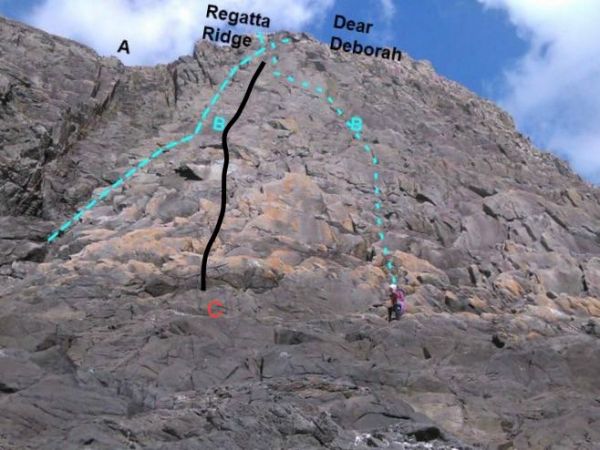
Regatta Ridge 70m VD
Barry Watts, Gerry Galligan, 5/8/2017
1. 35m Follow a line 1-3m right of the true arete. Protection improves with height. Belay at a ledge on the right.
2. 35m Continue up the arete on good holds until the rock becomes poorer. Veer right to follow a shallow corner crack to emerge at a large terrace, Traverse right for 6m and gain the next ledge system by a vertical crack. Move left to finish.
Back to Mizen 65m VD
Paddy O'Brien, William Blanchfield, Brian Walker, August 2020.
Starts about 10m above the high tide mark and below and to the right of a dark triangular block which is about 1/3 up the wall. The route goes to the right of the dark triangular block, then up a short corner finishing between Regatta Ridge and Dear Deborah.
Dear Deborah 65m VD
Barry Watts, Gerry Galligan, 6/8/2017
Start 12m right of the arete below a vague line of vertical cracks and an interesting right-facing corner high on the face.
1. 35m Follow the easy slabs and steepening cracks to a big terrace and a large block belay below the afore-mentioned corner.
2. 30m Move up the corner. Alternatively, traverse leftwards past a wall to a vertical crack which brings you to another terrace. Traverse right for 4m on this terrace and gain the next ledge system to finish.
Long March North 50m VD
Barry Watts, Colm Peppard, (alt leads) 3/6/2018
1) 45m Start 6m right of DD under a bulge at 6m. Climb
over the bulge and continue more easily over a few steep steps
to a final headwall taking a belay at a wide crack.
2) 6m Climb the pillar left of the crack to a wide ledge.
Black Sabbath Slab
Approach: The inlet is Coosbunnadoonroe (Cuas Bun a'Dún Rua). To approach scramble down the ridge for 150m as far as the unusual looking volcanic rock when there is a ‘clean drop’ to your right, this is Black Sabbath Wall and Slab, abseil in to a tidal ledge. Routes are listed from left to right. North Westerly facing, On the tidal ledges after the abseil, scramble leftwards towards the huge cave on a good ledge above the high tide mark until you come to a very black, smooth, large featured, slabby face.
Black Sabbath 20m VS 4c
Sile Daly, David Craig, 16/07/2017.
Start at the first obvious and widest crack trending diagonally to the right. Climb this for 3 meters until the angle eases, then step left onto the the face and climb up vaguely leftwards through the steepest territory you can see passing through a few overlaps to the top of the slab.
Black Sabbath Wall
This is the wall you abseil down
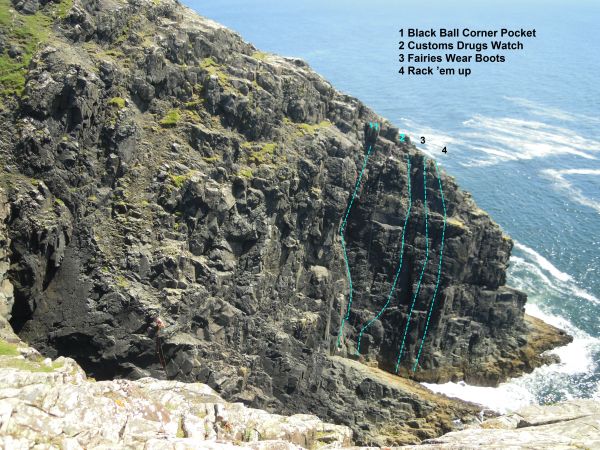
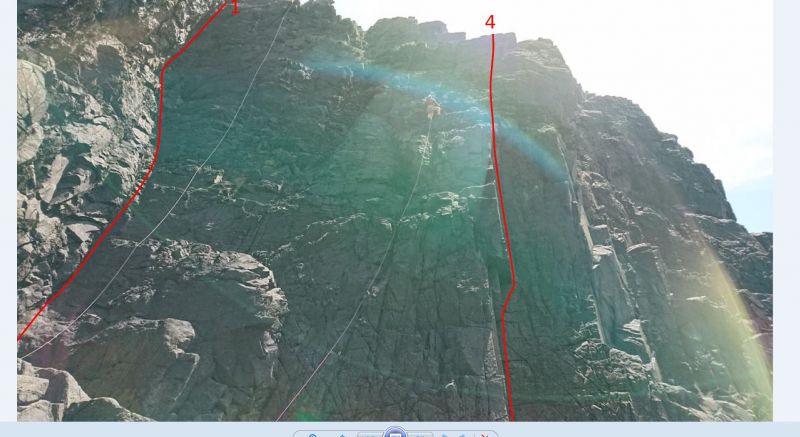
Black Ball Corner Pocket 45m S
David Craig, Sile Daly 16/07/2017.
Climbs the obvious corner on the left side of the slab. Some suspect rock near the top.
Sweet Leaf 45m V Diff
Gerry Galligan, Barry Watts, Colm Peppard, 4/6/2018
An eliminate wall stands between Black Ball Corner Pocket and the wide gully in the centre of the cliff. This route takes a general line between both, linking slabs and short cracks. Well protected and enjoyable.
Heavy Boots of Lead 45m V Diff
Colm Peppard, Gerry Galligan 25/9/2018
This route runs 3 to 4 metres right of Sweet Leaf but left of the wide gully. Another general line. Enjoyable and well-protected, though some loose rock.
Customs Drugs Watch 45m V Diff
Barry Watts, Gerry Galligan,16/07/2017.
Start 2m right of the obvious corner, follow a shallow crack line to the left side of the big recess and traverse a m right to avoid steeper ground, continue to the top. Good holds and gear all the way.
Hole in the sky 45m V Diff
Barry Watts, Colm Peppard, 4/6/2018.
Start at a shelf 2m right of CDW, climb the wall (1 m left of FWB)
to a large ledge, continue up the right hand side of the recess finishing up a crack
on the skyline.
Rogue Wave 45m VD
Gerry Galligan, Colm Peppard 25/9/2018
Takes the same start as Hole in the Sky, to the large ledge. However, move up the arete, through the eroded brown slab and corner, then finish directly.
Fairies Wear Boots 45m V Diff *
Gerry Galligan, Barry Watts, 16/07/2017.
Takes the shallow crack 2m right of the recess. A direct line to the top. Provides enjoyable, well-protected climbing.
Pixies prefer stilettos 45m V Diff *
Colm Peppard, Gerry Galligan, Barry Watts, 4/6/2018.
An excellent companion to Fairies Wear Boots, Takes a line 3m right of Fairies Wear Boots
to the top.
Rack ’em up 45m S
David Craig, Sile Daly 16/07/2017.
Climbs the excellent right-facing shallow corner on the right-hand side of the wall.
Harrington's Catch 45m S
Steven Hanney, Gerry Galligan 31/07/2021.
Follows the arete directly, 2m right of 'Rack 'em up'. A good companion route to the same.
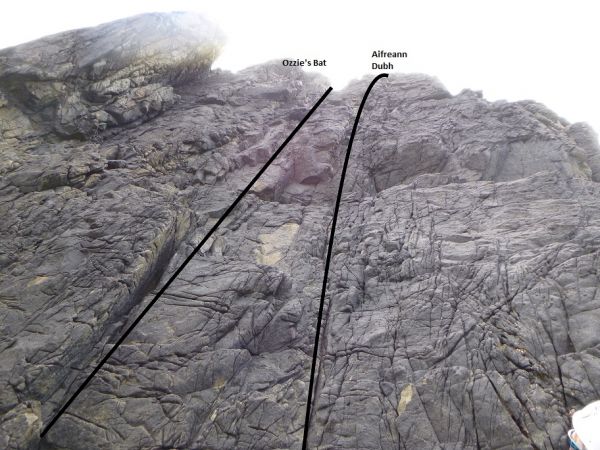
Black Sabbath Annex Wall
This is the shorter wall beyond the right-hand end of the Black Sabbath wall, at the bow end of the Head (the crossing corner of which leads to Ecstasy Wall, two routes are recorded here to date.
Ozzie's Bat 25m S
Paddy O'Brien, Con O'Shea 3/08/2020.
Takes shallow cracks to the left of a slabby bulge at the centre of the wall, directly to the top.
Aifreann Dubh 25m V Diff
Paddy O'Brien, Con O'Shea 3/08/2020.
Takes a line to the right of a slabby bulge at the centre of the wall, directly to the top.
Black Ball Head Grand Traverse 140m V Diff
G. Galligan, A. O'Reilly, 14/09/2019.
An enjoyable grand tour of the Head, linking Black Sabbath and Ecstasy Walls.
1) 35m. Starts at the left-hand end of Black Sabbath wall, at the adjacent wall (Black Sabbath Slab). Scramble up the ramp to belay at a height aligned approximately midway up Black Sabbath wall. Move forward off the ramp to attain the wall. Continue rightwards, taking the series of short horizontal crack lines to gain the seaward corner. Belay.
2) 25m. Continue around the corner, moving along the prominent ledge, again at approximately mid-height of the Head wall, to reach a wide shelf at the apex of the Head. Here the rock colour changes from black to grey.
3) 45m. Maintain the same level, climbing delicately across ledges to move above and around the recessed corner. Step 3m higher to continue crossing Ecstasy wall, keeping mid-height. Belay on a short triangular spike at the base of a high, outward-aspect corner.
4) 35m. Continue traversing for approximately 15m before a tapering descent to easy slabs approaching the base of Ecstasy descent gully.
