Difference between revisions of "Roberts Cove/Roberts Head"
m (→Second Pillar) |
|||
| Line 153: | Line 153: | ||
Routes 1 and 2: L. De Bonis, W. Pickles, T. Pradat 10/07/2024. | Routes 1 and 2: L. De Bonis, W. Pickles, T. Pradat 10/07/2024. | ||
| − | 1. '''Shagspotting 20m VS | + | 1. '''Shagspotting 20m VS 4b''' |
Good protection throughout, although you may miss the cams you used for the abseil anchor. Start at the obvious arete rising from the left end of the main face ledge. Climb on the arete / just to the left of it. The crux comes at the highest point visible from the belay. After that, the arete is less distinct, ascend and move right, to finish as 'Trundle!'. A more direct finish is possible, but the rock is loose. | Good protection throughout, although you may miss the cams you used for the abseil anchor. Start at the obvious arete rising from the left end of the main face ledge. Climb on the arete / just to the left of it. The crux comes at the highest point visible from the belay. After that, the arete is less distinct, ascend and move right, to finish as 'Trundle!'. A more direct finish is possible, but the rock is loose. | ||
| Line 160: | Line 160: | ||
Stand in the middle of the bottom ledge and climb up slightly to the left, going straight through the first overhang. Once you get above it, climb up and finish by following the slab on the right. | Stand in the middle of the bottom ledge and climb up slightly to the left, going straight through the first overhang. Once you get above it, climb up and finish by following the slab on the right. | ||
| + | |||
| + | Routes 3 and 4: L. De Bonis, W. Pickles, G. Giunta 13/08/2024. | ||
| + | |||
| + | 3. | ||
| + | |||
| + | 4. '''Chough-tastic 20m HVS 5a''' | ||
| + | |||
| + | Lovely route on the arete, right hand side of the main face of the pillar. Protection is fairly good. The climbing is generally on the left of the arete. About halfway up, move right to straddle the arete and climb over a slight bulge. After this, squirm up to the left of the prominent buttress. The start might be wet at high tide or big swell. | ||
=='''1st Lookout Wall (Second Pillar Wall)'''== | =='''1st Lookout Wall (Second Pillar Wall)'''== | ||
Revision as of 14:23, 14 August 2024
Robert’s Head (PDF Guide with pictures available from 'bishopstown@hotmail.com')
Location
Just use the following grid reference code W782531.
History
Cast your mind back through time if you will. No, no, even further back than that! I’m talking about the ‘80’s here. Before desktop publishing was available to the masses, and men were… well men began to wear multi-coloured Lycra for climbing. Now, cast your mind forward again to the summer of 2007. Ken Moore after climbing the third “new” route was directed to look at a dirty, great piton in the cliff! Oh well.
Approach from Roberts Cove. From the village/beach at Roberts Cove take the clifftop path west along the coast until 2 WW2 watchman's huts come into sight. The first area described below is beneath the western (RH) hut. Please use the paths and do not cut across the crops in the field. Takes about 15 min
Layout
The bulk of the climbing is to be found towards the blunt South-Western portion of Robert’s Head. For convenience of communication, the Main Area of climbing has been subdivided into the following areas: Upper Tier (home of dirty, great piton), Stumpy Wall (below and slightly left of Upper Tier), Lower Wall (to the right of Stumpy Wall), Chimney Area (to the right of Lower Wall) and the Big Wall (which is to be found over a rise to the right of the Chimney Area). There is also a Twin Pillars Area, perhaps 300m right (East) of the Main Area, subdivided into the following areas: First Pillar, Second Pillar and Second Pillar Wall. Oh yes, we mustn’t forget the Forgotten Wall, which is west of the Twin Pillars area. There is another wall called Lost Wall but I couldn’t tell you where that is.
Geology
Imagine that you are a grain of seafaring sand that has had enough and has decided to settle down in a nice beachfront property. Over time, millions of other residents move in on top of you. You resist joining the residents committee but after an age the pressure becomes unbearable and you and your fellow residents become one. Actually I don’t have a clue about the geology but the rock is generally good solid stuff to clamber about on. Development Scope The big wall has some 'nice looking' lines available. E1 grade leaders have been defeated here, so may be higher in the grad. Lost Wall area has another wall further East of it with steep cracks that also have rejected said leaders. Other routes could be contrived from the whole Roberts Head area generally. It has a strange tendency to reveal new routes the more you climb there.
Upper Tier
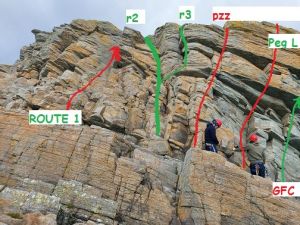
A 6m high section of wall. Easily identifiable by the dirty great piton sticking out below the centre of the main headwall (unless some hero removes said piton of course).
Route 1 Diff
On left side of Upper Tier there is an obvious short corner at the top of the wall. Climb easily to the corner and a stiffer finish
Route 2 V Diff
Between R1 and PZZ is a groove that forks at half height. Climb the LHS of the groove and the L fork. Hard to protect
Route 3 V Diff
The RHS and right fork of the groove. Well protected with a bit of a pull to finish
p. z. z 6m S
On left side of Upper Tier, take line trending slightly rightwards, finishing along a very thin crack.
2. Peg Legs 6m HVS/E1 5b
Thin crack with dubious peg at 3/4 height. Blind and fingery climbing. Gear is poor, don't fall.
B.Hall, H.Moloney, P.Stejskalova 22 May 11 (first recorded ascent)
2a. Gaeilge Fiche Ceathair HVS 5a
Climb the groove Right the start of Peg Legs then step right using the undercuts until you can reach up to positive holds and climb boldly to the top. E McLoughlin, J Healy 10/11/20
3. e. z. p 6m HS
On right side of Upper Tier, look up to see very thin vertical crack with useful looking steps scattered either side on the way up.
Stumpy Wall
Another short wall providing some short, sharp sporting routes, down and to the left (as you look at the cliffs with your back to the sea) of the Upper Tier.
Family Affair V Diff
Left of the harder routes is a more gentle corner with an alcove half way up. Climb the corner to a belay on a large horizontal spike. Well protected.
1. One Nut Wonder 5m HVS 5a
On left side of Stumpy Wall, look up for two vertical cracks, the higher crack slightly offset to the right, the lower crack providing the wonder.
2. Bursto 6m HVS 5b
A shallow rightwards facing inside corner provides some moves requiring at least two bursts of energy.
3. Wet 6m HVS 5a
A thin crack to the right of Bursto, choked with quartz tempts you upwards but then two lumps on the left, just above midway, take away your direct inclinations.
4. Chicken Finish 6m HVS 5a
A rightwards facing inside corner, to the right of Wet. At the end, when the corner ends, there is more rock on the right that you can avoid.
5. Arêto 6m E1 5b
Step up to the deceiving angle of the leftwards trending outside corner leading to the top. A flaring pockmark on the right side of the corner provides the only desperate hope of protecting the finish.
6.Roberto 10m E1 5b
On the right side of Stumpy Wall, start at the inside corner and overlap beneath the non-existent crack. Try not to let Roberto push you off balance.
Lower Wall
The Lower Wall begins in a dark corner, just to the right of where Stumpy Wall ends. It begins as a slab but it turns into some thing more vertical before midway. This wall is affected by the tide, the left side remaining drier for longer than the right.
1. La Premier 12m VS 4c A very definite crack in a dark corner. Follow crack to top beneath the looming black wall on your left.
2. Mozzies & Dolphin 13m E1 5a
Variation on La Premier; half way up dark corner find finger pocket, too small to accommodate most peoples fingers plus gear. Swing up to stepped ledges and the leaning wall on the left and go up to obvious crack to finish. Grade to be confirmed. Terence J. Hoare & Dom O Calaghan 2007.
The Ballycotton Arete E1 5a/b
Easy first moves from big ledge, slightly overhanging, into the obvious big square cut out. Moving out and up is the crux, a long reach using a pinch or a sloppy crimp. Once on the rectangular face look for that hold you need, tis somewhere, scramble on the ledges to the top. Is this worthy of a star or two? Grade to be confirmed. Terence J. Hoare & Kevin Ring 2007.
3. Roberto Blanco 12m E1 5a
As the name suggests, not a whole lot of useful fissures on this climb. Following two hairline cracks just right of La Premier to the blankness above.
4. Spiton 12m VS 4c
Start underneath two zigzag overlaps. Continue past overlaps and to the left of the leftward facing corner at the top.
5. Severe 12m S
A pair of defined cracks rise up and slightly away from each other, just to the left of where the Lower Wall takes a turn for the steeper. Follow the right hand crack until it peters out. Finish as for Spiton (or slightly to the right HS).
6. Slow Arrest 12m VS 4c
Start nearly 2m right of where the Lower Wall takes a turn for the steeper, up a vague crack line. Two higher cracks then present themselves as the angle eases. Follow the right crack to a large shelf. Take stock of yourself before proceeding to a thin line above the porous-looking rock above, and on to the top.
7. Groove Armada 13m HVS 5a
An obvious line below, an obvious line above; find your own way in the middle but enjoy it all the way. The last move is a humdinger.
8. Duty Calls 13m HVS 5a
Start 1m to the right of Groove Armada. Use fingertips and toes to gain nearly horizontal cracks. Then move up right of overlap on thin holds to porous-looking rock. Find holds to propel you upwards using protuberance that seems to support the overlap.
9. Pocket Surprise 13m HVS 5a
This climb starts on a small step, that the belayer might find useful, on the right side of the Lower Wall. Ignore flaring crack above and right; instead move up slightly left of the step. Continue to ledge beneath final overlap. Resist urge to escape right. Instead tackle overlap and hopefully you will get a nice surprise.
Chimney Area
To the right of the Lower Wall (sea at your back) there is a chimney feature. On the right side of the chimney there is a nice looking wall, the left side is less pretty.
1. Chasm Spasm 20m HS
Start at the entrance to the chimney at the base of a broad outward facing corner. Climb to small ledge at top of corner (could belay part-way up corner if sea is rough/tide is in). Continue up vague crack to base of another outward facing corner that leads to right side of crowning capstone.
2.Really? 20m HVS 5b
Start as for Chasm Spasm. Use a more leftward line from the small ledge atop the first broad outward facing corner. Follow small holds to overlaps above. Move up on the left side of the crowning capstone.
3. Heart Of Darkness 20m HS
Let yourself be engulfed by the chasm by delving deep within it down to the back. Then make the required moves to ascend the chimney aiming to have your back to the sea when you emerge into the light.
Big Wall
This tall vertical wall is to the right of the Chimney Area over a slight rise. Approach to the base of this wall can be problematic when the tide is in (the same can be said when the tide is out!). It is possible to abseil in I’d say but I haven’t tried to be honest.
1. Light Chocolaty Moments 8m HVS 5a
Deepest inside corner to the left of the Big Wall (a chunk missing from the left wall of the corner). Climb wall on the right of corner. Mind head below rock protruding above the corner. Finish on clean, compact, suspicious rock to finish ledge.
2. Got Out Clause 25m VS 4c
Somehow get to right side of the bottom of the Big Wall. Follow along line of the deepest diagonal fissure (rising leftwards) but climb 1m or 2m above it. Stop climbing when you reach same finish ledge as for Light Chocolaty Moments.
3. The Honeymoon Is Over 12m VS 4c
Start in next inside corner, to the right of Light Chocolaty Moments. Go straight up corner and then start to veer ever leftwards the further up you go, until you suddenly feel a belay coming on.
Forgotten Wall
This wall is about 100m left (West) of the Twin Pillars Area (see next section). Approach the base of climbs by a scramble (exposed in parts) on the left (west) side of wall.
1. Geordie 12m HS
Climb within obvious gap on the left side of the wall. Above the this move up a bit and then veer left towards the multiple mini overlaps where the gear is better (the direct finish is less amenable).
2. Break From The Books 13m HS
Climb up wall just to the right of the gap. Giving a much more direct line, sharing the same finish with Geordie and skirting over or around a fun overlap in the middle. But only if the doctorate studies go well.
3. Diagonal Mick ??? 15m VS 4c
Climb protruding rock to the right of Geordie to find a diagonal line of good holds leading up and right towards the overlap. Try and find a nice way through before scurrying to the inside corner above and right again.
4. Mick Meandering ??? 13m VS 4c
Start to the right of the roof, which is right of the start for Diagonal Mick. Go up and above lower stepped overlap to the overlap at mid height. Skip over overlap like a surgical knife. Either scurry to the cosy corner on the right. Or go up direct much more steeply with very sparse gear where falling is not an option (HVS 5a).
5. Mick Direct ??? 12m HVS 5a
Do you see the subtle, broad, flaring corner? The one beneath and slightly right of the (usually) wet overhanging crack? Good. Well, ascend both features and then finish up the cosy corner.
6. Supermodel 12m HVS 5a
About 2m to the right of Mick Direct, pounce onto the slabby piece of rock beneath the overlap with a crack running up above it. Generally follow this to a sort of flake near the top. Once over the flake, promenade with a rightward facing confidence to the top.
7. Blood Red Sky 14m E1 5b
A vertical edge of rock leads up to the right of a significant overlap, which is just above another significant overlap. Follow the edge up and then traverse, as best you can, left under the higher overlap. If possible induce swelling in left hand to give comfortable jam around left side of overlap. You never know there may be a handhold for a normal sized right hand above your head. After this just climb straight up to the top. Or alternatively and more easily skirt off left to finish up Supermodel.
8. Belgacious 12m E2 5b
Start about a metre to the right of the starting edge of Blood Red Sky. Rise with a sense of invincibility towards the goal of an obvious hole in the upper wall about a metre from the top. Do not fall when you realise this hole does not contain a jug, since you will probably be on a long run-out.
9. New Arrivals 12m HVS 5b
There are two main cracks at the top of the cliff to the right of Belgacious. The aim of the game for this climb is to end up ascending the left crack, by following a fairly direct line below it upwards.
10. Forgotten 12m HVS 5b
To the right of Belgacious, there are two main cracks at the top of the wall. The aim of the game for this climb is to end up ascending the right crack, by following a fairly direct line below it upwards. Déjà vu?
11. Big Girls 12m HVS 5a
Tucked in on the right side of the wall is a sort of shallow overlap facing right, running vertically from top to bottom. The imaginary line is more pronounced at the bottom but is still visible at the top.
12. HAG 12m HVS 5a (to be confirmed)
Ian Walsh & Kian Buckley 11/03/12
The obvious offwidth line on the left of Geordie, climb until you reach a 2 foot roof where the crack becomes 1 inch wide. Follow the crack around the roof and onto the verticle face. From here the climb continues over the ledge leftwards (sea to back) where a horizontal crack appears over the ledge. The climb is sustained until you are over this ledge. The rest of the climb is on this slab where you follow a pin scar crack where small protection can be found nuts size 1 and under are handy here. Finish on ledge under 3/4 height and left of Geordie finish.
Twin Pillars Area
This area is about 300m right (East) of the Main Area. The First Pillar is to the left of the Second Pillar. An abseil approach is advised for most of the climbs.
First Pillar
1. First Pillar Direct 20m S
Follow the obvious line bisecting the front of the First Pillar.
2. Chasm Arête 20m S
On the left side of the First Pillar, find nice looking continuous outward facing corner and climb it to the top.
Second Pillar
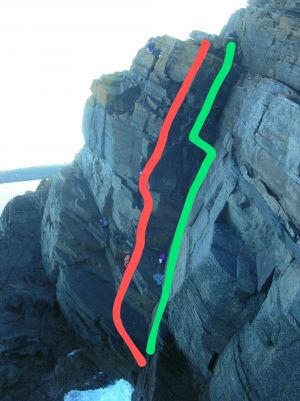
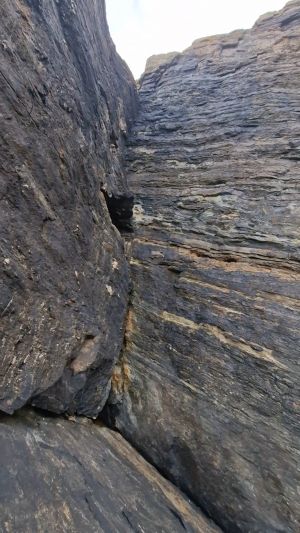
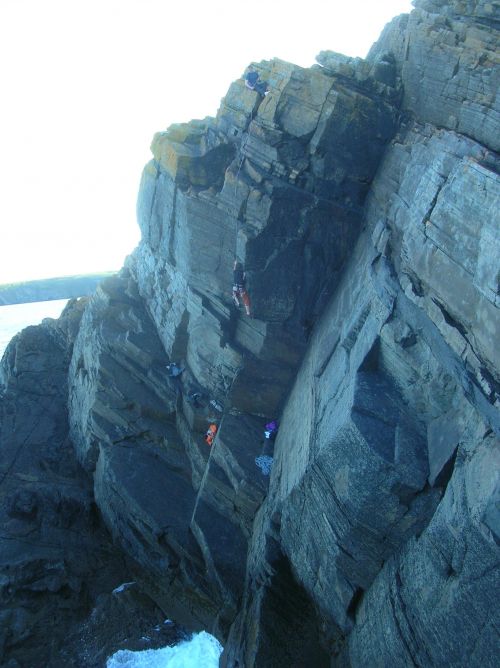
Building your abseil anchor is half the challenge for the second pillar: it took us an hour to find three secure cam placements (yellows and red). Much loose rock around. Once down, there is a handy ledge that should be dry at high tide unless there is significant swell. We don't yet have a good photo showing all of each route, so descriptions will have to do for now.
The following two routes are on the main face of the second pillar, accessed by abseiling down to the obvious ledge.
Routes 1 and 2: L. De Bonis, W. Pickles, T. Pradat 10/07/2024.
1. Shagspotting 20m VS 4b
Good protection throughout, although you may miss the cams you used for the abseil anchor. Start at the obvious arete rising from the left end of the main face ledge. Climb on the arete / just to the left of it. The crux comes at the highest point visible from the belay. After that, the arete is less distinct, ascend and move right, to finish as 'Trundle!'. A more direct finish is possible, but the rock is loose.
2. Trundle! 20m HVS 5a
Stand in the middle of the bottom ledge and climb up slightly to the left, going straight through the first overhang. Once you get above it, climb up and finish by following the slab on the right.
Routes 3 and 4: L. De Bonis, W. Pickles, G. Giunta 13/08/2024.
3.
4. Chough-tastic 20m HVS 5a
Lovely route on the arete, right hand side of the main face of the pillar. Protection is fairly good. The climbing is generally on the left of the arete. About halfway up, move right to straddle the arete and climb over a slight bulge. After this, squirm up to the left of the prominent buttress. The start might be wet at high tide or big swell.
1st Lookout Wall (Second Pillar Wall)
Originally, this wall was called the Second Pillar Wall, which made it easy to think that it was on the Second Pillar itself. Instead, it is to the East of the Second Pillar, directly under the 1st lookout tower. Access to the routes is by abseiling from the top ledge, which is reached by scrambling down toward South from the 1st lookout tower. Just before you tackle any of these routes, give a quick wistful look over your left shoulder – if you see the majesty of the Second Pillar – go forth and conquer. Climbs are listed from right to left.
1. Bidet Blues 12m Diff
Obvious cleft and weakness on the far right side of the Second Pillar / 1st Lookout Wall. A nice way out after you have finished exploring.
2. Chunga Lunga ??? 13m HS
Do not be perturbed by the initial bulge of this climb, a few metres to the left of Bidet Blues. After you ascend into the shallow corner just above the bulge, you will think it was just all in your mind as you amble over the easier rock above.
3. Unga Bunga ??? 14m HS
Just because a climb a few metres to the left of Chunga Lunga does not have a vertical crack to follow upwards, this does not mean there is no gear. Overcome the bulge and have a look for yourself. And again, just go up, that’s what its all about.
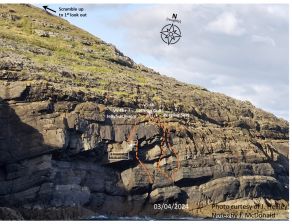
The following 3 routes (4, 5 and 6) start from an abseil point in the middle of the wall, see picture. Semi-hanging belay just above the high tide mark. J. McDonald & L. De Bonis, 03/07/2024.
4. Peeping Seal 12m S From the belay step up and right into the easy angle slab then left to a fault in the slightly left trending slab.
5. Let’s Go Gull 12m VS 4b From the belay step up and left to the next bigger horizontal break. Then follow right, bridging the slab underneath the overhang and directly finish at the abseil.
6. Jellyfish Bloom 14m VS 4b+ Traverse left from the abseil of the previous two routes for about 3-4m to the next crack in the wall. Best to stay on the abseil rope while doing this or pitch it. Semi-hanging belay can be built from here. From the belay take the easy angled slab to the next large break. Then into the corner and bridge through the overhanging section. Airy but fun crux coming out of the corner. Watch out for some loose but (probably) stuck blocks here (I’d avoiding testing how stuck they are on lead). Then more bridging and palming up to a big flake and top out just right of the flake.
7. Oogie Coogie ??? 15m HVS 5b
Now this route does have a crack line, so you need to follow it backwards as you abseil down to the start of the route. At the top is a (currently) yellow block with a sort of rib below it. The climb ascends up this, starting from a line to the left of this rib (if you have back to the sea).
8. Bloody Warm-up 15m E1 5b
Abseil from ledge with big detached block. Start climbing from square cut ledge near the sea. Climb directly to first overlap into a tight, right-trending, steep corner. Elegantly climb/fight your way to top of corner and search for daylight above and slightly right of terminating overlap. Rejoice over more lenient rock to the top and make friends with detached block.
9. Attack of the Dweebs 15m HS
Start just around corner to the left of square cut ledge (start of Bloody Warm-up). Climb up to first overlap and overcome it (crux) about a metre left of the corner. Dance up the easier ground to the top, to the left side of a ledge.
9a. Return of the Dweebs 17m HS W. Pickles, L. De Bonis 16/07/2024 Variant of Attack of the Dweebs. As AOTD until the first overlap. Then climb about 1m to the left of AOTD to the ledge at the top of Right Turn Clyde. Then climb 2m to a grassy ledge.
10. Right Turn Clyde 20m VS 4c
Start nearly 4m to the left of Attack of the Dweebs. Climb up to and beyond first overlap onto rock with small gregarious holds. Pull on holds excessively, towards second overlap. Ignore the aloof rock above and instead traverse 3m right to a ledge
11. Thrift (Straight Up Clyde) 20m E1 5b L. De Bonis & W. Pickles 16/07/2024
Start as Right Turn Clyde, with your back to the majestic arete of the second pillar. Once gained the intermediate ledge, don't turn right but climb instead straight up (crux) to the ledge above.
Lost Wall
Lost Wall is way over to the east of the other areas. I suppose I could tell you where it is but the guide writing is getting somewhat tiresome. If it can be found by one person but that person falls into a coma, that does not mean it can not be rediscovered by others does it?
1. Banana Split 10m HVS 5a
This is an acute corner, not bisected by a banana, but by a crack. As you ascend the crack a revelation overcomes you as you bridge upwards – it is you who is the banana!
2. Paul’s Fall 8m HVS 5a
If you find the Banana Split corner, then look to the right of it. Suddenly the rock strata becomes wiggly in waves. Somewhere in the middle of this, there is, shall we say a natural scratch (more than a crack) ascending the wall to lure the unwary upwards.
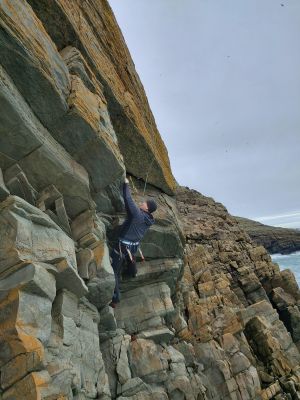
The Ballycotton Arête is a new route at Roberts Head (Confusing eh?). The route is slightly overhanging, almost a three move wonder with easy above and below, but I liked it a lot (having lashed it up myself). It is in between "Mozzies & Dolphins" and "Roberto". A knee jam and some small pinches.
