Difference between revisions of "Allihies"
Barry watts (talk | contribs) |
|||
| (53 intermediate revisions by 2 users not shown) | |||
| Line 1: | Line 1: | ||
| − | == Introduction == | + | ==Introduction== |
| − | Location: | + | Location: These crags are between Dursey Sound and the small harbour at Garnish, about 5km south of the village of Allihies in West Cork. |
| − | + | ==Whaleback Crag== | |
| + | The routes are between 8m and 18m high and were done without prior inspection or cleaning. Protection is generally good and the rock is generally solid though some extra care should be taken in the upper sections of the longer routes. The location is scenic and the big platform allows easy navigation around the bottom of the crag. | ||
| + | |||
| + | This crag is reached by driving to the pier at Garnish. Road signs for Dursey should be followed until the final turn off for the pier is reached, park at the pier. Pick up the signs for the Beara Way heading Westwards along the coast from the pier, after crossing the first fence stile follow the path for another 100m before veering right and uphill towards the coast. The ledges below the crag are above tide level. The best way of accessing them is by veering down to the left at the top of the crag as you face out to sea. The descent is stepped and the scramble down the last few metres would probably warrant a Diff grade. An abseil can easily be set up. The following routes are described form left to right (with your back to the sea) while '''Mixed Up''' and '''Gilesmeister''' are to the left of the descent. | ||
| + | [[File:W back layout.jpg|center|thumb|500x500px]] | ||
| + | |||
| + | The following routes are reached from '''Mixed Up''' by scrambling around the corner and down to a large flat platform. | ||
| + | |||
| + | '''Buzzback''' S | ||
| + | |||
| + | ''Gill Ryan, Paul Harrington, 7/9/2007.'' | ||
| + | |||
| + | This route starts left around the corner from '''Rainshelter'''. It is the last obvious line before the zawn. It follows an obvious crack for a few metres. and then continues more easily up the arete. | ||
| + | [[File:Wback1.jpg|center|thumb|667x667px]] | ||
| + | |||
| + | '''Rainshelter''' VD | ||
| + | |||
| + | ''Gill Ryan, Paul Harrington, 17/6/2007.'' | ||
| + | |||
| + | The large corner on the left of the platform. | ||
| + | |||
| + | '''Fairy Village''' HS 4b | ||
| + | |||
| + | ''Paul Harrington, Gill Ryan, 17/6/2007.'' | ||
| + | |||
| + | This route follows the twin cracks in the middle of the wall just right of the large corner of '''Rainshelter.''' | ||
| + | |||
| + | '''Scales''' VS 4b | ||
| + | |||
| + | ''Paul Harrington, Gill Ryan, 7/9/2007.'' | ||
| + | |||
| + | The twin cracks on the right hand side of the platform. The moves are not difficult and the line is obvious but the rock is not as reassuring as on other routes, hence the VS grade. | ||
| − | + | '''Rocking at the Lighthouse''' 22m S | |
| − | + | ''Barry Watts, Bernie Stubbs, 29/4/2023.'' | |
| − | + | Start on the platform right and above of '''Scales''', climb the leftwards trending cracks over shelves to a ledge. Climb the 3m wall to a second ledge and finish up a leftwards facing corner. | |
| − | + | [[File:WB.jpg|center|thumb|556x556px]] | |
| − | ''' | + | '''Moss flavored''' 22m S |
| − | |||
| − | |||
| − | '' | + | ''Barry Watts, Bernie Stubbs, 29/4/2023.'' |
| − | |||
| − | |||
| − | + | There is a high slabby face/flank left of the descent and '''Mixed Up'''. Start 1m left of '''Mixed Up''' and climb directly up the slab to the second col on the skyline, place some gear and traverse right to gain cracks that will deliver you to the third col on the skyline, continue up the easy arete to the top. | |
| + | [[File:W back 2.jpg|center|thumb]] | ||
| + | '''Mixed Up''' VD | ||
| − | '' | + | ''Gill Ryan, Paul Harrington, 17/6/2007.'' |
| − | |||
| − | |||
| − | + | The corner just left of the descent. Follow it to the top. | |
| − | ''' | + | '''Mixed Up detour''' S |
| − | |||
| − | |||
| − | + | ''Bernie Stubbs, Barry Watts, 29/4/2023.'' | |
| − | ''' | + | Climb the corner of '''Mixed Up''' to a ledge at two thirds height, climb the hand crack in the left wall to the top. |
| − | + | [[File:W back 3.jpg|center|thumb]] | |
| − | |||
| − | + | '''Gilesmeister''' D/VD | |
| − | + | ''Gill Ryan, Paul Harrington, 17/6/2007.'' | |
| − | + | This route follows the short cracks just left of the descent and right of the corner of '''Mixed Up'''. | |
| + | [[File:Pinnacles.jpg|center|thumb|369x369px]] | ||
| − | + | '''Pinnacles''' VD | |
| − | + | ''Gill Ryan, Paul Harrington, 7/9/2007.'' | |
| + | This route is right of the descent and starts on a platform a few metres left of a deep zawn. It is the most continuous line on this side of the descent. Up the corner and short little wall to a ledge. You could traverse off left at this point but continue up another little wall to the top. | ||
| + | [[File:Saucy baboon.jpg|center|thumb]] | ||
| − | ''' | + | '''Saucy Baboon''' S |
| − | |||
| − | |||
| + | ''Jill French, Jane Irvine, 29/4/2023.'' | ||
| − | ''' | + | Start 2m right of '''Pinnacles,''' climb the corner over several shelves to the top. |
| − | + | ==The Slab== | |
| − | + | [[File:Allihies.jpg|center|thumb|500x500px]] | |
| + | Approach: Initially, it is best to approach from the Dursey side along the Beara Way because the crag comes into full view from this side and the approach is more evident. On subsequent visits it is shorter to approach along the Beara way from the Garnish side. | ||
| − | + | The most obvious feature is a large grassy ledge with a few boulders that is at the top of the Bull Wall. A ledge that is above tide (unless there is a swell running) runs along the base of the Bull Wall. The other sections of the crag can be located in relation to the Bull Wall. | |
| − | A | ||
| − | |||
| + | Description: This is a very pleasant small crag offering low to middle grade climbing in a beautiful setting. Access is easy and the existence of ledges means that it is easy to get around the crag. However, it is necessary to abseil into all routes. | ||
| − | + | This face is to the left of the Bull Wall (facing the crag). It is above a small inlet and has a flat ledge with some large boulders on top. | |
| − | |||
| − | |||
| + | '''H.O.S.''' 8m V.Diff<br />''R. Stack (Solo) 15/10/95<br />''Abseil in to the base of the climb. Climb the short corner on the left hand side of the slab. | ||
| − | ''' | + | '''Hairy Pink Herrings''' 25m S<br />''A. Forde, R. Stack 17/9/95<br />''Abseil into the base of the climb. Climb the wide crack line on the left hand side of the slab. |
| − | A. Forde, R.Stack | ||
| − | |||
| + | '''Pleiadies''' 30m HVS 5a<br />''R.Stack, A. Forde 17/9/95<br />''Abseil in to the base of the corner. Climb the obvious quartz crack/corner in the middle of the slab. | ||
| − | ''' | + | '''The Cat from Idaho''' 43m E2 5c<br />''A. Forde, R. Stack 17/9/95''<br />Abseil into the base of the climb. Climb the right tending series of crack lines on the right hand side of the slab. |
| − | A. Forde, R.Stack | ||
| − | |||
| + | '''Muffy''' 43m E2 5c<br />''A. Forde, R. Stack 15/10/95''<br />Climb the thin right tending diagonal line to the right of Islands In The Stream(???). A vertical line crosses this route at half height. Protection is poor at the start but the crux is towards the top. | ||
| − | + | ==Bull Wall== | |
| − | |||
| − | |||
| − | + | There are two ledges under this wall. The square ledge and the long ledge. Abseil into the square ledge. It is possible to climb down to the long ledge from the square ledge. | |
| + | Watch the tide, people have had to scramble up the wall to avoid freak waves. | ||
| − | + | [[File:Bull Wall.JPG]] | |
| − | |||
| − | |||
| + | Note : The following routes are above the Square Ledge. | ||
| − | ''' | + | '''Cladonia''' 15m S<br>''R.Stack (Solo) 31/8/95''<br>Start at the left side of the square ledge. Climb the quartz line to the top of the arête. Traverse right to Tralee Dog Show or abseil off. |
| − | |||
| − | Start | ||
| + | '''Back Wash''' 15m HS<br>''R.Stack, A. Forde 1/9/95''<br>Start 0.5m right of Cladonia. Climb the right trending line. | ||
| − | ''' | + | '''Samphire''' 15m HS<br>''A. Forde (Solo) 31/8/95''<br>Climb the right tending crack line 2-3m right of Cladonia. Finish as for Cladonia |
| − | |||
| − | |||
| + | '''Never Mind The Pollocks''' 20m HS<br>''A. Forde (Solo) 1/9/95''<br>Climb the wide crack line above the square ledge. | ||
| − | ''' | + | '''Dirty Dozen''' 30m VS 4c<br>''A. Forde, R.Stack 1/9/95''<br>Start 3-4m left of Tralee Dog Show. Climb straight up to the top of the arête |
| − | R.Stack | ||
| − | Climb the | ||
| + | '''Hot Lava''' 30m E3 6a<br>''A. Forde, R.Stack 31/8/95''<br>Start 3m left of Tralee Dog Show. Climb diagonally right to gain a small ledge at 10 m. Step across to the overhanging wall and move up to a horizontal crack. Move left along this to the base of a vertical crack. Climb this to the top. | ||
| − | ''' | + | '''Tralee Dog Show''' 30m HS<br>''A. Forde, R.Stack 31/8/95''<br>This route follows the crack/corner at the back right of the square ledge. |
| − | R. Stack | ||
| − | |||
| + | '''The following routes are above the Long ledge''' | ||
| − | ''' | + | '''Fifty Wheel Barrows''' 45m E1 5b<br>''A. Forde, R. .Stack, D Tagney 17/9/95''<br>This route zig zags a few times before following a faint line to the top. Protection is not good and the rock is of poor quality towards the top of the climb. |
| − | A. Forde, | ||
| − | |||
| + | '''Ali Baba Goes West''' 54m VS 4c<br>''A. Forde, R.Stack 1/9/95''<br>Start just left of the break in the high point of the long ledge. Climb the crack to a small overhang at 15m and continue straight to the top. | ||
| − | ''' | + | '''Hiri Kiri''' 45m HS<br>''C. Cudden, A. Forde 16/9/95''<br>This route follows the crack line just to the right of Ali Baba Goes West. |
| − | |||
| − | |||
| − | + | '''Wierd Fish''' 40m VS 4b<br>''R.Stack, A. Forde 31/8/95''<br>Climb the obvious quartz line left of a broken quartz area. The line is left tending and goes through a small overhang at one third height. | |
| − | ''' | + | '''Babooshka''' 35m HS<br>''R. Stack, A. Forde 31/8/95''<br>Start behind or on top of the large block at the right hand end of the Bull Wall. Climb the obvious line to the top of the crag. |
| − | R.Stack, A. Forde | ||
| − | |||
| − | ''' | + | '''(unnamed)''' 40m E1 5b<br>''A. Forde, C. Cudden 16/9/95''<br>(no description) |
| − | A. Forde, C. Cudden 16/9/95<br> | ||
| − | (no description) | ||
| − | ''' | + | '''Rock Juice''' 30m HS<br>''R.Stack, A. Forde 1/9/95''<br>Climb the (quartz) arête at the extreme right hand end of the Bull Wall. |
| − | A. Forde | ||
| − | |||
| − | |||
| − | |||
| − | == | + | ==Orca Wall== |
| + | '''Verbal Werbal''' 45m VS 4c<br>''R.Stack, A. Forde, D. Tagney 17/9/95''<br>Abseil in to the base of the corner (boulder field). Climb the corner on the left side of Orca Wall. | ||
| − | + | '''Sun Fish''' 45m E2 5c<br>''A. Forde, C. Cudden 16/9/95''<br>(no description) | |
| + | '''Orca''' 60m E2 4b/5c<br>''A. Forde, R.Stack 1/9/95''<br>This route follows the large crack/corner and then veers left along an arch/lip and then breaks through a small overhang to the top. Abseil in to the bottom of the boulder field and scramble over to the base of the corner.<br>1. 30m Climb the crack/corner to a narrow ledge.<br>2. 30m From the ledge climb up and left following the arching line ( tending left). Near the top of the arch traverse left and up to the lip again (poor protection). Climb through a small overhang (quartz) to the top. | ||
| − | + | ==Titan Wall== | |
| − | |||
| − | |||
| − | |||
| − | |||
| + | This is the next wall to the right of Orca wall. All routes have to be abseiled into. About 8m down from the top of the crag there is a long narrow ledge running across the top of the face. It is possible to scramble down to this ledge from the right (as you look at the face) or abseil onto this ledge. From this ledge abseil into the base of the climbs. It is possible to scramble from this ledge to the top. | ||
| − | ''' | + | '''Titan''' 40m HVS 5a,4c<br />''R. Stack, C.Cudden, A. Forde 15/10/95''<br />This is the corner on the left of this face. Abseil down and slightly right. It was originally climbed in two pitches, but it would be possible to do it in one.<br />1. 20m Start at the base of a groove. Climb a steep crack for about 10 m which then eases off and continue up to a small ledge. Belay Here.<br />2. 20m Climb the wide crack/corner finishing over a large block. |
| − | |||
| − | |||
| − | == Poll an Tarbh == | + | '''Waiting For M''' 45m VS 4c<br />''A. Forde, C. Cudden, R.Stack 15/10/95''<br />Start abseiling about 10 m to the right of Titan. Abseil down to the base of a wide groove. Climb the groove for about 20m, then break out right following a crack line up the slab to the top. |
| + | ==Poll an Tarbh== | ||
This face is about 100m to the right of Titan wall (as you look at it from the sea). All routes are generally abseiled into, although it is possible to scramble in from the left hand side. On top of these routes is a large series of blocks which form a small cave. Abseil from this position. | This face is about 100m to the right of Titan wall (as you look at it from the sea). All routes are generally abseiled into, although it is possible to scramble in from the left hand side. On top of these routes is a large series of blocks which form a small cave. Abseil from this position. | ||
| − | '''Red Hess'''<br /> | + | '''Red Hess'''<br />''C.Cudden, A. Forde 8/4/96''<br />Climb the right facing corner on the left hand side of the face. |
| − | C.Cudden, A. Forde 8/4/96<br /> | ||
| − | Climb the right facing corner on the left hand side of the face. | ||
| − | '''Two Little Hitlers''' 25m E1/HVS 5b/5a<br /> | + | '''Two Little Hitlers''' 25m E1/HVS 5b/5a<br />''A. Forde, C. Cudden, R.Stack 8/4/96''<br />Climb the crack line in the centre of the face (surmounting a small overhang at the start of the route). |
| − | A. Forde, C. Cudden, R.Stack 8/4/96<br /> | ||
| − | Climb the crack line in the centre of the face (surmounting a small overhang at the start of the route). | ||
| − | '''An Evening with Mighty''' 25m HVS 5a<br /> | + | '''An Evening with Mighty''' 25m HVS 5a<br />''C.Cudden, A. Forde, R. Stack 8/4/96''<br />To gain access to the base of this route, abseil in to the right of the start of Two Little Hitlers, then traverse right and under the boulders, then climb up through the boulders (Poll an Taribh) to the base of the climb. Climb the obvious left tending crack line at the right hand end of the wall. |
| − | C.Cudden, A. Forde, R. Stack 8/4/96<br /> | ||
| − | To gain access to the base of this route, abseil in to the right of the start of Two Little Hitlers, then traverse right and under the boulders, then climb up through the boulders (Poll an Taribh) to the base of the climb. Climb the obvious left tending crack line at the right hand end of the wall. | ||
| − | '''Pushing Cotton''' 15m HS<br /> | + | '''Pushing Cotton''' 15m HS<br />''A. Forde, R. Stack, C. Cudden 8/4/96''<br />Start 10m right of An Evening With Mighty. Climb the obvious right tending crack line. |
| − | A. Forde, R. Stack, C. Cudden 8/4/96<br /> | ||
| − | Start | ||
Whaleback Crag: [http://harringtonp.googlepages.com/whalebackcrag.doc] | Whaleback Crag: [http://harringtonp.googlepages.com/whalebackcrag.doc] | ||
Latest revision as of 15:45, 24 May 2024
Introduction
Location: These crags are between Dursey Sound and the small harbour at Garnish, about 5km south of the village of Allihies in West Cork.
Whaleback Crag
The routes are between 8m and 18m high and were done without prior inspection or cleaning. Protection is generally good and the rock is generally solid though some extra care should be taken in the upper sections of the longer routes. The location is scenic and the big platform allows easy navigation around the bottom of the crag.
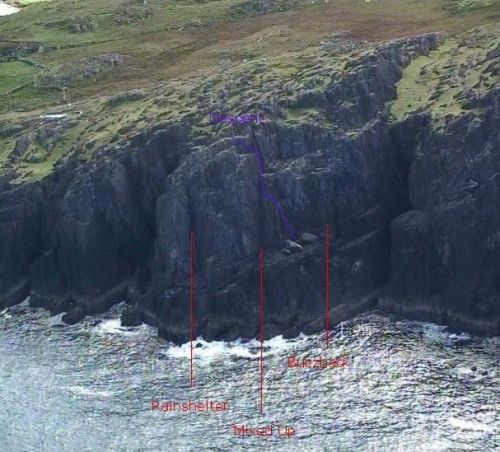
This crag is reached by driving to the pier at Garnish. Road signs for Dursey should be followed until the final turn off for the pier is reached, park at the pier. Pick up the signs for the Beara Way heading Westwards along the coast from the pier, after crossing the first fence stile follow the path for another 100m before veering right and uphill towards the coast. The ledges below the crag are above tide level. The best way of accessing them is by veering down to the left at the top of the crag as you face out to sea. The descent is stepped and the scramble down the last few metres would probably warrant a Diff grade. An abseil can easily be set up. The following routes are described form left to right (with your back to the sea) while Mixed Up and Gilesmeister are to the left of the descent.
The following routes are reached from Mixed Up by scrambling around the corner and down to a large flat platform.
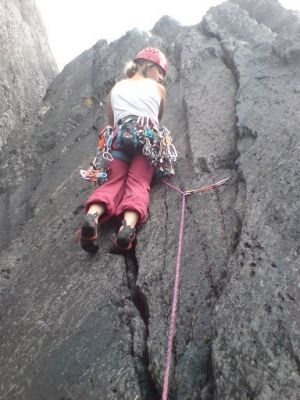
Buzzback S
Gill Ryan, Paul Harrington, 7/9/2007.
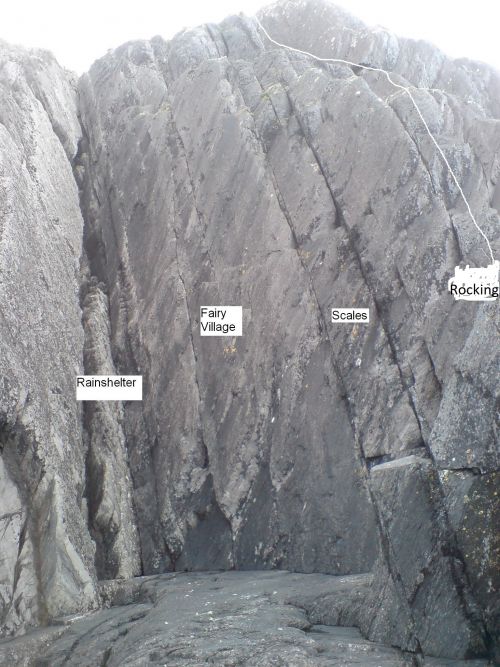
This route starts left around the corner from Rainshelter. It is the last obvious line before the zawn. It follows an obvious crack for a few metres. and then continues more easily up the arete.
Rainshelter VD
Gill Ryan, Paul Harrington, 17/6/2007.
The large corner on the left of the platform.
Fairy Village HS 4b
Paul Harrington, Gill Ryan, 17/6/2007.
This route follows the twin cracks in the middle of the wall just right of the large corner of Rainshelter.
Scales VS 4b
Paul Harrington, Gill Ryan, 7/9/2007.
The twin cracks on the right hand side of the platform. The moves are not difficult and the line is obvious but the rock is not as reassuring as on other routes, hence the VS grade.
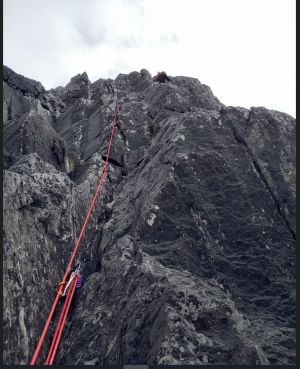
Rocking at the Lighthouse 22m S
Barry Watts, Bernie Stubbs, 29/4/2023.
Start on the platform right and above of Scales, climb the leftwards trending cracks over shelves to a ledge. Climb the 3m wall to a second ledge and finish up a leftwards facing corner.
Moss flavored 22m S
Barry Watts, Bernie Stubbs, 29/4/2023.
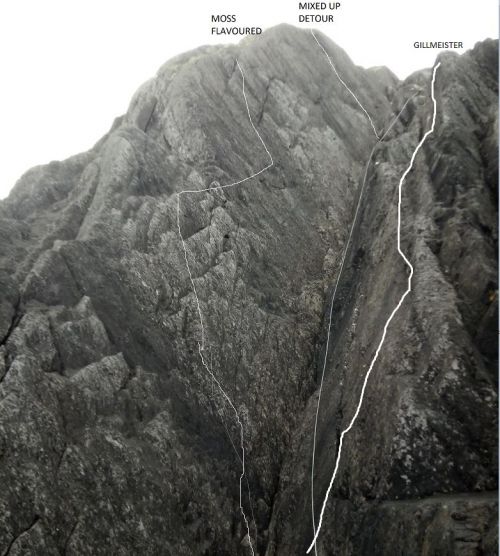
There is a high slabby face/flank left of the descent and Mixed Up. Start 1m left of Mixed Up and climb directly up the slab to the second col on the skyline, place some gear and traverse right to gain cracks that will deliver you to the third col on the skyline, continue up the easy arete to the top.
Mixed Up VD
Gill Ryan, Paul Harrington, 17/6/2007.
The corner just left of the descent. Follow it to the top.
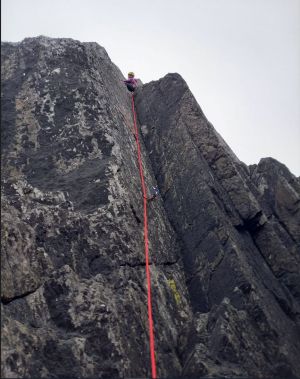
Mixed Up detour S
Bernie Stubbs, Barry Watts, 29/4/2023.
Climb the corner of Mixed Up to a ledge at two thirds height, climb the hand crack in the left wall to the top.
Gilesmeister D/VD
Gill Ryan, Paul Harrington, 17/6/2007.
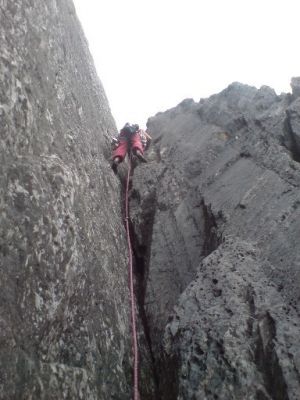
This route follows the short cracks just left of the descent and right of the corner of Mixed Up.
Pinnacles VD
Gill Ryan, Paul Harrington, 7/9/2007.
This route is right of the descent and starts on a platform a few metres left of a deep zawn. It is the most continuous line on this side of the descent. Up the corner and short little wall to a ledge. You could traverse off left at this point but continue up another little wall to the top.
Saucy Baboon S
Jill French, Jane Irvine, 29/4/2023.
Start 2m right of Pinnacles, climb the corner over several shelves to the top.
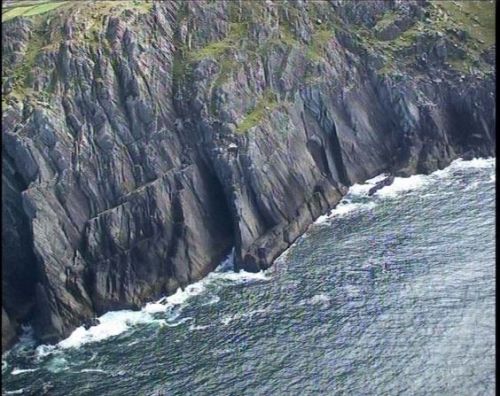
The Slab
Approach: Initially, it is best to approach from the Dursey side along the Beara Way because the crag comes into full view from this side and the approach is more evident. On subsequent visits it is shorter to approach along the Beara way from the Garnish side.
The most obvious feature is a large grassy ledge with a few boulders that is at the top of the Bull Wall. A ledge that is above tide (unless there is a swell running) runs along the base of the Bull Wall. The other sections of the crag can be located in relation to the Bull Wall.
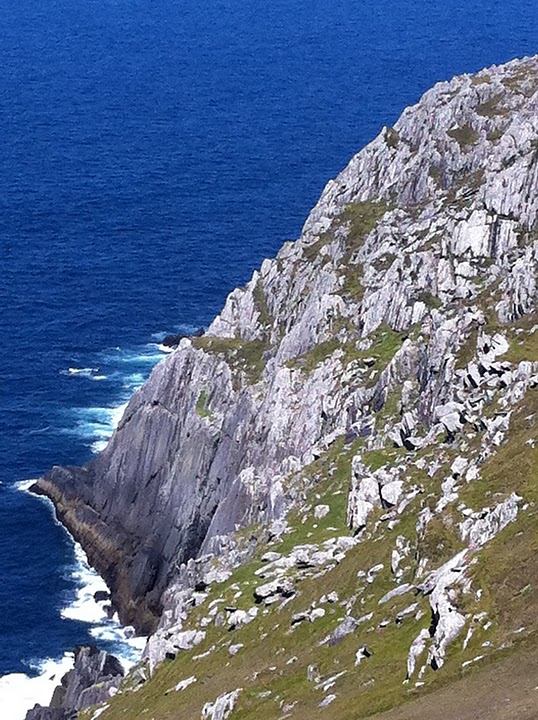
Description: This is a very pleasant small crag offering low to middle grade climbing in a beautiful setting. Access is easy and the existence of ledges means that it is easy to get around the crag. However, it is necessary to abseil into all routes.
This face is to the left of the Bull Wall (facing the crag). It is above a small inlet and has a flat ledge with some large boulders on top.
H.O.S. 8m V.Diff
R. Stack (Solo) 15/10/95
Abseil in to the base of the climb. Climb the short corner on the left hand side of the slab.
Hairy Pink Herrings 25m S
A. Forde, R. Stack 17/9/95
Abseil into the base of the climb. Climb the wide crack line on the left hand side of the slab.
Pleiadies 30m HVS 5a
R.Stack, A. Forde 17/9/95
Abseil in to the base of the corner. Climb the obvious quartz crack/corner in the middle of the slab.
The Cat from Idaho 43m E2 5c
A. Forde, R. Stack 17/9/95
Abseil into the base of the climb. Climb the right tending series of crack lines on the right hand side of the slab.
Muffy 43m E2 5c
A. Forde, R. Stack 15/10/95
Climb the thin right tending diagonal line to the right of Islands In The Stream(???). A vertical line crosses this route at half height. Protection is poor at the start but the crux is towards the top.
Bull Wall
There are two ledges under this wall. The square ledge and the long ledge. Abseil into the square ledge. It is possible to climb down to the long ledge from the square ledge.
Watch the tide, people have had to scramble up the wall to avoid freak waves.
Note : The following routes are above the Square Ledge.
Cladonia 15m S
R.Stack (Solo) 31/8/95
Start at the left side of the square ledge. Climb the quartz line to the top of the arête. Traverse right to Tralee Dog Show or abseil off.
Back Wash 15m HS
R.Stack, A. Forde 1/9/95
Start 0.5m right of Cladonia. Climb the right trending line.
Samphire 15m HS
A. Forde (Solo) 31/8/95
Climb the right tending crack line 2-3m right of Cladonia. Finish as for Cladonia
Never Mind The Pollocks 20m HS
A. Forde (Solo) 1/9/95
Climb the wide crack line above the square ledge.
Dirty Dozen 30m VS 4c
A. Forde, R.Stack 1/9/95
Start 3-4m left of Tralee Dog Show. Climb straight up to the top of the arête
Hot Lava 30m E3 6a
A. Forde, R.Stack 31/8/95
Start 3m left of Tralee Dog Show. Climb diagonally right to gain a small ledge at 10 m. Step across to the overhanging wall and move up to a horizontal crack. Move left along this to the base of a vertical crack. Climb this to the top.
Tralee Dog Show 30m HS
A. Forde, R.Stack 31/8/95
This route follows the crack/corner at the back right of the square ledge.
The following routes are above the Long ledge
Fifty Wheel Barrows 45m E1 5b
A. Forde, R. .Stack, D Tagney 17/9/95
This route zig zags a few times before following a faint line to the top. Protection is not good and the rock is of poor quality towards the top of the climb.
Ali Baba Goes West 54m VS 4c
A. Forde, R.Stack 1/9/95
Start just left of the break in the high point of the long ledge. Climb the crack to a small overhang at 15m and continue straight to the top.
Hiri Kiri 45m HS
C. Cudden, A. Forde 16/9/95
This route follows the crack line just to the right of Ali Baba Goes West.
Wierd Fish 40m VS 4b
R.Stack, A. Forde 31/8/95
Climb the obvious quartz line left of a broken quartz area. The line is left tending and goes through a small overhang at one third height.
Babooshka 35m HS
R. Stack, A. Forde 31/8/95
Start behind or on top of the large block at the right hand end of the Bull Wall. Climb the obvious line to the top of the crag.
(unnamed) 40m E1 5b
A. Forde, C. Cudden 16/9/95
(no description)
Rock Juice 30m HS
R.Stack, A. Forde 1/9/95
Climb the (quartz) arête at the extreme right hand end of the Bull Wall.
Orca Wall
Verbal Werbal 45m VS 4c
R.Stack, A. Forde, D. Tagney 17/9/95
Abseil in to the base of the corner (boulder field). Climb the corner on the left side of Orca Wall.
Sun Fish 45m E2 5c
A. Forde, C. Cudden 16/9/95
(no description)
Orca 60m E2 4b/5c
A. Forde, R.Stack 1/9/95
This route follows the large crack/corner and then veers left along an arch/lip and then breaks through a small overhang to the top. Abseil in to the bottom of the boulder field and scramble over to the base of the corner.
1. 30m Climb the crack/corner to a narrow ledge.
2. 30m From the ledge climb up and left following the arching line ( tending left). Near the top of the arch traverse left and up to the lip again (poor protection). Climb through a small overhang (quartz) to the top.
Titan Wall
This is the next wall to the right of Orca wall. All routes have to be abseiled into. About 8m down from the top of the crag there is a long narrow ledge running across the top of the face. It is possible to scramble down to this ledge from the right (as you look at the face) or abseil onto this ledge. From this ledge abseil into the base of the climbs. It is possible to scramble from this ledge to the top.
Titan 40m HVS 5a,4c
R. Stack, C.Cudden, A. Forde 15/10/95
This is the corner on the left of this face. Abseil down and slightly right. It was originally climbed in two pitches, but it would be possible to do it in one.
1. 20m Start at the base of a groove. Climb a steep crack for about 10 m which then eases off and continue up to a small ledge. Belay Here.
2. 20m Climb the wide crack/corner finishing over a large block.
Waiting For M 45m VS 4c
A. Forde, C. Cudden, R.Stack 15/10/95
Start abseiling about 10 m to the right of Titan. Abseil down to the base of a wide groove. Climb the groove for about 20m, then break out right following a crack line up the slab to the top.
Poll an Tarbh
This face is about 100m to the right of Titan wall (as you look at it from the sea). All routes are generally abseiled into, although it is possible to scramble in from the left hand side. On top of these routes is a large series of blocks which form a small cave. Abseil from this position.
Red Hess
C.Cudden, A. Forde 8/4/96
Climb the right facing corner on the left hand side of the face.
Two Little Hitlers 25m E1/HVS 5b/5a
A. Forde, C. Cudden, R.Stack 8/4/96
Climb the crack line in the centre of the face (surmounting a small overhang at the start of the route).
An Evening with Mighty 25m HVS 5a
C.Cudden, A. Forde, R. Stack 8/4/96
To gain access to the base of this route, abseil in to the right of the start of Two Little Hitlers, then traverse right and under the boulders, then climb up through the boulders (Poll an Taribh) to the base of the climb. Climb the obvious left tending crack line at the right hand end of the wall.
Pushing Cotton 15m HS
A. Forde, R. Stack, C. Cudden 8/4/96
Start 10m right of An Evening With Mighty. Climb the obvious right tending crack line.
Whaleback Crag: [1]
