Ailladie DWS Routes
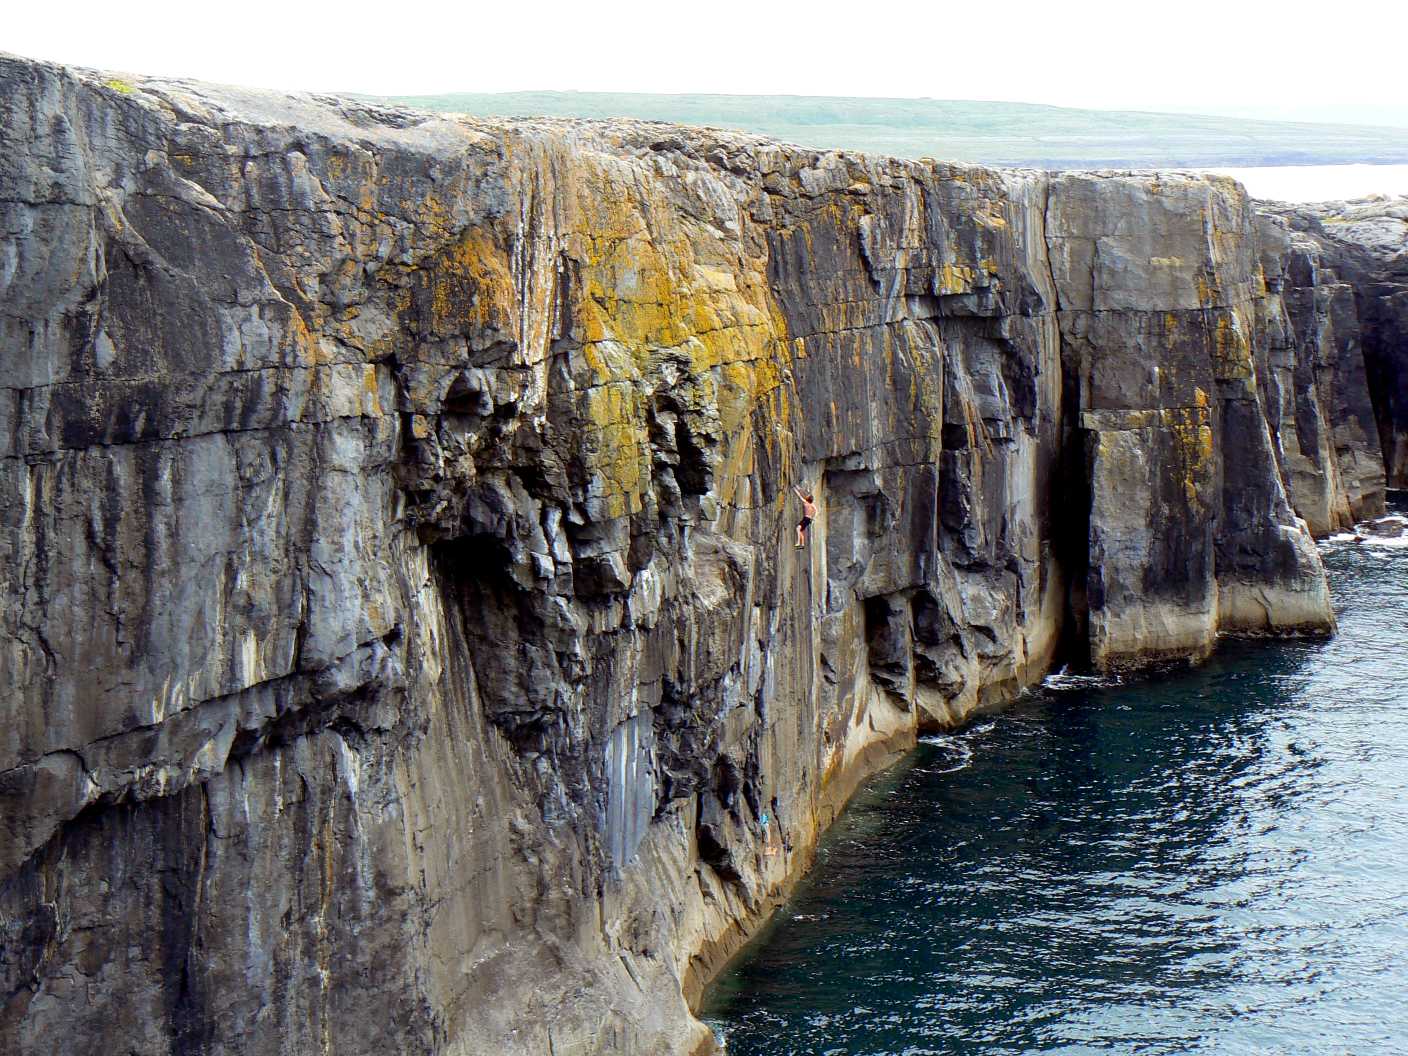
The routes are generally safe and most can be climbed at any tide. Most of the routes on An Falla Uaigneach ease with height, with the the top 10m being about Fr 3. However, a fall from here could still hurt, and so they have been given S1. Hanging a rope ladder on an anchor, so that if you fall in, you can pull out and try again or climb back up the rope, is probably the best way to approach the routes on An Falla Uaignech, as the nearest exit is Durk Wall (a fair swim away). I've made a rope ladder so get in touch if you're interested. Colm.
An Falla Uaigneach
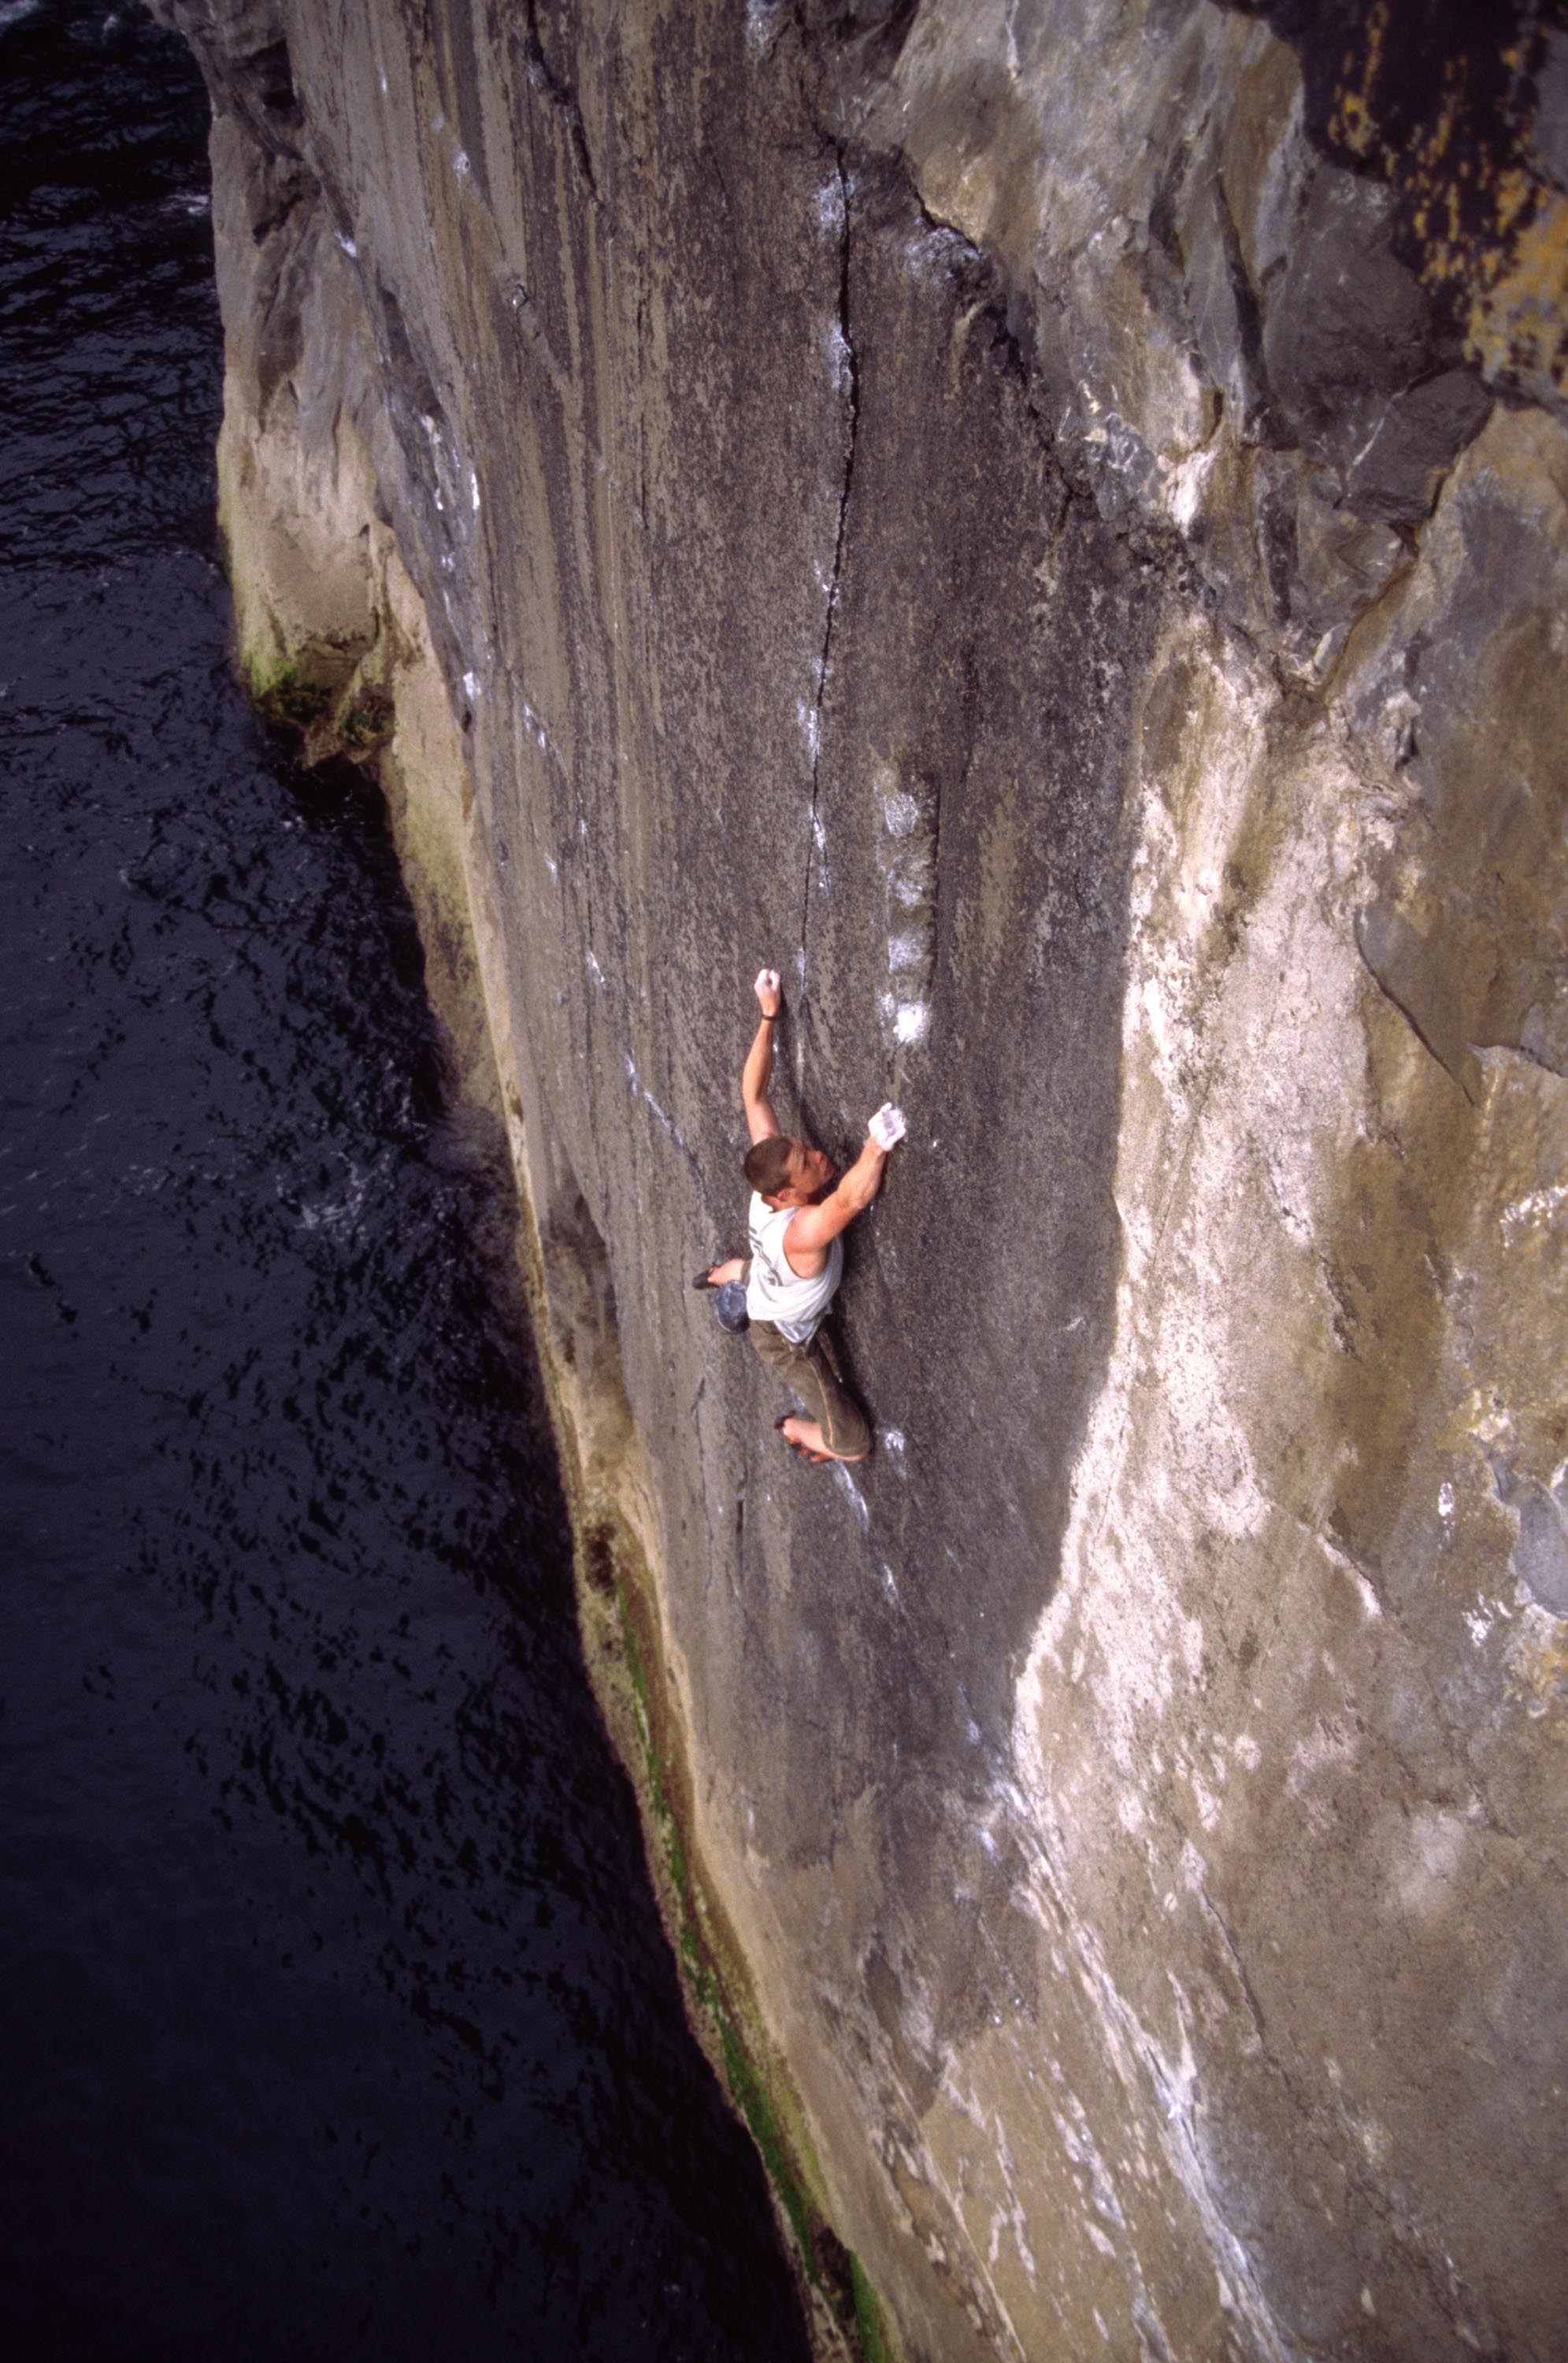
The Adventures of the Wonderwagon ** 25m F7b+/7c (S1/2)
Ab down to the second lowest ledge on Black Widow. Swing down left to gain a traverse line, and follow this to the base of a shallow grove. Follow the grove to the roof, and swing back right to finish up the end of Black Widow.
Best done at high tide with a particularly calm sea. Hanging a rope ladder off the lowest ledge on Black Widow provides the most convienent escape.
FA C. Shannon 10/06/16
The Jelly Situation *** 28m F7c+ (S1)
The big line on the wall. Start from the Seabird belay. Traverse left, staying low initially, before moving up to an obvious jug on the wall. From there, move left to a leftwards facing jug, and then up, where a hard move gains you the overlap. Step left, and then sequence up through the overlap and pumpy headwall.
This has hard climbing at height. Best done at high tide as a result, and I'd also recomment having someone on the Seabird ledge ready to act as lift guard. Hanging a rope ladder from the Seabird belay provides the most convienent escape. .
FA C. Shannon 12/06/16
Topo:
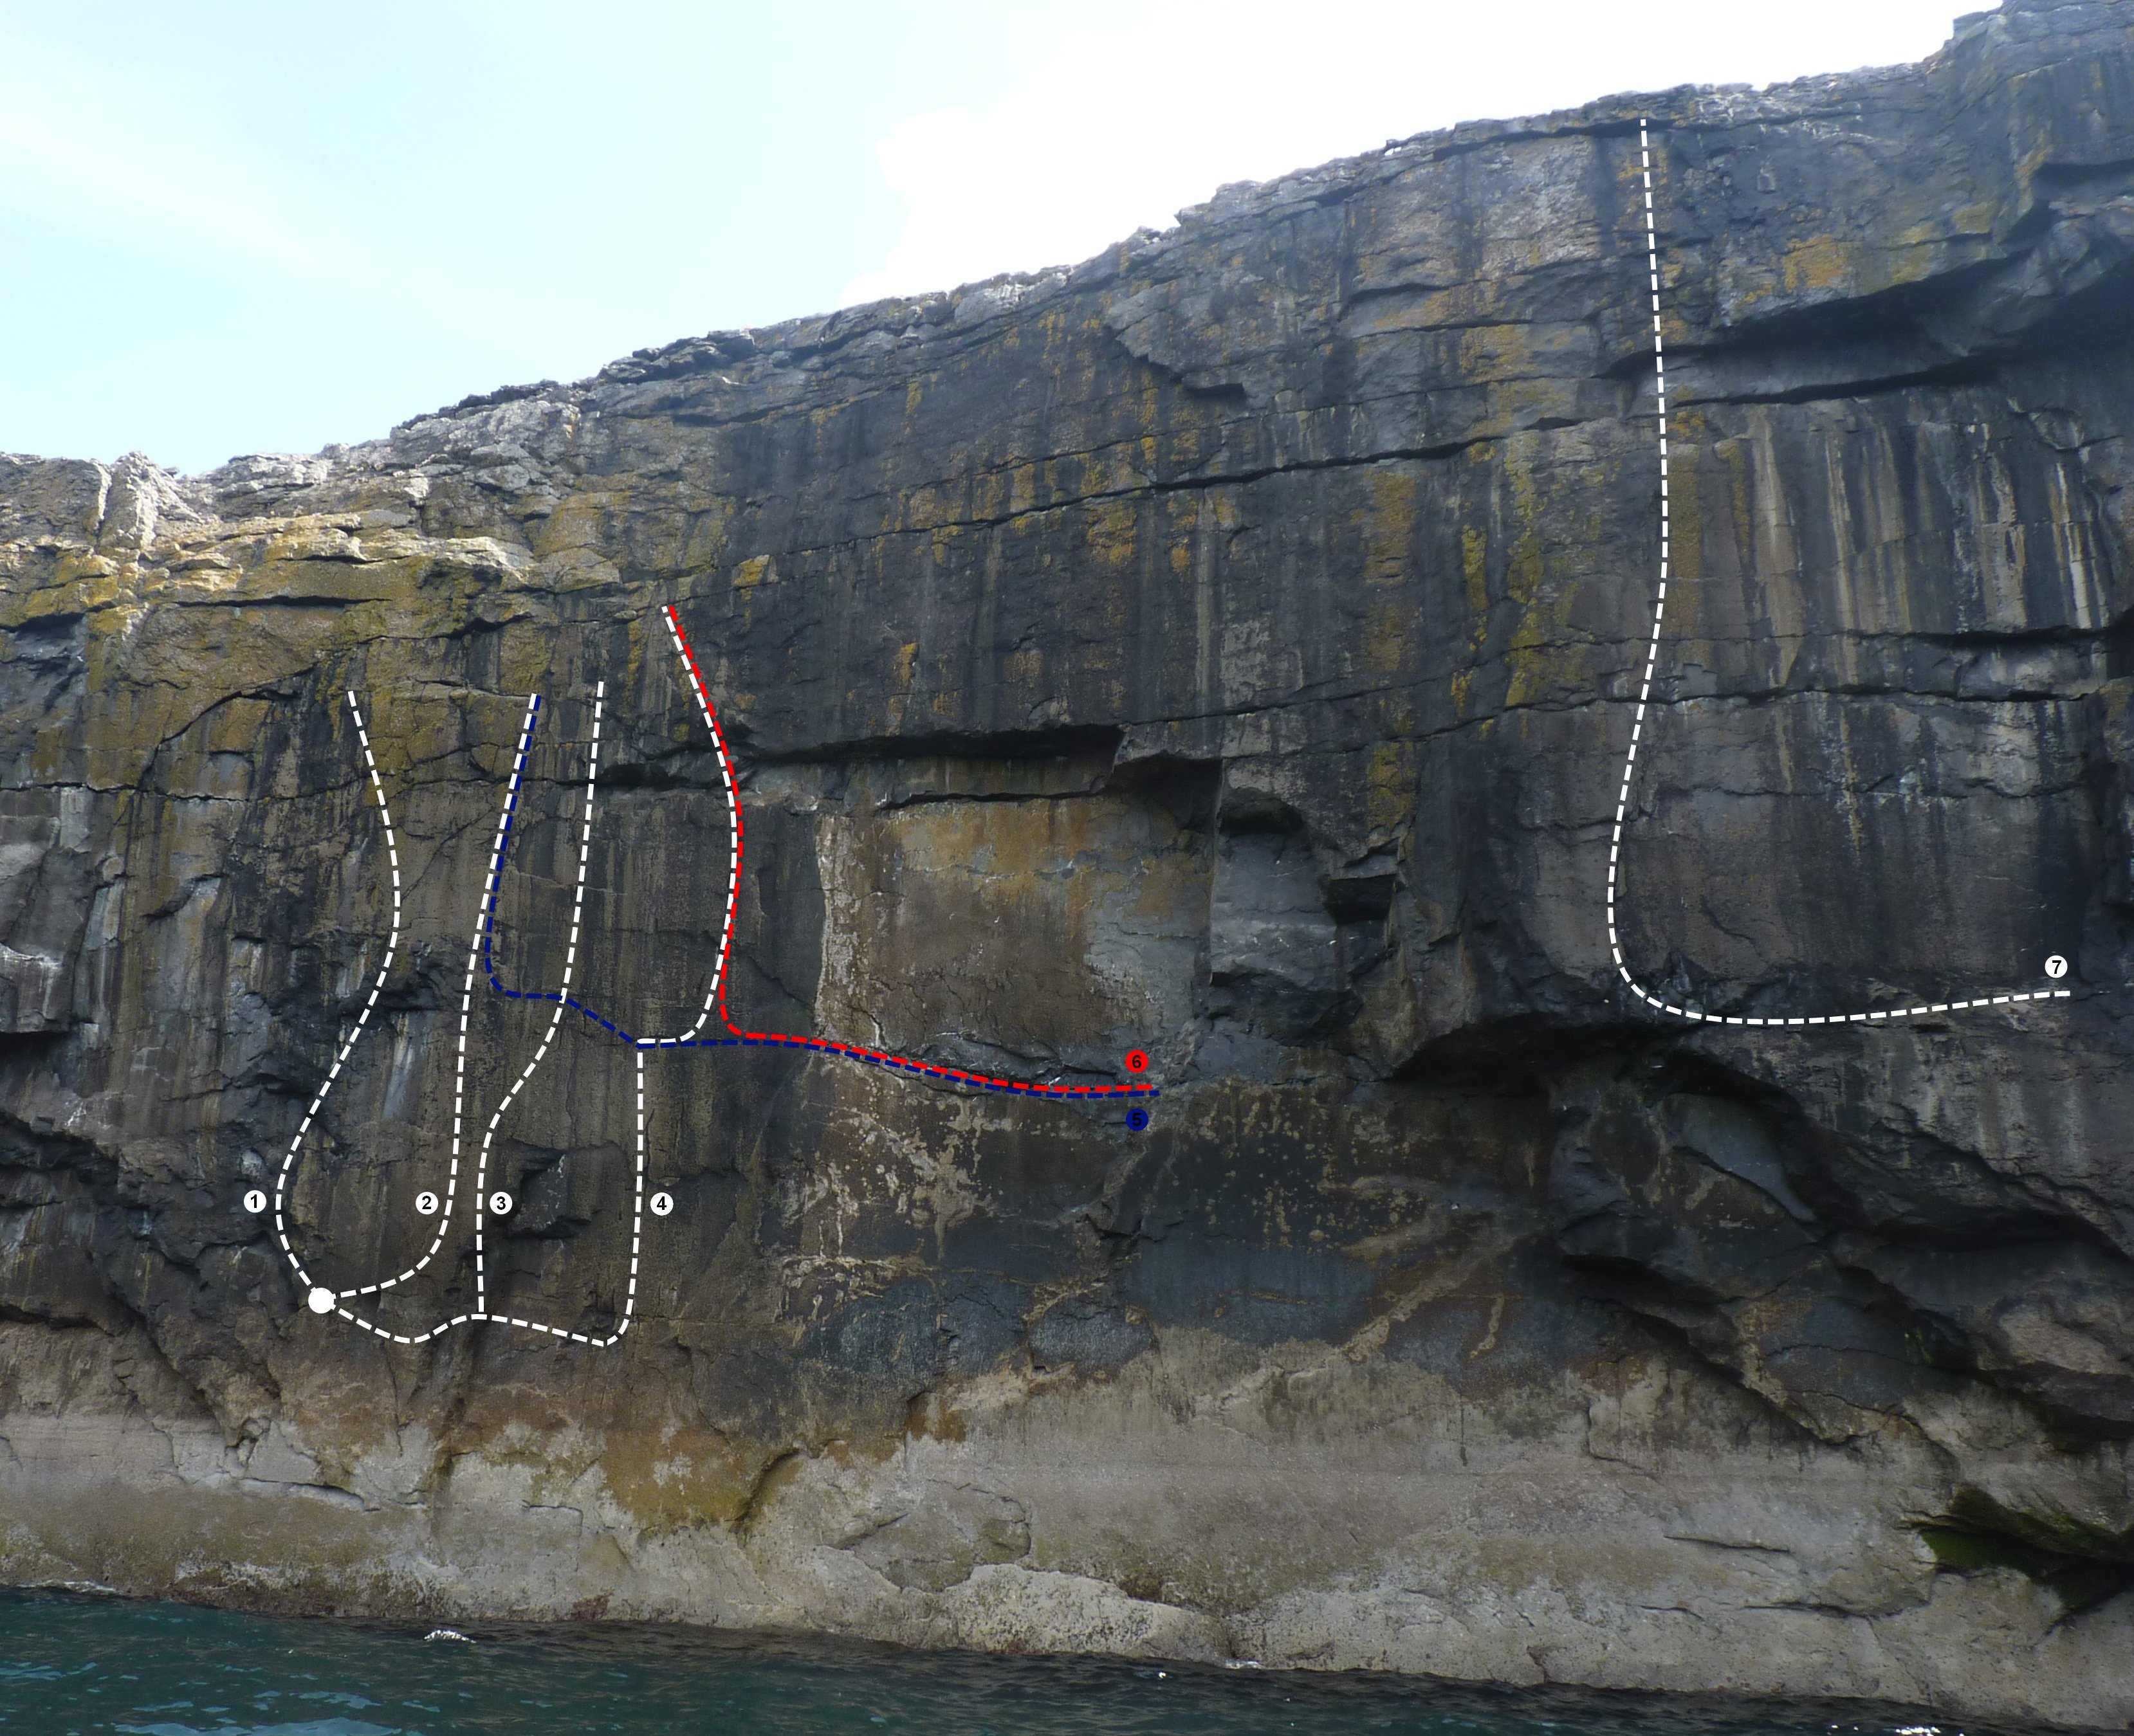
Abseil Points:
Routes Gained from the Right Abseil:
Just above the high tide mark is a foot ledge and a slot above that takes a Friend 2 or 2.5, from which you can hang a rope ladder.
Identity Crisis *** 27m Fr 7c+ (S1)
10m right of ‘Sea Bird’ there is a big blocky ledge around half height. 5m Right of this blocky ledge is a blank wall which is slightly overhanging for the first half. Abseil down to a jug about 3m above the high tide mark. Climb up and slightly right on a juggy ramp to a tricky section on small side-pulls and an undercut to gain a pocket on the lip of the bulge. A few more tricky moves to gain the rightward trending crack lead to a long reach out left to good holds and easier ground about at about 2/3’s of the height of the wall.
FA S. Moore 24/07/08
King Crozzle *** 20m F7b+ (S1)
Brilliant, probably the best climb on the wall, and the best climb of its type and standard anywhere. From the foot hold, step right and move up onto the thin and absorbing blunt rib, the tenuous climbing revolves around a crucial flat edge. Continue to better holds where it joins crozzly show, which comes in from the right.
FA J.Lines 05/07/10
Skin deep *** 20m F7c/7c+ (S1)
Traverse right to gain a good, flat hold in a right facing groove, climb the groove to the roof, and make difficult moves through this to gain a sequence of finger slots that lead to the break of the crozzly show. Now reach directly up for some finger dimples above, step in the break and snatch for a superb finger jug, using this, pedal for the finishing jug-ledge.
FA J.Lines 09/07/10
The Crozzle Monster *** 25m F7c+ (S1)
A sustained and technical face climb. Start as for Skin Deep. From the good hold in the groove, move right on small edges for 2/3 meters before questing upwards to gain two good opposing side pulls. From here, delicate moves thin holds gains or an all out lunge (crux) gain you the break. Step right and finish as for Bing Crozzly.
Possible to step left at the crux and take a hold from Skin Deep to gain the break at 7c.
FA C.Shannon 07/09/12
Routes gained from the Middle Abseil:
To the right of the crozzly wall and left of Reprieve is a large square rock fall scar. Abseil down to a sloping ramp at the base of this feature. The routes take the break moving left from here.
The Crozzly Show *** 35m Fr 7b (S1)
Traverse the break left on good holds and big footholds at first. Continue left along a crimpy seam and past a novelty mono in the middle of the black wall. Towards the left end of the black wall a tricky move up leads to big holds and easy ground to the top.
FA R. Bell 24/07/08
Bing Crozzly *** 30m Fr 7b+/c (S1)
Follow ‘The Crozzly Show’ onto the black wall then up the obvious flakey crack above. A few moves straight up after the crack leads to easy ground.
FA R. Bell 24/07/08
Routes gained from the Left Abseil:
Throw a rope down the obvious corner. Abseil down to the large sloping ledge at the base of the 'Reprieve' corner.
The Vein *** 20m F7a+ (S1/2)
Move out left along the traverse to gain the thin crack in the right side of the hanging prow, climb this with difficulty, followed by further technical moves to gain a ledge. Easier to the top.
FSA R. Bell 08
The next route starts on a grey hanging slab at a crescent shaped hold down and to the right of the ledge of reprieve.
Deep water horizon ** 25m F7b+ (S2/3)
Traverse right under the overhangs for 4m to gain some good flake holds in the blank wall. Step up and using a thin, black, snaking crack on the left make some hard (reachy) moves to better holds. Move up and right to a rest in the base of a groove. Make a hard pull right onto the hanging slab in an exposed position, once established take a deep breath and climb diagonally left to the top (steady but getting high).
FA J.Lines 28/06/10
The wall ends at the huge corner of the wound that never heals. To the right is a section of cliff with a huge ledge at half height. A number of safe DWS can be done here to the ledge, as long as a rope is put in place to climb out. Or can be continued up the arête of splash down (6a S2/3). Further Routes:
Ice breaker 10m F6a (S0)
Tape harness down to a foothold above HWM about 1m right of the arête. Step left onto the arête and climb it in a good position, easing all the way to the ledge.
FA J.Lines 25/06/10
Two tone 10m F5+ (S0)
The wall to the right of the arête, using holds on both the black and grey rock.
FA J.Lines 29/06/10
The next three routes are started from the square cut ledge of Doolin Rouge, but the first two can finish off at the half height ledge described above or continue to the top. The top is almost exactly 60ft on a high tide (slightly less on big springs) hence the presence of an S3 grade, although the water is very deep here.
Splash down* 10m/20m F6a+ S0 (S2/3)
This is a nicely positioned climb if a little sharp. From the ledge, drop down and finger traverse into the corner, move left onto the arête and climb it to a possible exit to the half-height ledge (S0). Or continue up the arête in a great position; long reaches between good holds.
FA J.Lines 30/06/10
Barracuda* 10m/20m F6c / F7a S0 (S2/3)
Climb as for Splash down into the corner, but then climb the corner to the horizontal break (exit here at S0 onto the ledge). Or continue through the overlap to a hard move up the right wall of the groove to gain the next break, and then step left and continue as for splash down. FA J.Lines 29/06/10
Doolin bleus * 20m F6b (S2/3)
Start off the Doolin Rouge ledge, but immediately step left and use hidden incuts to climb the rib directly up to a ledge at 14m. Now ease your way up and left following a tight groove in an airy situation to reach the top of Splash down.
FA J.Lines 30/06/10
Past Boulder Wall:
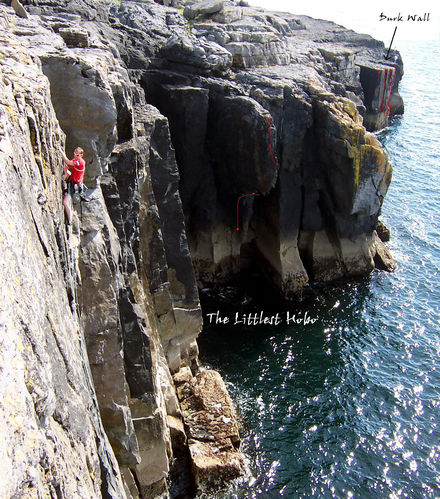
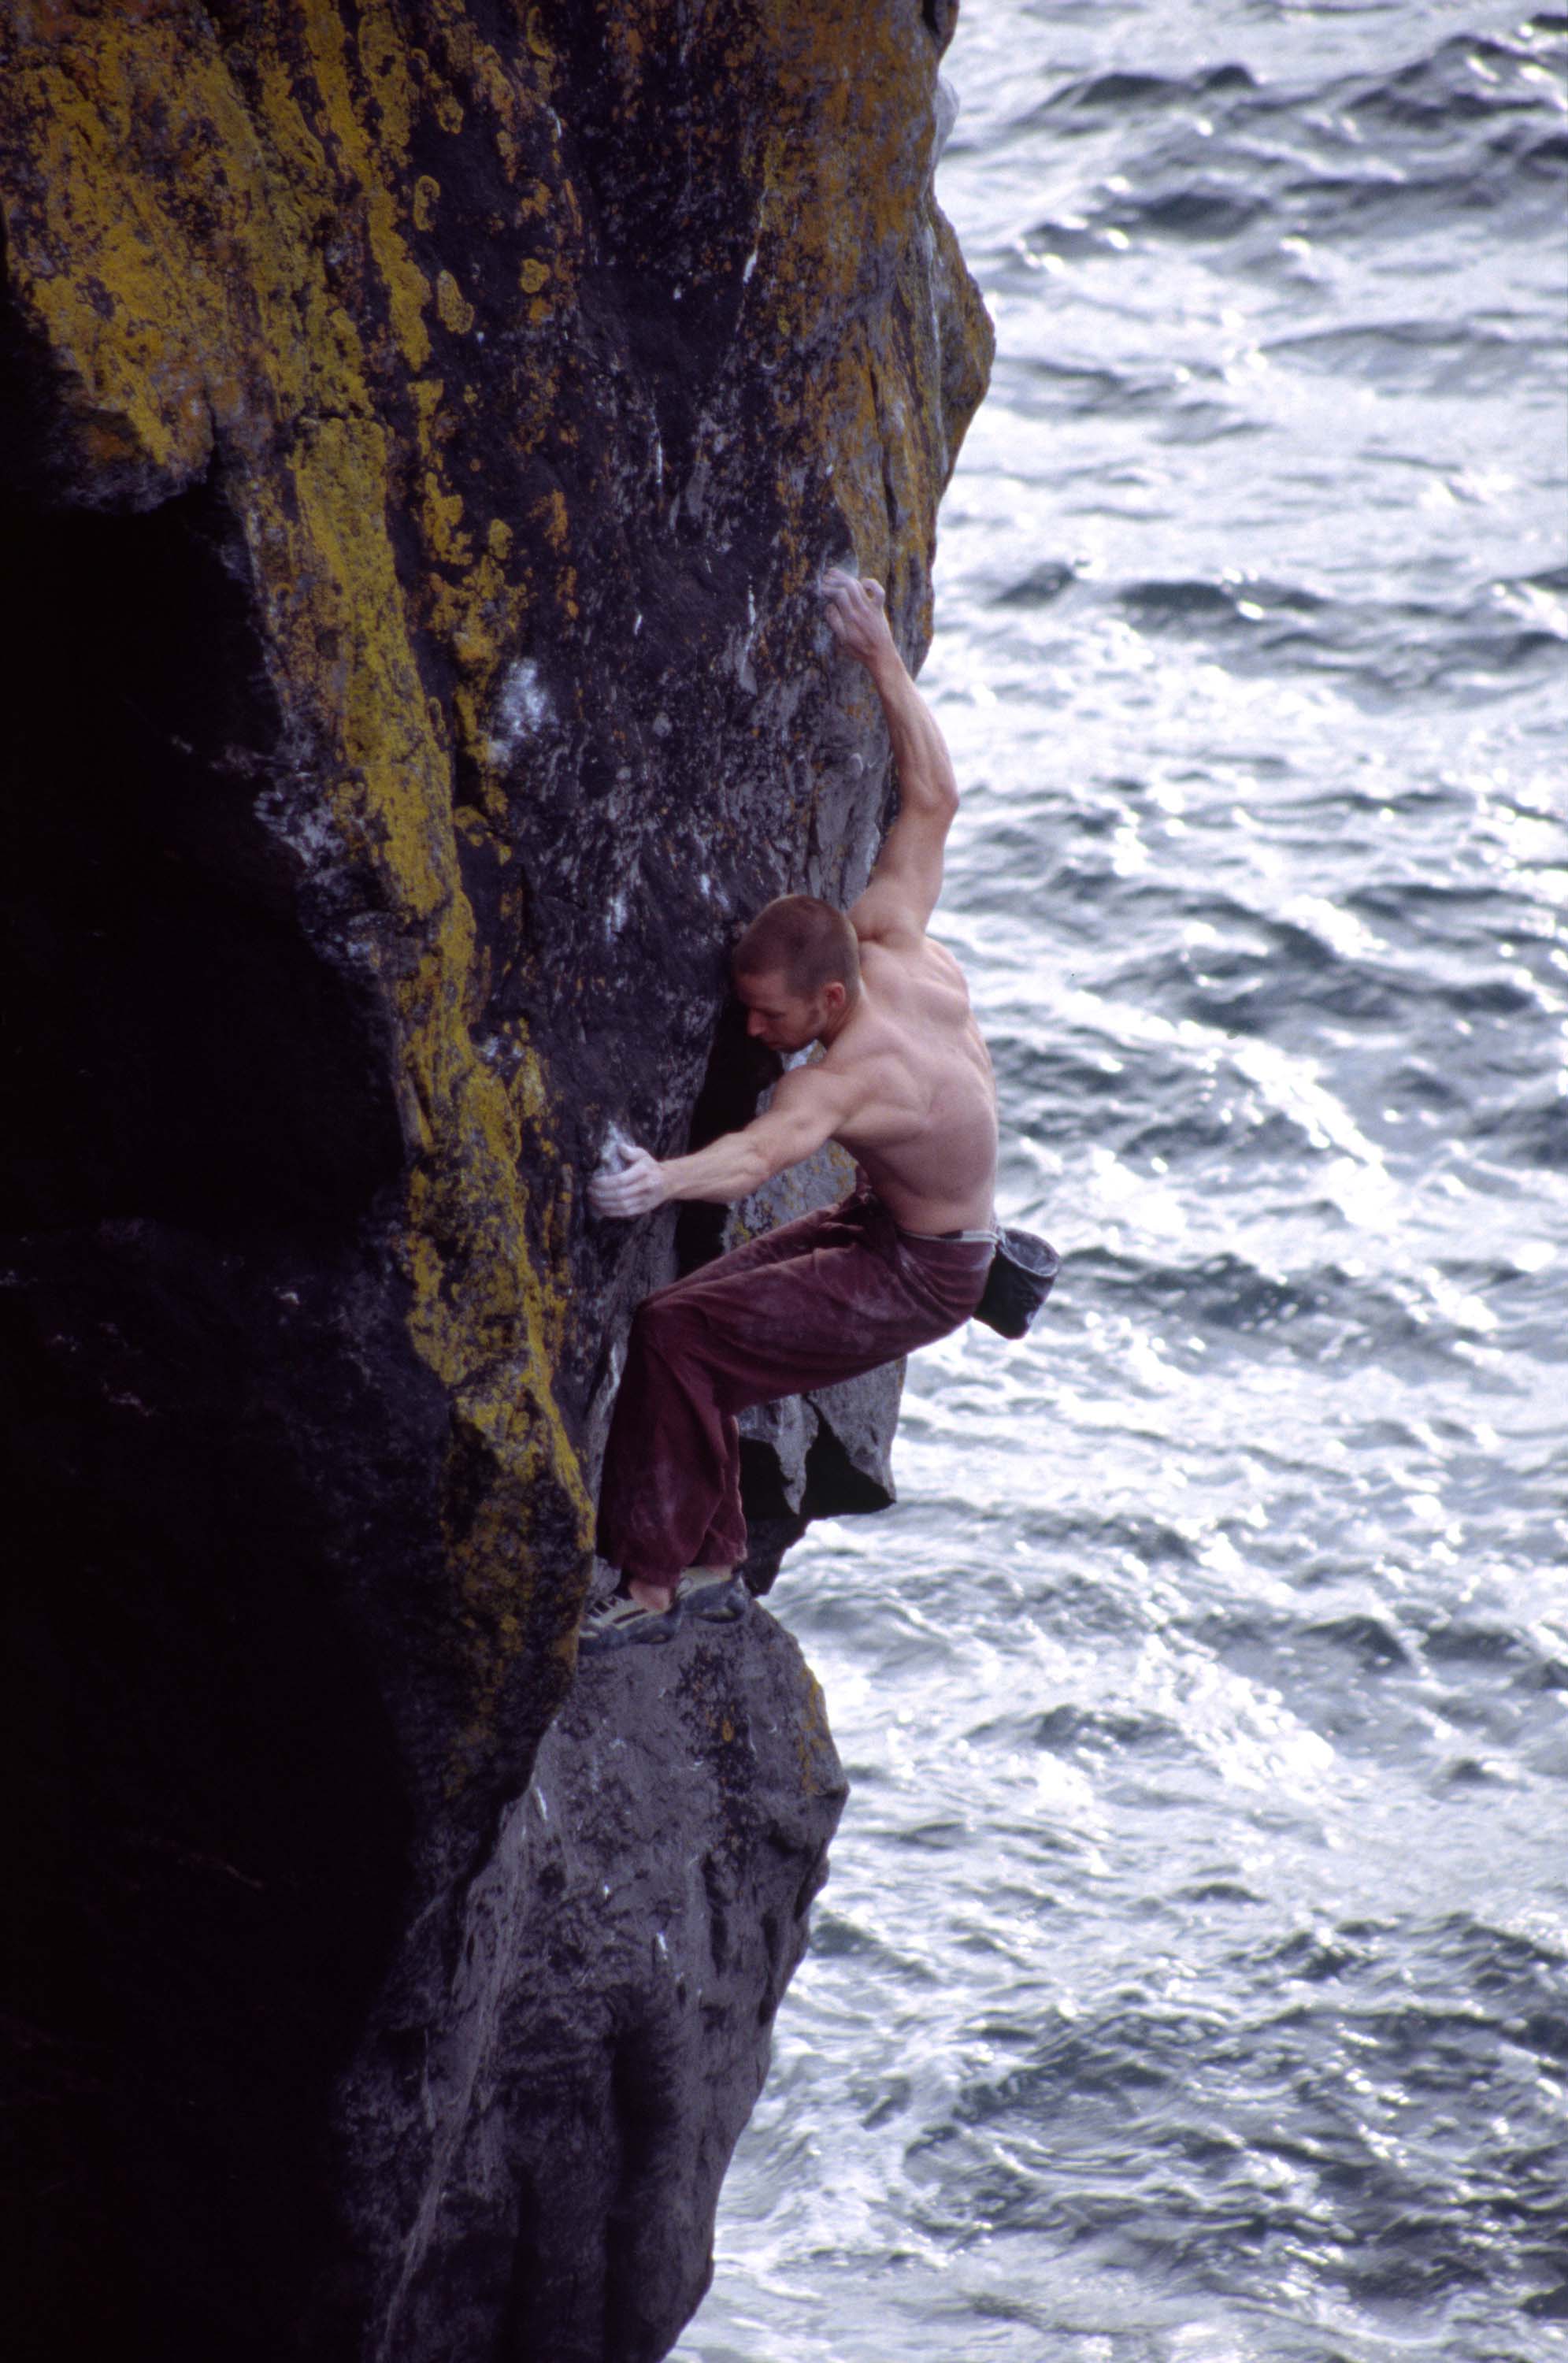
The Littlest Hobo*** E7 6c (S1/2)
The sharp overhanging arete soute of boulder wall. The first ascentionist remarked 'Totally surreal climbing only for those with an imagination'. Start down and left of the arete. Turn the arete below the overhang and body bridge your way up to a good rest below a roof up and right. Sequence out to the arete.
FA R. Bell
The Power of the Hobo*** E7 6c (S1/2)
A powerful line in an awesome situation which is best sent at high tide. Follow The Littlest Hobo out to a good stance below the roof. Pull up and left and force your way diagonally up right to airy moves onto the arete.
FA R. Bell 13/7/06
Anniversary *** 10m Fr 7c (S0)
Right of two little E7 routes 'the hobos' at the right end of Ailladie is another hanging fin/undercut roof. Climb down the slab on the sea front west face. Traverse around the blind corner to the left via an obvious finger lock. Traverse under the roof to the left via some big moves on good spaced holds to reach an obvious square block jug. Make a series of desperate moves (following obvious diagonal undercut) involving very small crimps and slopey sidepulls to reach the huge juggy foothold on the left arete. Continue up arete with ease.
FA S. Moore 22/07/08
Durk Wall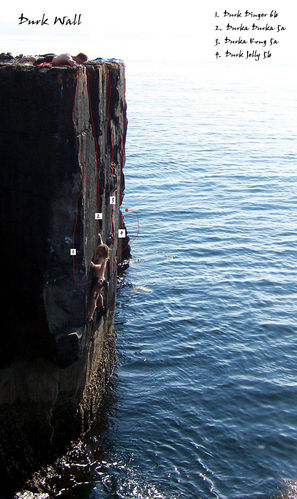
The next routes are climbed on the small wall at the south end of the crag. They can be accessed by scrambling down the south end of the wall and traversing in, or from the other side(bit trickier). Can be climbed at any tide, but it can be harder to get out at low tide.
Durk Dinger Fr 6b (S0)
Ricky Bell
Durka Durka Fr 5a (S0)
Craig Hiller
Durka Kong Fr 5a (S0)
Paul Swail
Durk Jelly Fr 5b (S0)
Paul Swail